Thanksgiving Turkey

This post may contain affiliate links. Read my full disclosure policy.
Looking for the best Thanksgiving turkey recipe? This foolproof version delivers juicy, golden perfection—plus answers to all your turkey questions, all in one place.
If you’re looking for the best way to roast a Thanksgiving turkey, you’re in the right place. I’ve been cooking professionally and hosting Thanksgiving for 25 years, and I’ve tried just about every method out there. In my experience, nothing beats a dry brine—it’s the simplest, most reliable way to get juicy, perfectly seasoned meat and shatteringly crisp skin without the hassle of a messy wet brine.
The process couldn’t be easier: rub a salt and seasoning mixture all over the turkey, let it rest in the fridge overnight, and the salt works its magic. It deeply seasons the meat, locks in moisture, and dries out the skin so it roasts up beautifully golden and crisp. Whether you’re a seasoned cook or making your first Thanksgiving bird, this method is about as foolproof as it gets.
Once you’ve got the roasting method down, there are still plenty of turkey questions that come up every year—from thawing and stuffing to carving and leftovers. This post covers everything you need to know to prep, cook, and serve the perfect Thanksgiving turkey.
“My husband just declared this is the best turkey we’ve made in 40 years!!!! I concur!!”
What You’ll Need To Roast Your Thanksgiving Turkey
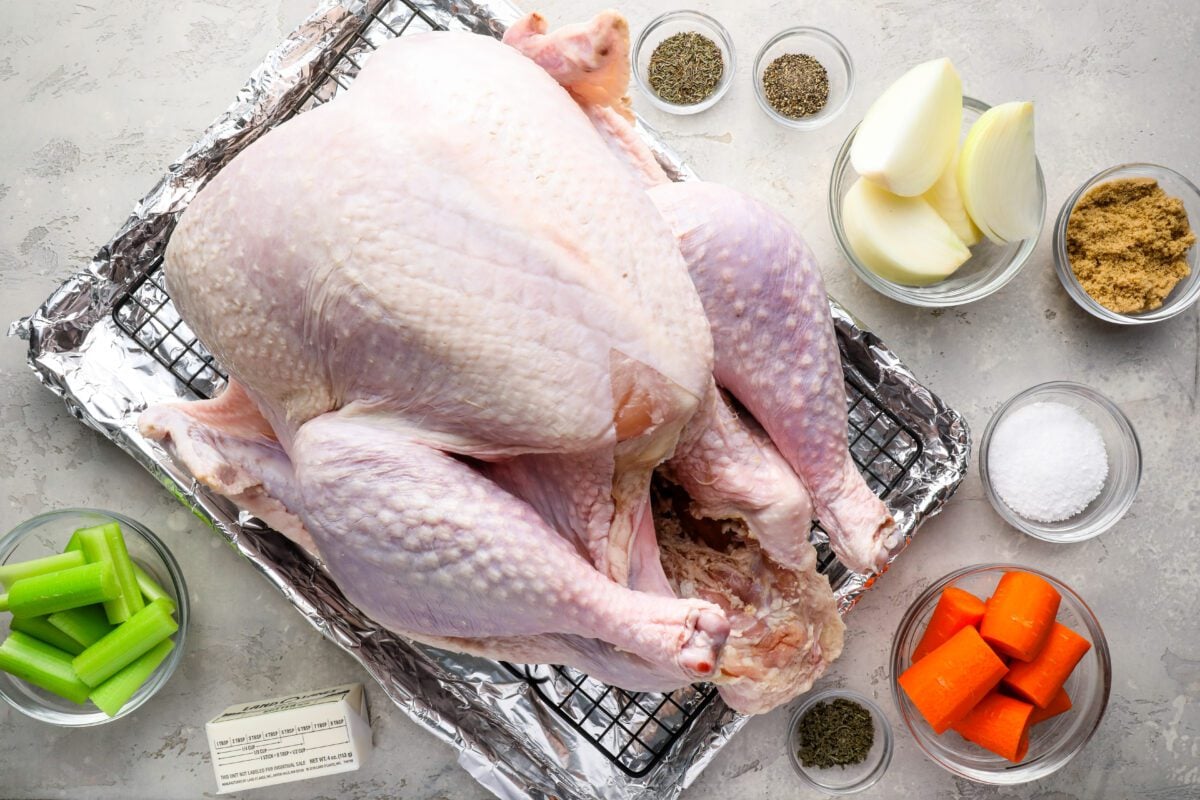
- The Bird – For the best results with this dry-brining method, look for a plain or “natural” turkey—one that hasn’t been injected, self-basted, or pre-salted. This gives you the most control over the seasoning. That said, if you can’t find a natural bird, you can still use this recipe; just halve the amount of salt in the brine to avoid over-salting.
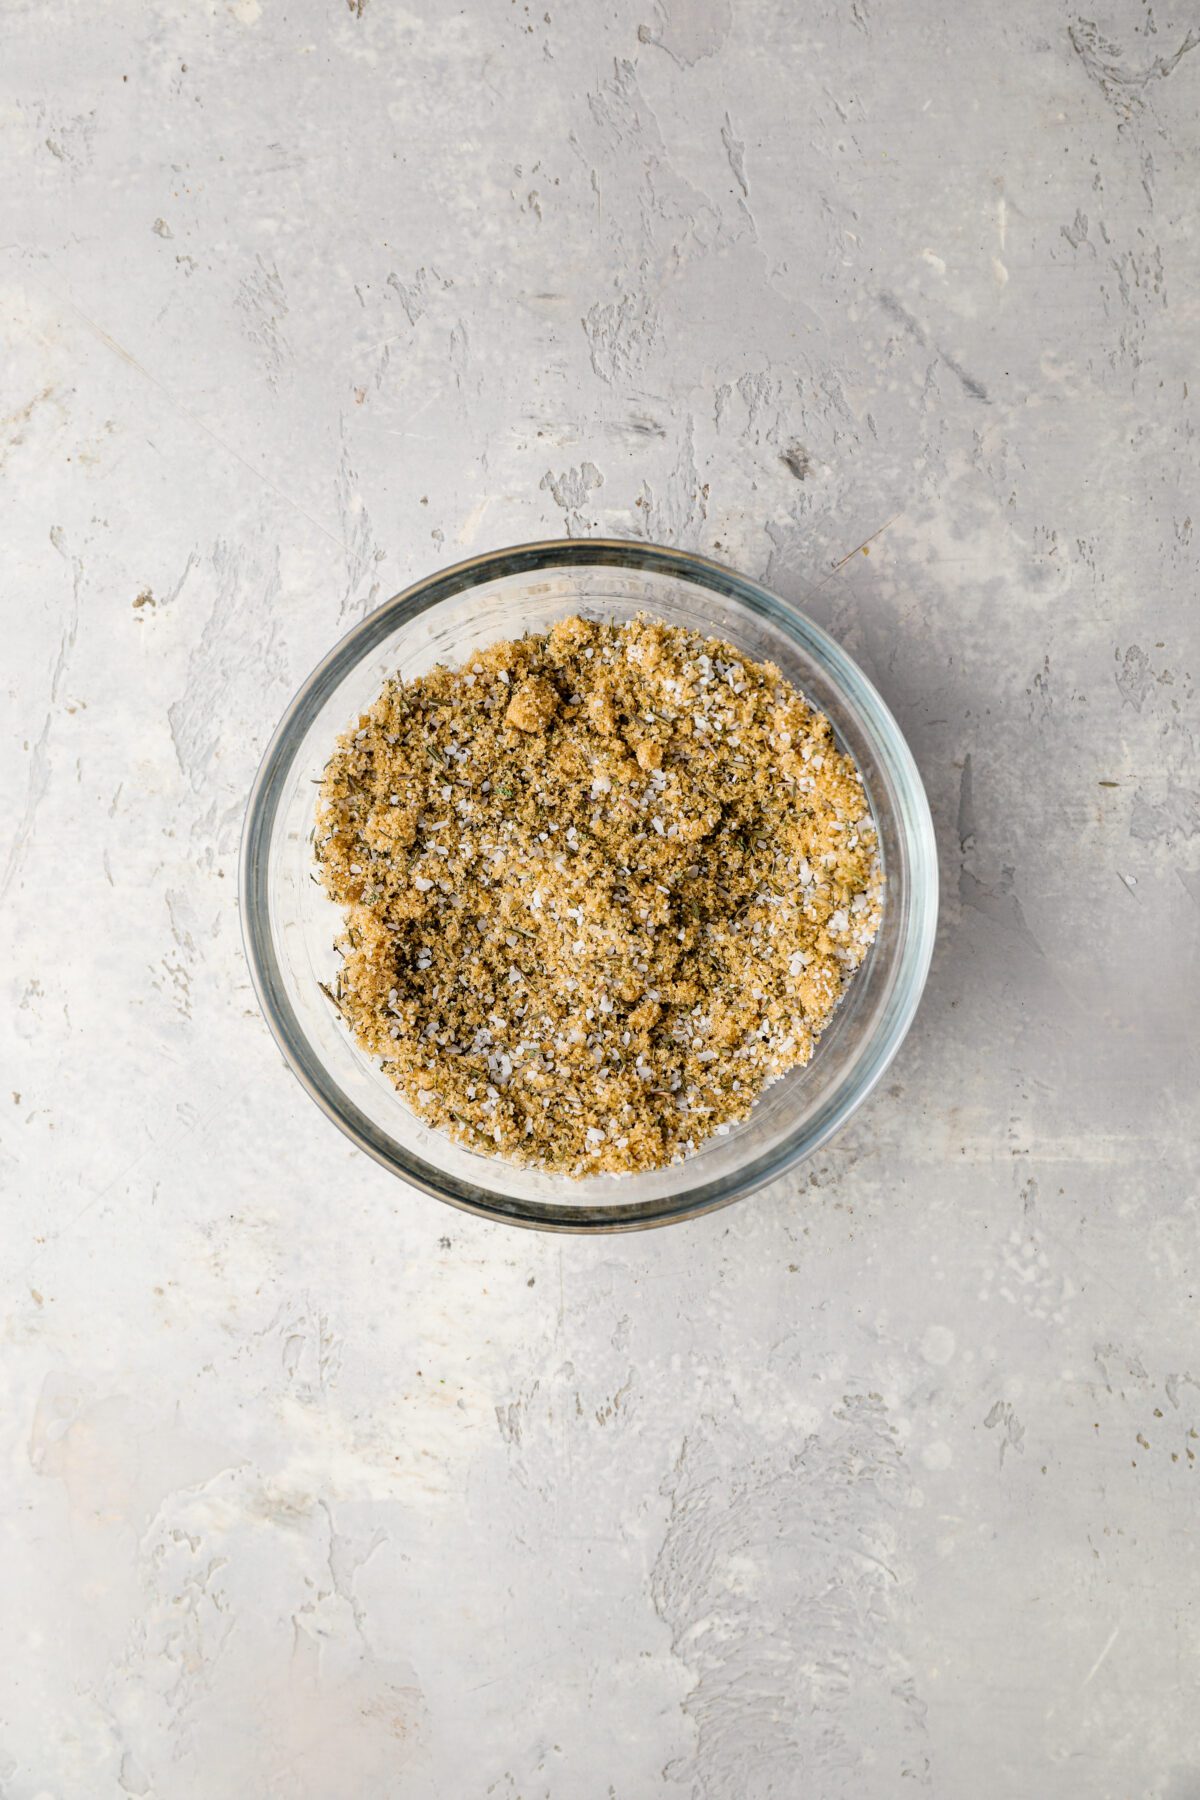
- Dry Brine (Kosher Salt, Light Brown Sugar, Dried Thyme & Sage, Black Pepper) – This simple mix does all the heavy lifting. The kosher salt draws moisture out of the skin for extra-crispy results while seasoning the meat throughout. The sugar balances the salt and enhances the turkey’s natural flavor, while the herbs and pepper infuse the bird with classic holiday aroma and warmth. I use Morton kosher salt; if you’re using Diamond Crystal, increase the amount to ¼ cup to get the same level of seasoning, since it’s lighter and flakier.
- Unsalted Butter – Rubbed on before roasting to add richness and help the skin brown evenly.
- Aromatics (Onion, Carrot & Celery) – Placed in the roasting pan to add sweetness and depth to the drippings; you’ll want that flavor to make a good gravy.
- Jump to the printable recipe for precise measurements
Step-by-Step Instructions
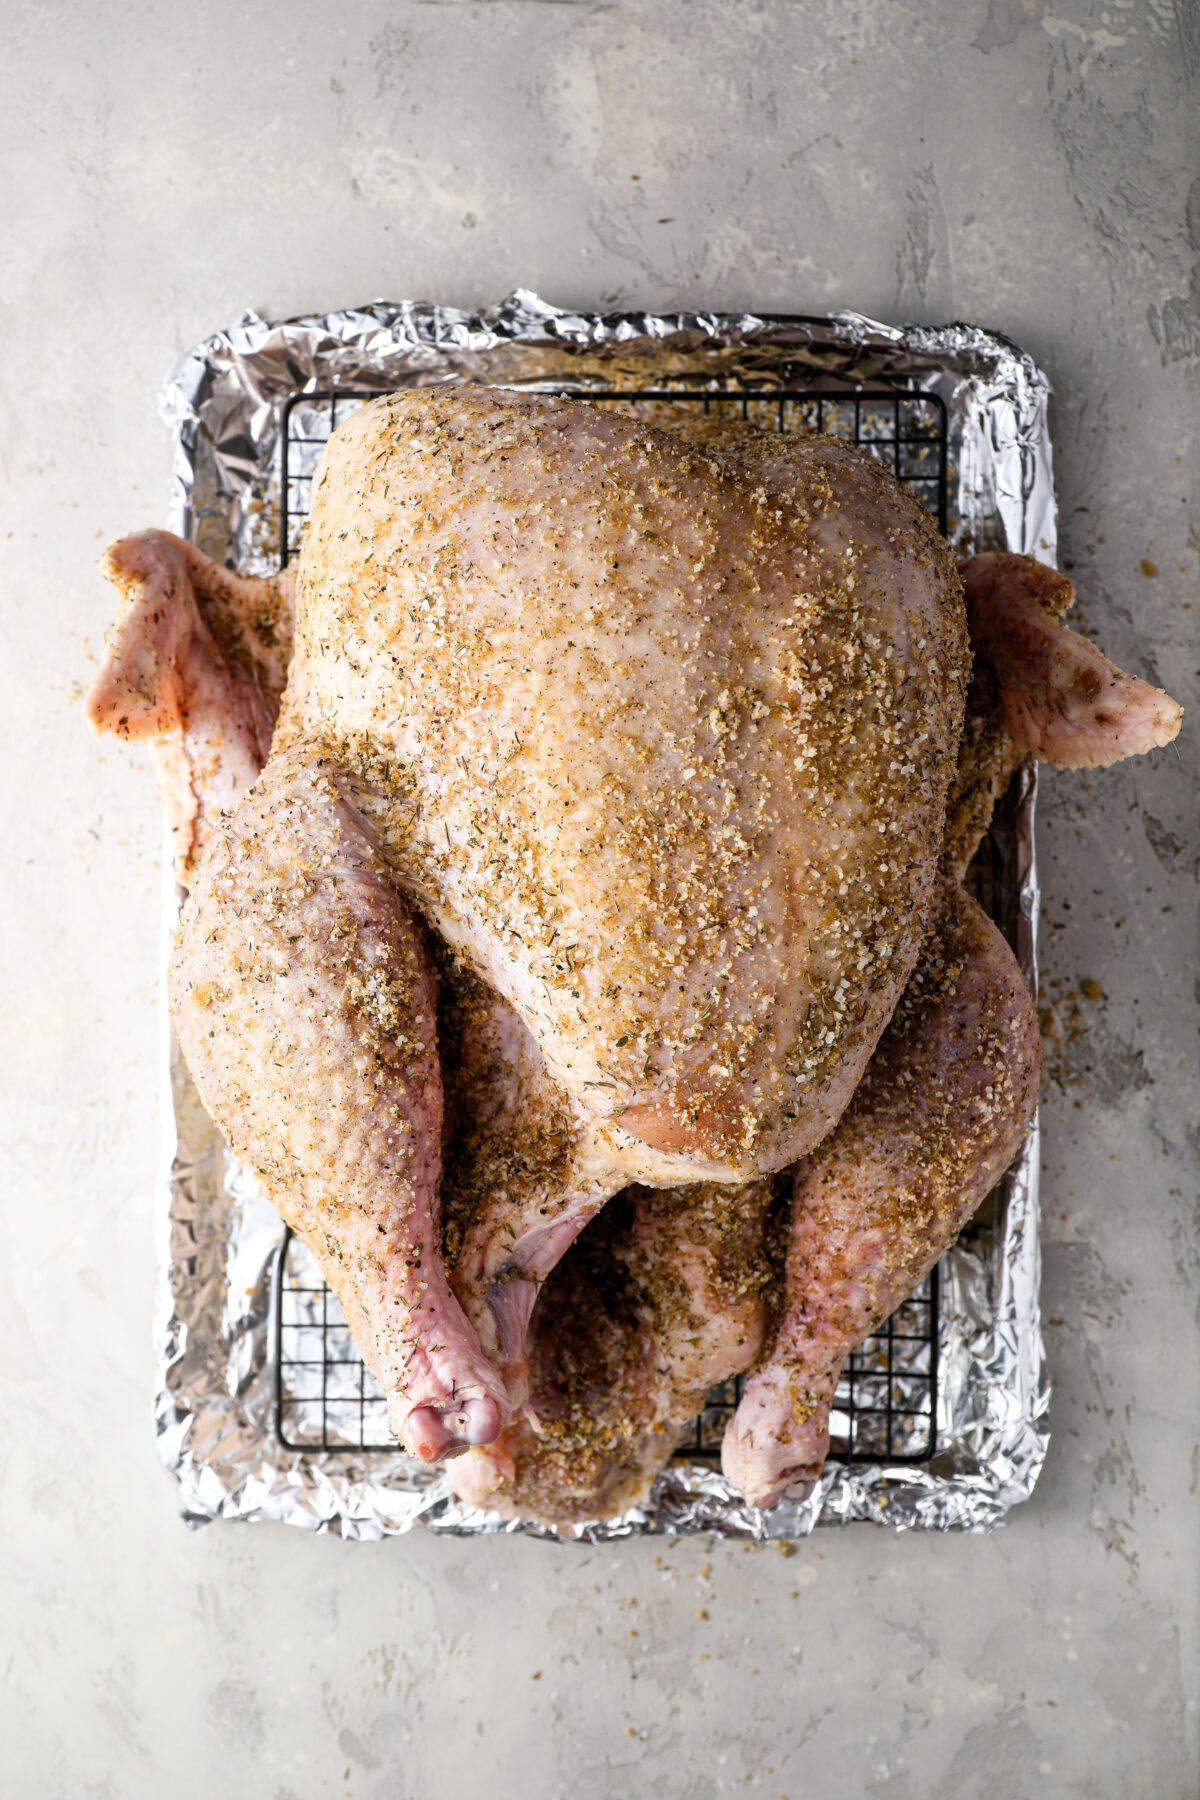
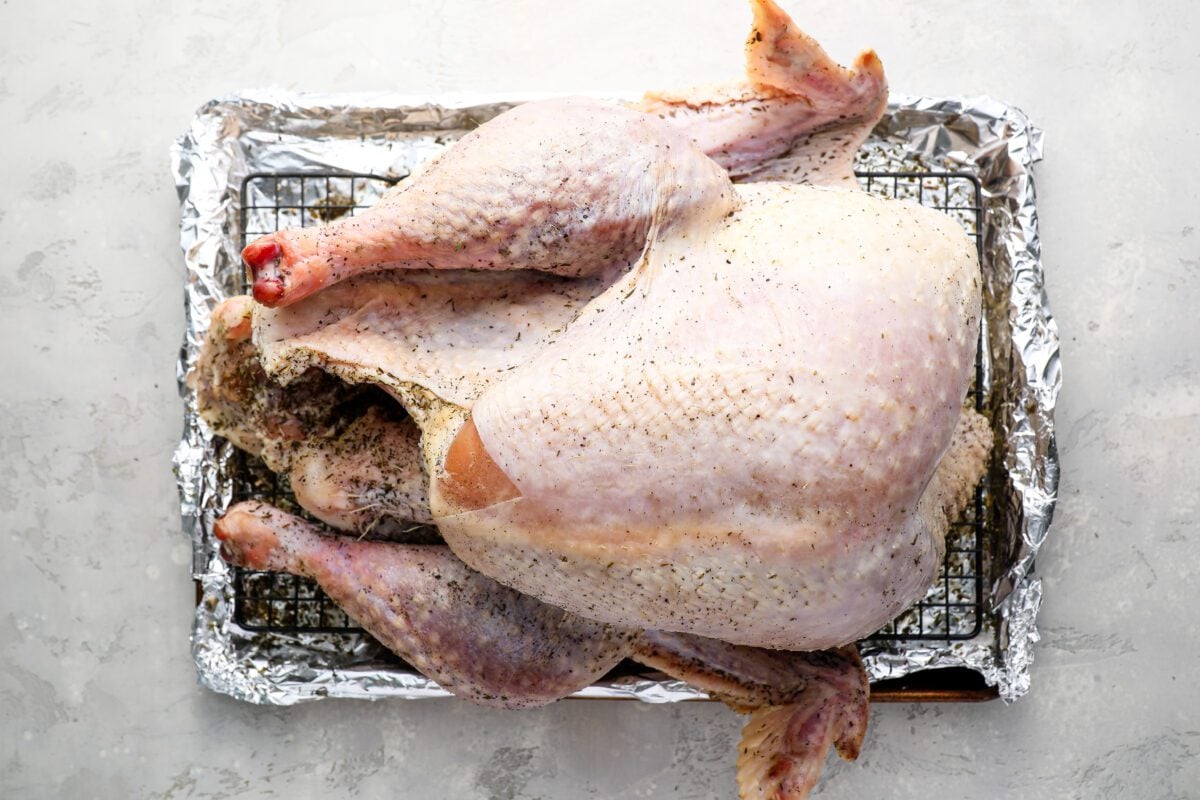
Step 1. Dry brine the turkey. In a small bowl, mix the sugar, salt, thyme, sage, and pepper. Place the turkey breast side up on a rack set over a baking sheet. Rub the dry brine all over, including inside the cavity. Refrigerate, uncovered, for 24 to 48 hours. (The longer you allow the turkey to brine, the more flavorful and moist it will be, but don’t go beyond 48 hours.)
Pro Tip: Slide the sheet pan with the turkey onto a bottom shelf where the air is coldest and most consistent—it’ll help keep the bird safe and the skin drying out properly for crispness.
Step 2. Remove the brine. Use damp paper towels to wipe the dry brine off the turkey’s exterior, leaving the seasoning inside the cavity.
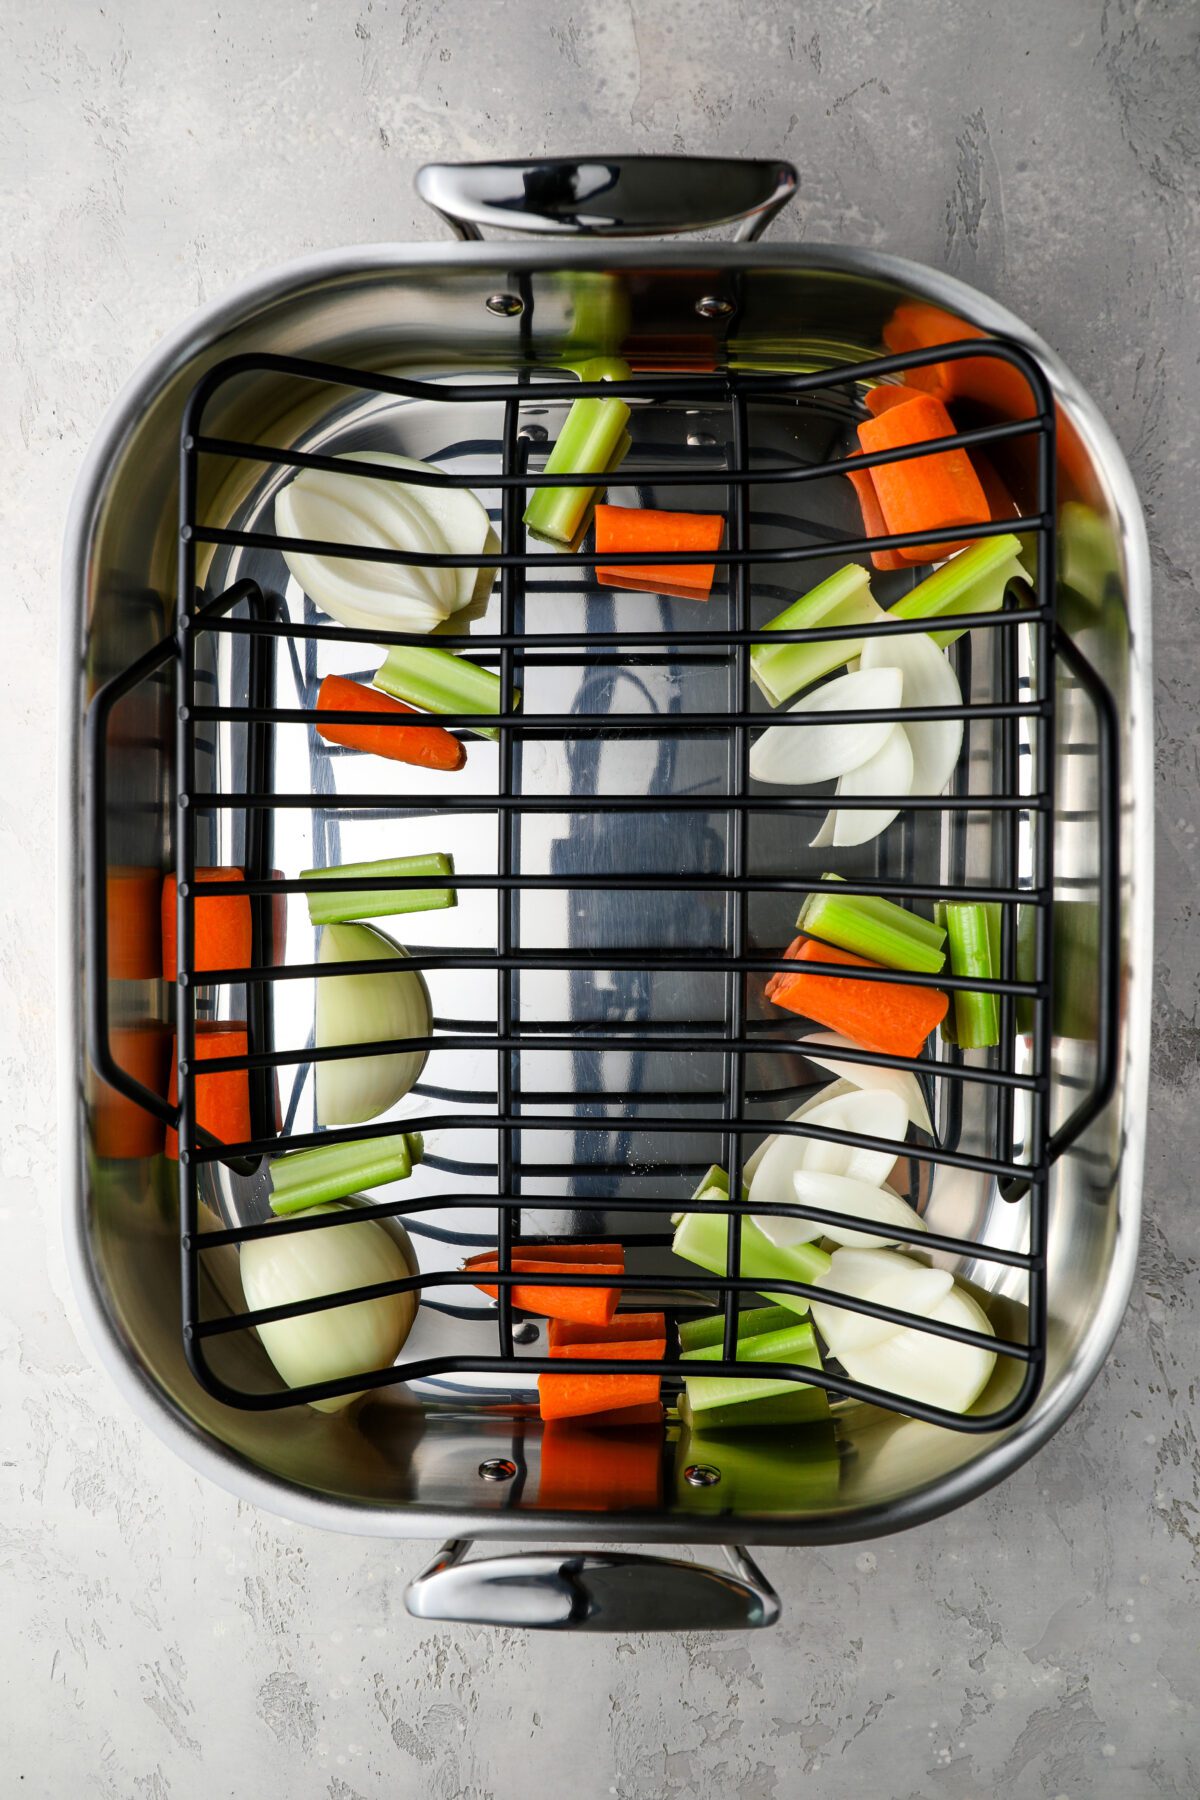
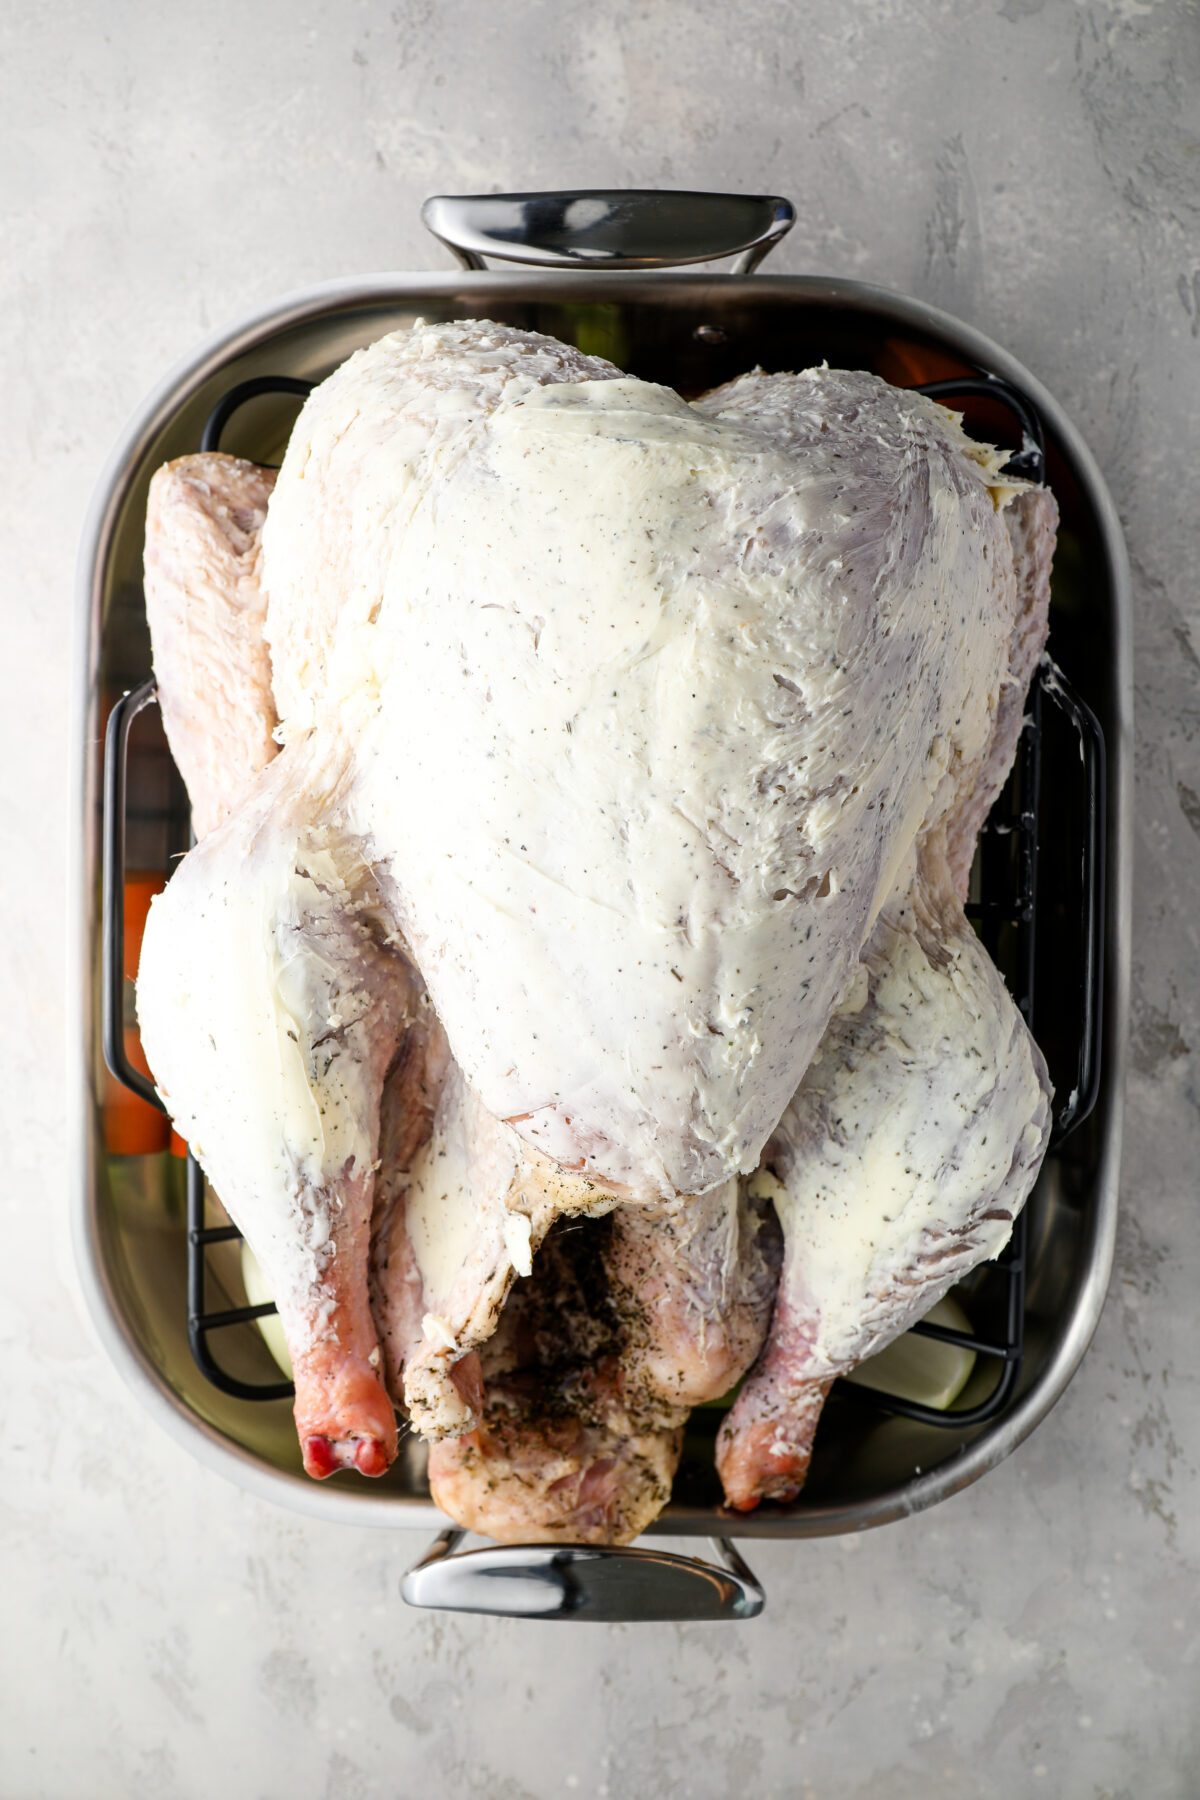
Step 3. Prep for roasting. Scatter the onion, carrots, and celery in the bottom of a large roasting pan. Set a rack inside, then place the turkey on the rack and tuck the wings underneath. Using your hands, smear the butter evenly over the turkey.
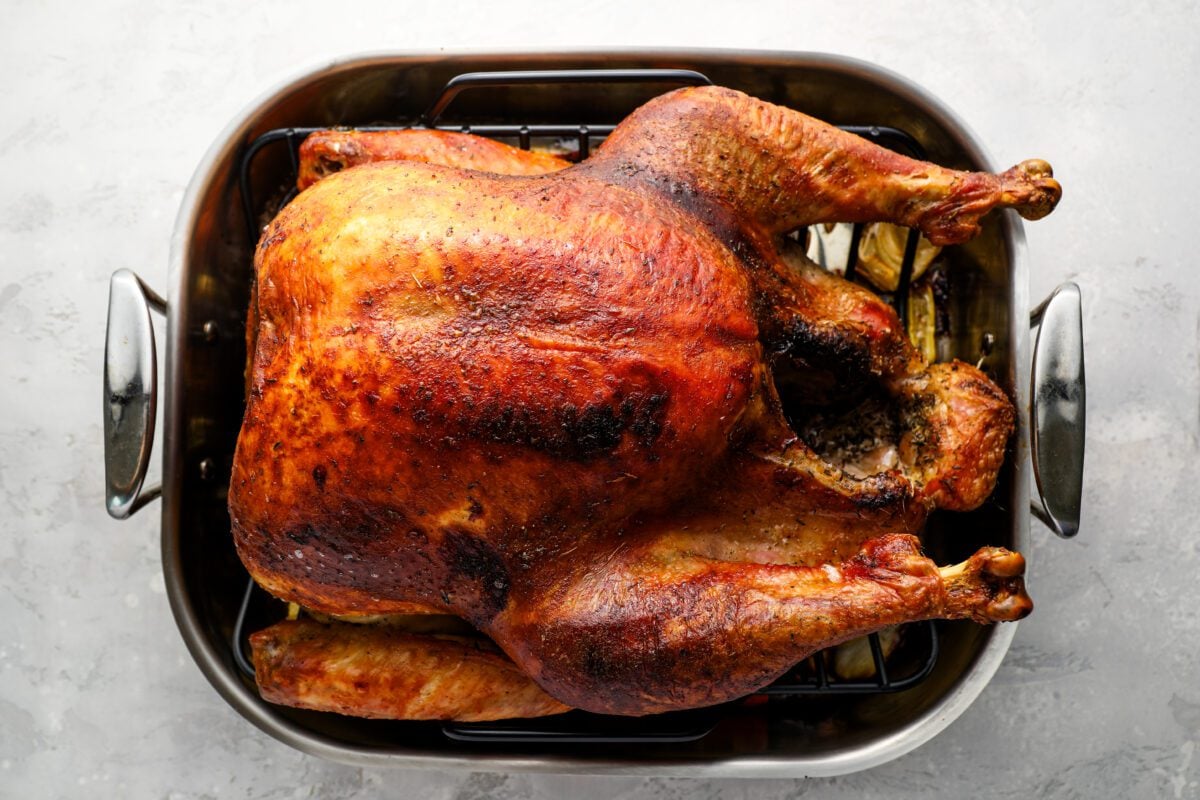
Step 5. Roast the turkey. Roast in a 375°F oven until the skin is deep golden and an instant-read thermometer registers 165°F in the thickest part of the breast and the thigh, about 1¾ to 2½ hours. Check after 1½ hours; if the skin is getting too dark, cover loosely with foil.
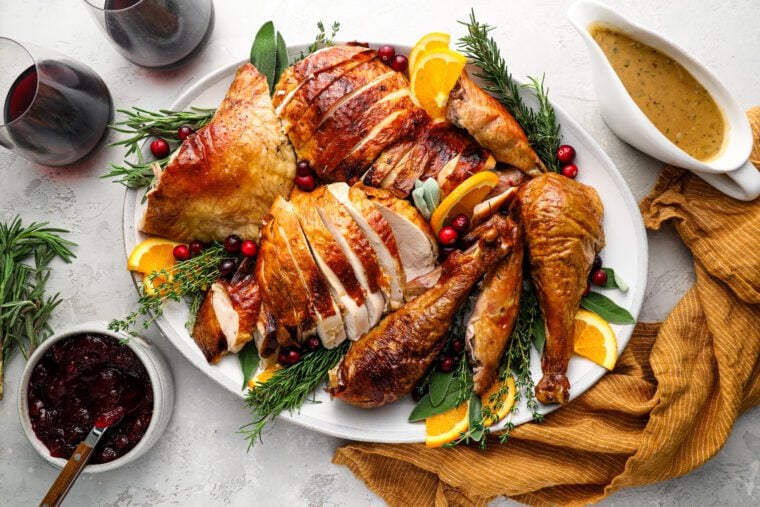
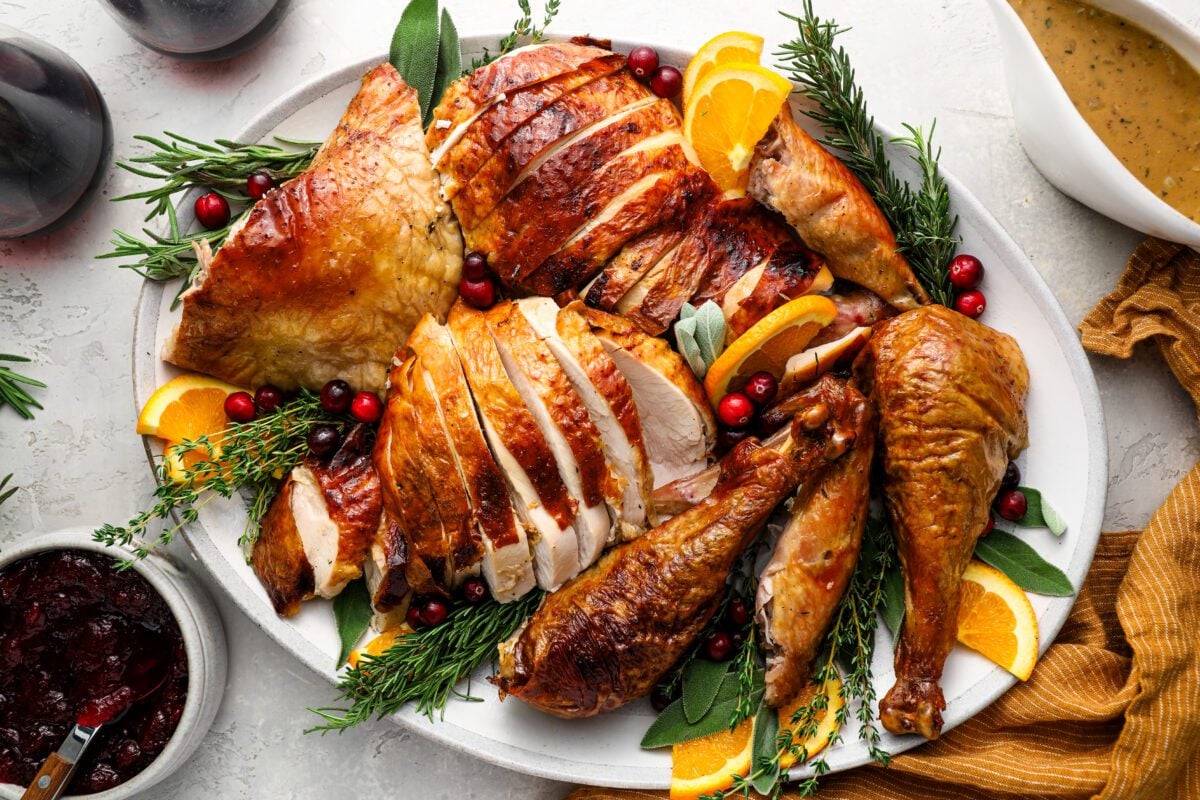
Step 6. Rest the turkey then carve and serve. Using clean oven mitts that you don’t mind getting dirty (silicone grilling gloves or mitts work well), carefully tilt the turkey to pour any juices from the cavity into the roasting pan. Transfer the turkey to a platter or cutting board, tent with foil, and let rest for about 30 minutes. Remove and discard the vegetables (or save them if not too soft), and reserve the pan drippings for gravy. While the turkey rests, make the gravy. Carve the turkey and serve with the gravy on the side. Serve with stuffing and cranberry sauce.
Thanksgiving Turkey Tips & FAQs
There are a few types of turkeys you’ll typically see in stores: natural or plain, self-basting or injected, or kosher turkeys. Natural turkeys haven’t been pre-treated in any way, while self-basting and kosher birds have already been salted or injected with a brining solution to keep them juicy.
For most recipes (including the one below), a plain, untreated turkey gives you the most control over seasoning. That said, if you can only find a self-basting or kosher bird, don’t worry—you can absolutely still make any turkey recipe. Just keep in mind that these birds already contain salt, so if using a brine, you may want to dial back the salt to avoid over-salting.
You may also come across organic, free-range, or heritage turkeys, which usually have excellent flavor but can be leaner and cook a little faster.
A good rule of thumb is about 1½ to 2 pounds of turkey per person if you’re buying a whole bird. That accounts for both the bones and the meat. If you want plenty of leftovers for sandwiches or soups the next day, lean toward the higher end of that range. For example, a 14-pound turkey comfortably serves about 8 to 10 people with leftovers.
The safest method is to let the turkey thaw slowly in the refrigerator. Plan on about 24 hours of thawing time for every 4 pounds of turkey. So, for a bird in the 12 to 14 pound range, you’ll want to start the process 3 to 4 days before roasting. This steady, hands-off approach keeps the meat at a safe temperature as it defrosts.
Nope—it’s best not to. Rinsing a raw turkey can actually spread bacteria around your sink and counters. Any surface bacteria will cook off in the oven, so just pat the bird dry with paper towels before brining or seasoning.
Dry brining involves rubbing salt, herbs, and spices onto the turkey skin and letting it rest in the fridge overnight (or longer). In contrast, wet brining requires soaking the turkey in a seasoned saltwater solution, which often means dealing with a large cooler or bag—a process that can be quite cumbersome. Both methods enhance flavor and juiciness, but dry brining is much simpler and produces beautifully crisp skin.
It’s best to cook the stuffing separately rather than inside the turkey. Not only does this reduce food safety risks (since the stuffing needs to reach a safe temperature along with the meat), but it also ensures the stuffing comes out golden and crisp on top instead of soggy. Bonus: your turkey will also cook more evenly and a bit faster.
If your turkey comes with the legs tucked into a metal or plastic clip, or held together by a small flap of skin, it’s best to remove it before roasting. Leaving the legs bound prevents heat from circulating properly, which can cause the inner thighs to cook more slowly. Let the legs rest naturally—this helps the turkey cook more evenly and ensures the meat near the cavity is fully done.
You don’t need to—and honestly, it can do more harm than good. Every time you open the oven to baste, you let out heat and extend the cooking time. Plus, basting doesn’t actually make the meat juicier; it just helps the skin brown. A dry-brined turkey already has plenty of flavor and moisture built in, and the butter rub before roasting gives you that beautifully golden, crisp skin without all the fuss.
It depends on the size of the bird, but generally you’ll be looking at a few hours. Smaller turkeys cook more quickly at a steady temperature, while larger ones benefit from a two-stage method—starting at a higher temperature to brown the skin, then lowering the heat so the meat cooks evenly.
Rather than relying strictly on minutes per pound, it’s best to use a thermometer: the breast should register 165°F and the thighs 175°F when done. Keep in mind that the temperature will rise several degrees as the turkey rests (carryover cooking).
To avoid any guesswork, use a digital thermometer with a leave-in probe and remote monitor so you can track the temperature without ever opening the oven.
To check the breast, insert the thermometer into the deepest part of the meat, holding it parallel to the bird from the neck end. Avoid touching the bone—it can give a false high reading. For the thigh, insert the thermometer into the thickest part of the meat near the hip joint, again avoiding the bone.
Not at the start. The bird should go into the oven uncovered so the skin can dry out and crisp as it cooks. After about 90 minutes, if the skin is browning too quickly, the turkey can be tented loosely with foil to prevent it from getting too dark before the meat is fully cooked. This approach gives you the best of both worlds: beautifully golden skin and evenly cooked, juicy meat.
At least 20 to 30 minutes. This gives the juices time to redistribute, keeping the meat moist when you carve it. Cover it loosely with foil to keep it warm—the internal temperature will continue to rise slightly as it rests.
Yes, you can absolutely roast it in advance to make the big day less hectic. Just keep in mind that the skin won’t stay as crisp once it’s reheated, but the meat will still be tender and flavorful. Detailed instructions for making ahead and reheating are included in the recipe card.
Video Tutorial
More Holiday Recipes You’ll Love

Dry Brine Turkey

Juicy meat, crisp skin, and classic holiday flavor—this Thanksgiving turkey recipe never fails to impress.
Ingredients
- 1 (12 to 14-pound) turkey, patted dry (see note)
- ¼ cup (packed) light brown sugar
- 3 tablespoons Morton kosher salt (or ¼ cup Diamond kosher salt)
- 2 teaspoons dried thyme
- 2 teaspoons dried sage leaves or ground sage
- 1 teaspoon freshly ground black pepper
- 6 tablespoons unsalted butter, at room temperature
- 1 large yellow onion, cut into wedges
- 2 carrots, cut into 2-inch pieces
- 2 stalks celery, cut into 2-inch pieces
Instructions
- Line a rimmed baking sheet with aluminum foil for easy clean up, and set an oven rack on top.
- Remove and discard the truss that holds turkey legs together (if the legs are held together with turkey skin, cut the skin to release them). Trim off and discard any excess fat in the neck or body cavity. Remove giblets and neck; discard or save for stock. Pat the turkey dry with paper towels.
- In a small bowl, mix the sugar, salt, thyme, sage, and pepper for the dry brine. Place the turkey on the rack of the prepared baking sheet. Rub and pat the dry brine all over the turkey, including inside the cavity. Refrigerate, uncovered, for at least 24 hours and up to 48 hours. (For food safety, ensure the turkey remains in the refrigerator at 40°F or lower during the entire brining period. If brining for longer than 24 hours, you can cover the turkey loosely with plastic wrap for the first part of the brining process and then uncover it for the final 24 hours to allow the skin to dry.)
- Preheat the oven to 375°F and set an oven rack in the lower third of the oven. Using damp paper towels, brush the dry brine off the turkey's exterior (keep the brine as-is in the turkey's cavity).
- Scatter the onion, carrots, and celery in the bottom of a large roasting pan. Place a roasting rack inside the pan and place the turkey on the rack. Tuck the wings underneath the bird. Using your hands, smear the butter all over the turkey.
- Roast the turkey until the skin is deep golden and a leave-in or instant-read thermometer registers 165°F (74°C) in the thickest part of the breast and 175°F (80°C) in the thigh, 1¾ to 2½ hours. Check the turkey after about 1½ hours; if the skin is browning too quickly, cover it loosely with foil.
- Using clean oven mitts that you don't mind getting dirty (silicone grilling gloves or mitts work well), carefully tilt the turkey so any juices from the cavity pour into the roasting pan. Transfer the turkey to a platter or cutting board. Tent with foil and let rest for 20 to 30 minutes. Remove the vegetables from the pan and discard (or if they aren't too soft/brown, save them and arrange on the serving platter with the turkey). Reserve the drippings in the pan for the gravy.
- While the turkey rests, make the gravy.
- Carve the turkey and serve with the gravy on the side.
- Make-Ahead Instructions: If you don't mind losing the crispy skin, the turkey can be roasted and carved ahead of time. Pour a thin layer of the gravy into an ovenproof serving dish. Arrange the carved turkey nicely on top of the gravy; cover tightly with plastic wrap and refrigerate for up to two days. Refrigerate the remaining gravy in a separate container. To reheat: remove the plastic wrap and cover the platter with aluminum foil. Place in a 325°F-oven for 20 to 30 minutes, until the turkey is hot. Reheat the gravy in the microwave or on the stovetop.
- Note on Selecting Your Turkey: For the best results with this dry-brining method, look for a turkey that is not injected, kosher, or labeled as "self-basting." These types of turkeys have already been treated with salt or a brining solution. However, if your bird has been treated, you can absolutely still use this recipe, as these birds do still benefit from additional seasoning. Just halve the amount of salt in the dry brine to avoid over-salting.
- Note: I've given a range for the cooking time, which will depend on the size of your turkey. For best results, I recommend using a digital thermometer with a leave-in probe and remote monitor (like this one). That way, you can monitor the temperature of the turkey without ever opening your oven.
Pair with
Nutrition Information
Powered by ![]()
- Per serving (8 servings)
- Calories: 1,075
- Fat: 47 g
- Saturated fat: 15 g
- Carbohydrates: 6 g
- Sugar: 5 g
- Fiber: 0 g
- Protein: 147 g
- Sodium: 1,619 mg
- Cholesterol: 513 mg
This website is written and produced for informational purposes only. I am not a certified nutritionist and the nutritional data on this site has not been evaluated or approved by a nutritionist or the Food and Drug Administration. Nutritional information is offered as a courtesy and should not be construed as a guarantee. The data is calculated through an online nutritional calculator, Edamam.com. Although I do my best to provide accurate nutritional information, these figures should be considered estimates only. Varying factors such as product types or brands purchased, natural fluctuations in fresh produce, and the way ingredients are processed change the effective nutritional information in any given recipe. Furthermore, different online calculators provide different results depending on their own nutrition fact sources and algorithms. To obtain the most accurate nutritional information in a given recipe, you should calculate the nutritional information with the actual ingredients used in your recipe, using your preferred nutrition calculator.
Gluten-Free Adaptable Note
To the best of my knowledge, all of the ingredients used in this recipe are gluten-free or widely available in gluten-free versions. There is hidden gluten in many foods; if you're following a gluten-free diet or cooking for someone with gluten allergies, always read the labels of your ingredients to verify that they are gluten-free.
Hi Jenn! My grocer ran out of bone in turkey breasts so I have a boneless breast. Can I still use the dry brined method? Do I keep the netting on the bird? Many thanks for the help! Your recipes always turn out perfectly!
Hi Maggie, Yes you can absolutely still dry brine it — and keep the netting on. Hope that helps and everyone enjoys!
Hi! I just began the dry brine process and it went on dry and now seems a bit wet. Is this ok?
Thanks!
Christine
Hi Christine, Yes this is normal – enjoy!
Please help! My husband brined our turkeys too soon. We are cooking 2 because we have a large crowd coming, and he couldn’t get a large enough one. It will be more than 48 hours. He hasn’t been feeling well and miscalculated his time. He did it a day ahead. So the turkeys will be brined for 48 hours tomorrow afternoon. What is your advice? Should we take the brine off of it? He is thinking of cooking them tomorrow to be safe with the meat even though we don’t need them until Monday night.
Hi Pam, You could rinse off the brine, pat the skin very dry, and place back in the fridge until ready to cook. Or you can cook the bird a day ahead and then reheat — either way it should be fine!
Thanks so much! We have used this dry brine for Thanksgiving and it was great! I have also used your gravy, stuffing, mashed potatoes and cranberry sauce. They are all wonderful! I really appreciate your advice and recipes. They always turn out perfect and delicious!
Hi Jenn
Was wondering if the turkey needs to be fresh or can I use a frozen, defrosted turkey.
Love all your recipes!
Ruth
So glad you like the recipes, Ruth! You can definitely use a frozen, thawed turkey. Enjoy!
Hey Jenn!
Great recipe, but did you ever try it on a bone in turkey breast? Like to try it for small group for Christmas. The stuffed looks good but looking for something a little easier.
Hi Kat, I haven’t tried it with a turkey breast, but a number of readers have commented that they have successfully.
Hello Jenn,
As we sat down for Thanksgiving dinner, one which included many of your recipes, I realized that you and your site make us novice cooks, like me, better than we really are. This is not meant as an insult to any readers/subscribers, but these step-by-step instructions provide results far superior to those most restaurants do at this time of year.
This recipe was fantastic. I followed the 48-hour protocol and on the second day, added additional rub (without the salt). Using the link to get the thermometer, I programmed to 180F (our butterball suggested 175F) as a compromise to some skeptics on this method. This produced great results, even in a builders’ quality oven where actual temps seem to very quite a bit with the posted temp. Frankly, I too was shocked at the moistness of all the cuts.
Question: Is there any types of meat you would not recommend to use this recipe?
Keith, I’m so glad to hear that my recipes have given you a lot more confidence in the kitchen, and that you had success with the turkey! 😊
Regarding your question about using the brine on other types of meat, what do you have in mind?
Does it have to be a meat with skin like chicken, duck, other fowl? Or perhaps other wild game which is sometimes very tough (instead of marinade)?
I think this would work well on wild game or any kind of poultry.
Ok, I used the exact mix on a Cornish hen and duck with the thermometer and the resulting flavors for both were amazing. The duck carving, however, was a bit problematic, so the presentation was slightly barbaric. Can you give me any secrets?
So glad to hear it! I’d recommend a video tutorial to help you. This one looks pretty thorough. Hope you find it helpful!
New Thanksgiving Turkey recipe!!! My family couldn’t stop going on about how moist and flavorful the white meat and the bird were overall. It probably brined for about 36 hours (not quite 48). I’m not a big fan of thyme; I cut that back to 1 tsp, added 1 tsp each of tarragon, onion powder, & garlic powder (I don’t think this changed the overall recipe much, just my taste). My bird was a 16lb butterball with solution so I cut the salt back as suggested (to about 1/2). There was plenty of rub and butter for the bigger bird. I forgot to wipe the rub off before the butter BUT it turned out GREAT for the turkey drippings/gravy later. The instructions were fantastic! I used foil at about the same spot the recipe said to check it. My turkey actually looked like a magazine turkey and tasted WONDERFUL overall!
I liked that this recipe used spices/herbs I had in my cabinet rather than fresh herbs (most dry brine recipes-I just don’t grow the ‘Thanksgiving’ herbs and they are hard to find at the store during this holiday). Totally DOABLE! I’ve been doing this dinner for 10 years now and I feel like I FINALLY got the turkey RIGHT, not just good, but REALLY GOOD!
This was astonishingly excellent! I followed the recipe exactly as written, allowing about 36 hours of refrigeration with the dry brine. Combined with a digital thermometer as recommended, this came out PERFECT! (I don’t usually even like turkey, but I loved this, as did my entire family. Thanks, Jen!
This is a great recipe and was so moist and delicious! I did the 48 hour brine and it was easily the best Thanksgiving turkey I’ve made to date. Thanks Jenn, I predominately used your recipes for gravy, cranberry sauce and mashed potatoes and our dinner was a big hit!
Dry brine worked perfectly! Turkey was moist and flavorful. Everyone raved
Hi Jen, can’t wait to try the dry brine technique.
Question: I’ve been told by friends that turkey should always be cooked at 325. Is it the brining process that requires higher temp? Thanks, Rose
Hi Rose, there are different methods for roasting turkey—some people/recipes use more of a slow and low method, but I prefer to go with a higher temp. (But if a turkey is very large, it’s good to go with a lower temperature, so the center of the turkey gets fully cooked without drying out the exterior.) Hope that clarifies!