Rainbow Sprinkle Funfetti Cake


This post may contain affiliate links. Read my full disclosure policy.
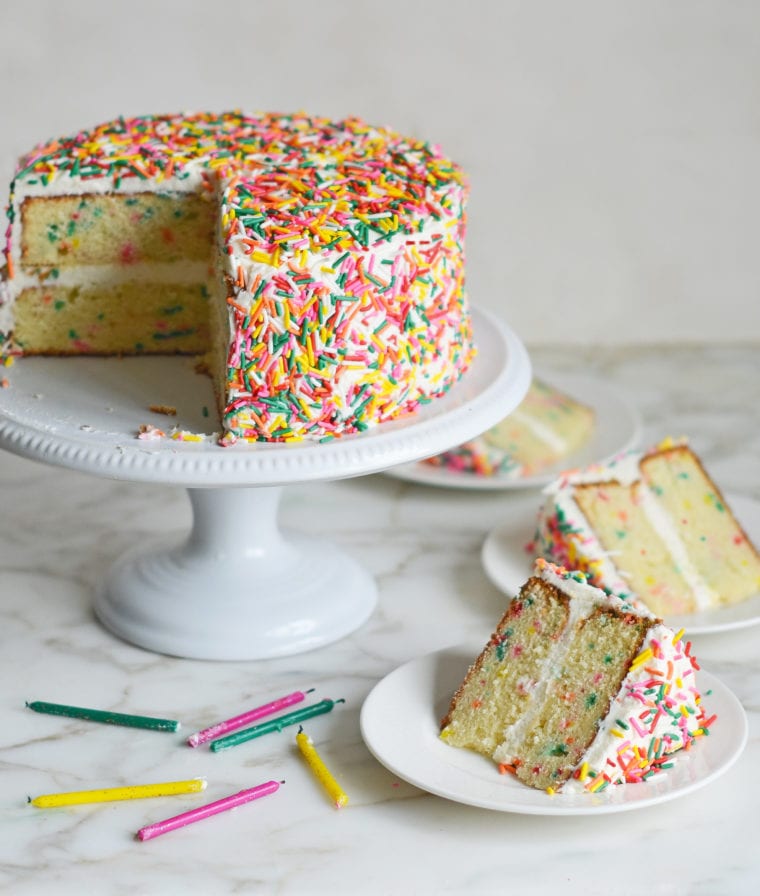
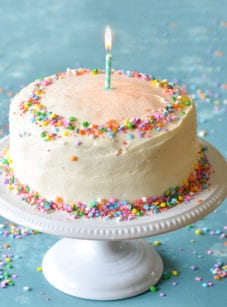
Retire the boxed version! This funfetti cake has tender vanilla layers, luscious cream cheese frosting, and enough rainbow sprinkles to make everyone smile.
This delicious funfetti cake recipe comes from my friend Lisa Kolb Ruland. Lisa is a CIA-trained pastry chef who’s worked in New York City’s top bakeshops, and she’s the editor of Unpeeled, one of the loveliest food blogs out there.
When Lisa’s cake popped up in my inbox, my daughter insisted we make it right away. It was an instant hit. Light, tender, and packed with vanilla flavor, it’s everything a funfetti cake should be. The colorful sprinkles add a playful pop of fun, and the classic flavor appeals to kids and adults alike.
“Absolutely delicious! The best recipe I’ve used for this kind of cake.”
What You’ll Need To Make A Rainbow Sprinkle Funfetti Cake
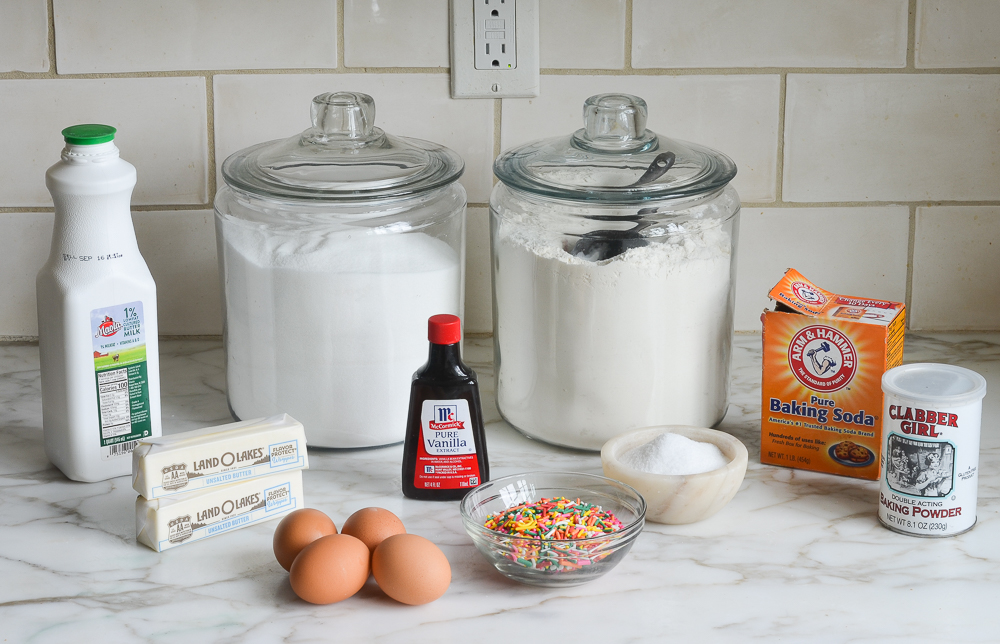
For the cake, you’ll need all-purpose flour, baking powder, baking soda, salt, unsalted butter, sugar, eggs, vanilla, buttermilk, and rainbow sprinkles.
If you’ve had sprinkles tucked away in your pantry since your last cake decorating project, make sure they’re still good—they can go bad, and if they do, they’ll taste bitter. Make sure to taste a few before you incorporate them into the batter.
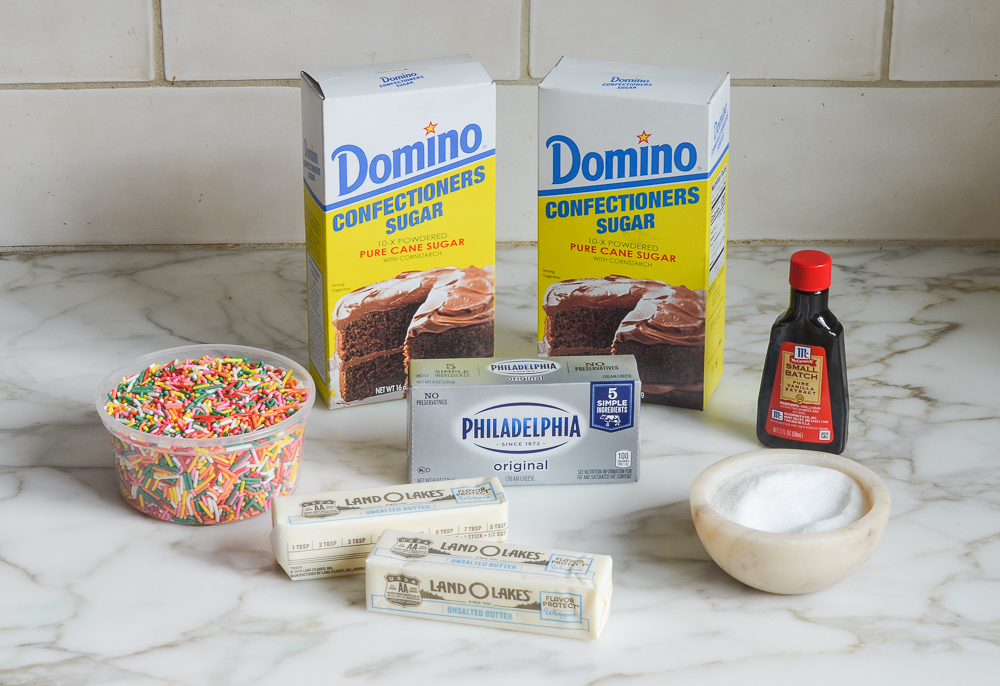
For the frosting and decoration, you’ll need unsalted butter, cream cheese, confectioners’ sugar, vanilla, salt, and rainbow sprinkles.
Step-By-Step Instructions
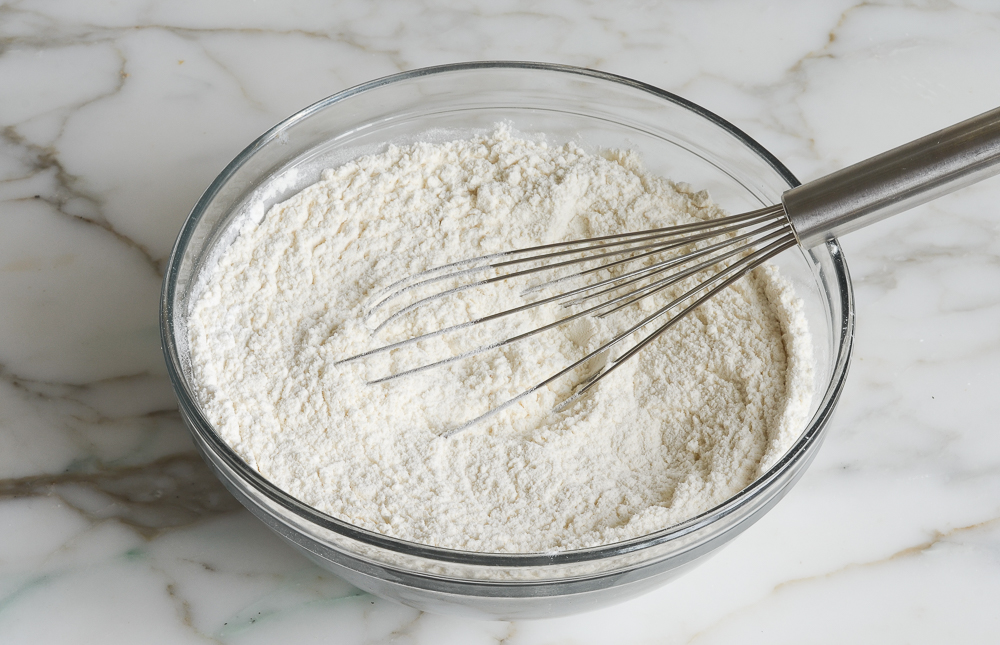
Step 1: Whisk the dry ingredients. In a medium bowl, whisk together the flour, baking powder, baking soda, and salt, then set it aside.
Step 2: Cream the butter and sugar. In a mixer fitted with the paddle attachment, cream the butter and sugar on medium speed for about 2 minutes until light and fluffy, scraping the bowl thoroughly during the process to ensure everything is evenly combined.
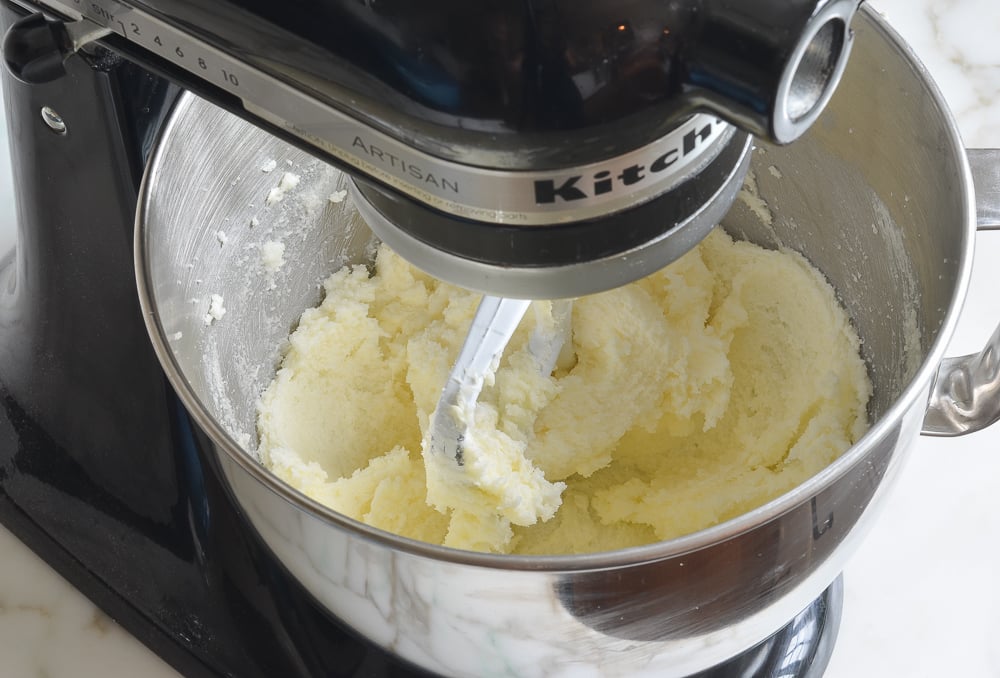
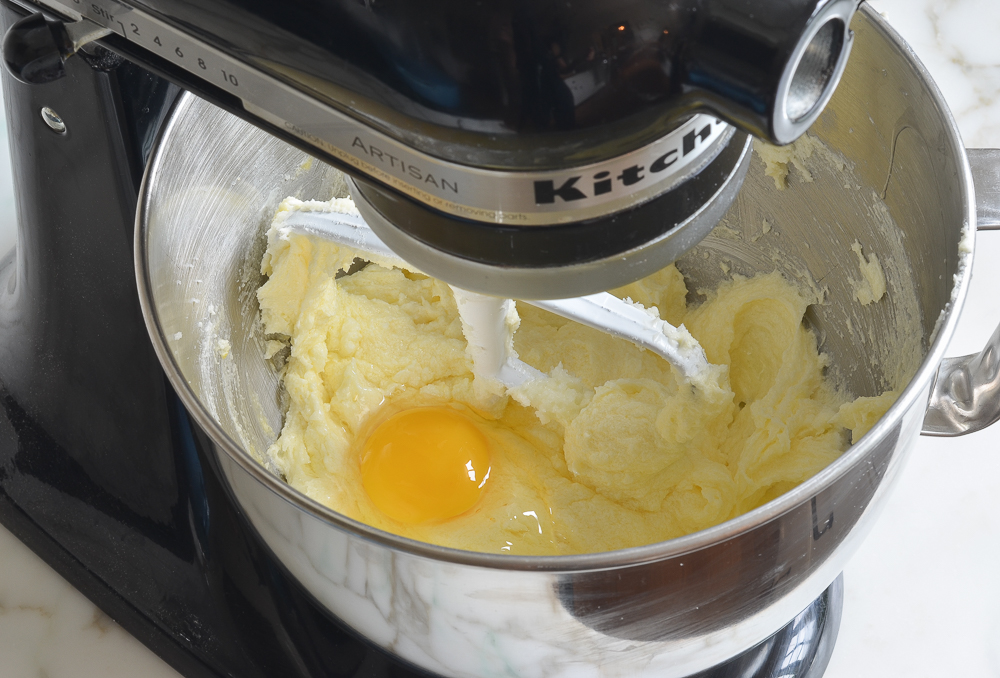
Step 3: Add the eggs and vanilla and emulsify. With the mixer on low, add the eggs one at a time, beating well after each addition (ignore any curdled appearance). Beat in the vanilla, increase the speed to medium for one minute until light and fluffy.
Pro Tip: Don’t worry if the batter looks a bit curdled—that’s totally normal. It usually happens because the cold eggs don’t easily bond with the fat in the butter. It’ll all come together and smooth out as soon as you mix in the dry ingredients.
Step 4: Alternate additions. Scrape the bowl, and then on low speed, alternately add the whisked dry ingredients in three additions and the buttermilk in two: dry, wet, dry, wet, dry.
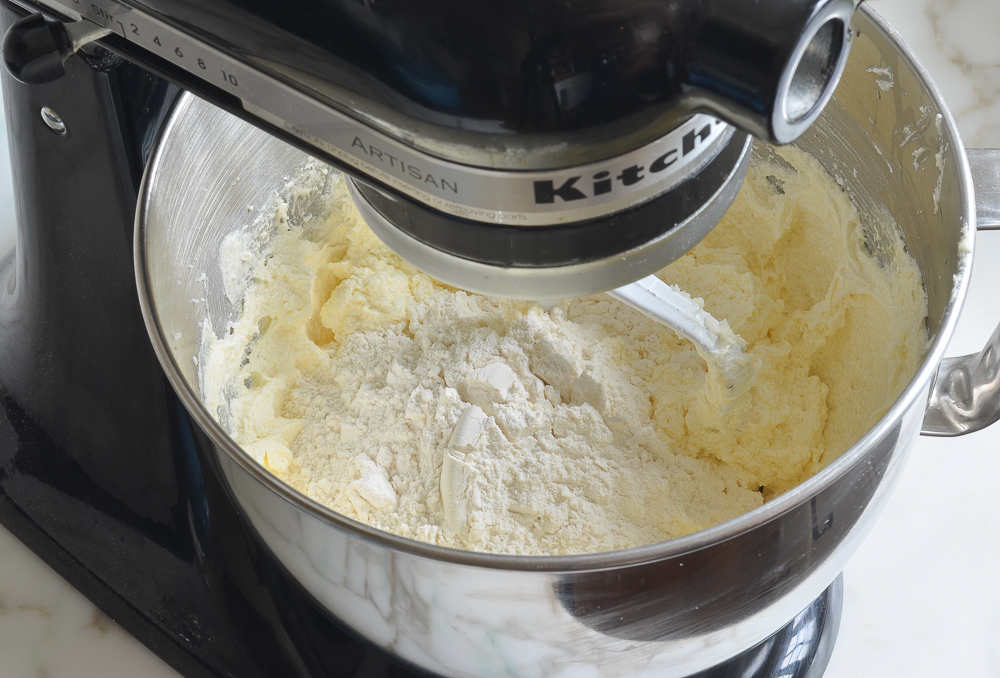
Step 5: Finish the batter. Once everything is just incorporated, remove the bowl from the mixer.
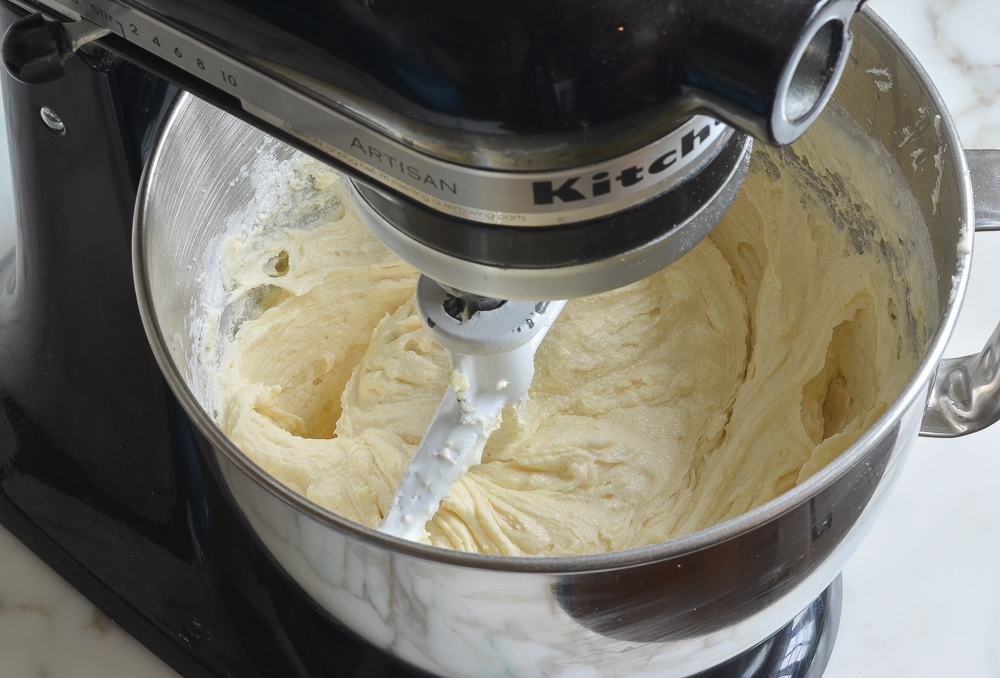
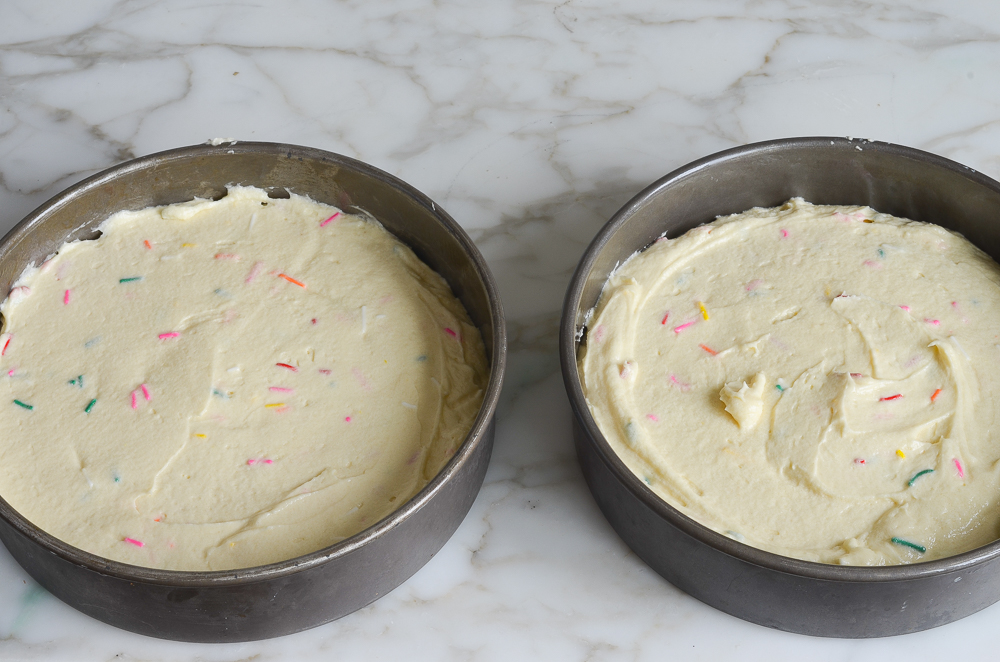
Step 6: Fold in the sprinkles and fill the pans. Scrape down the bowl as necessary, add the sprinkles, and gently fold them into the batter by hand using a spatula. Pour the batter evenly into your prepared cake pans and use the back of the spatula to smooth out the surface.
Pro Tip: Make sure you’re using classic jimmies (the long, skinny kind of sprinkles) rather than nonpareils (the tiny round little balls). Nonpareils bleed their food coloring almost as soon as they touch wet batter, which will discolor the cake.
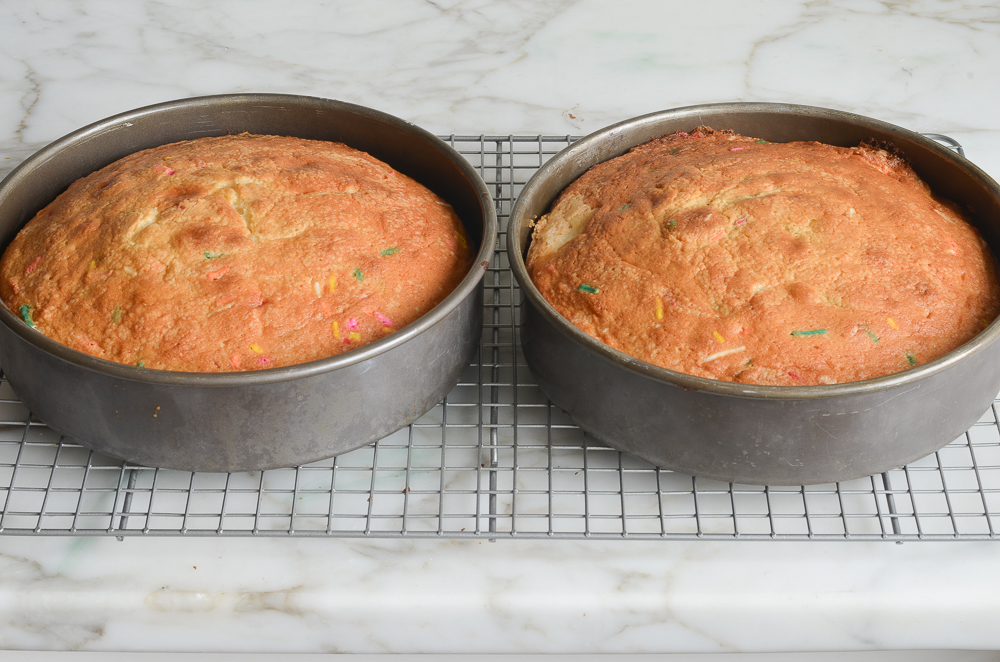
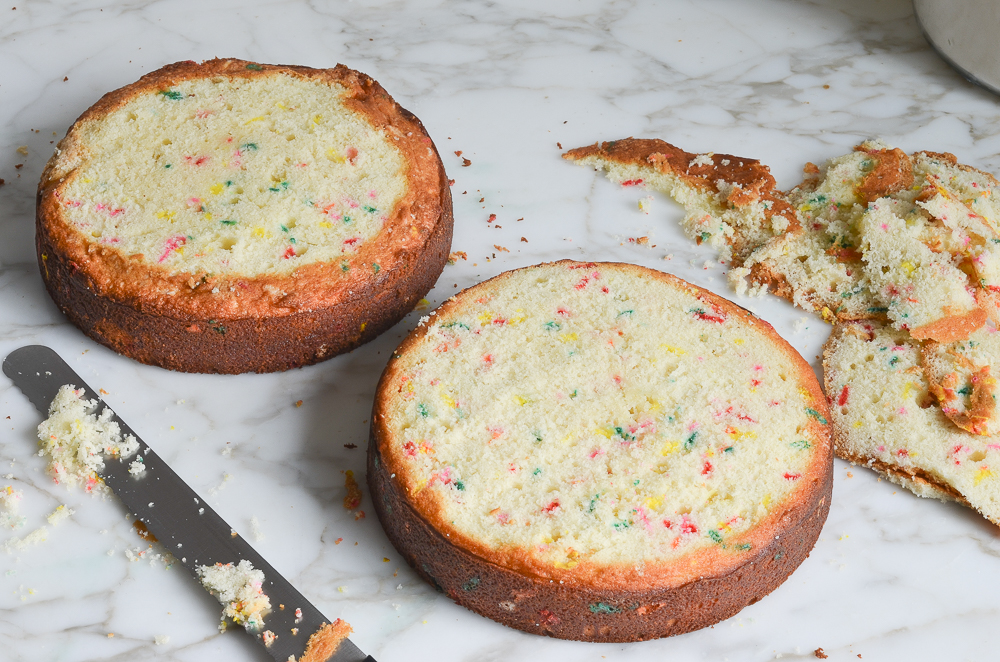
Step 7: Bake and cool. Bake for 30 to 35 minutes until golden and a tester comes out clean, then cool in the pans on a wire rack for 20 minutes before running a knife around the edges and turning the cakes out to cool completely.
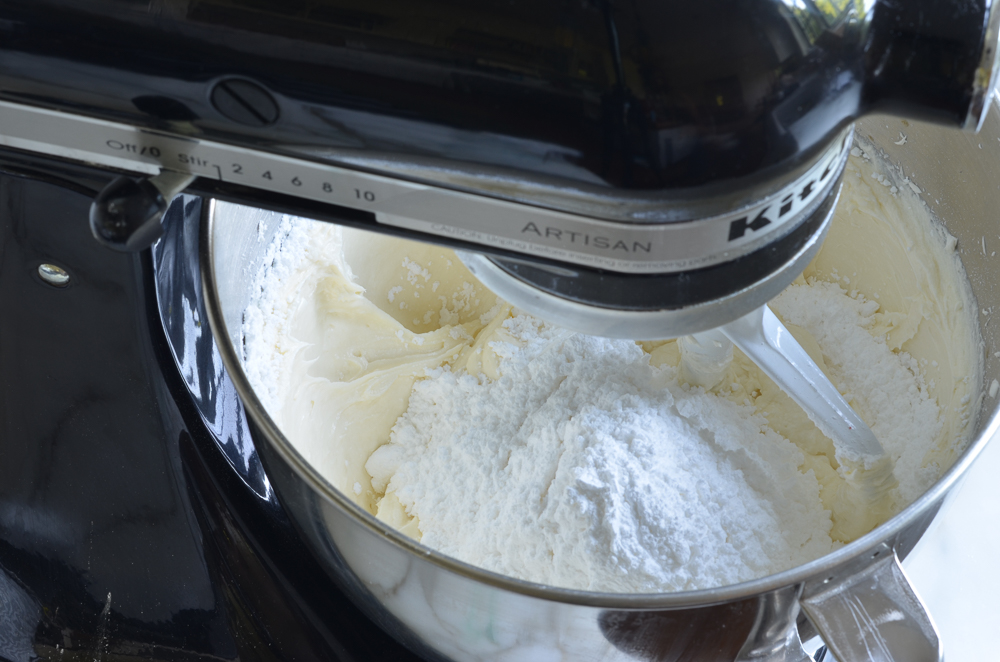
Step 8: Start the frosting. In a mixer fitted with the paddle attachment, beat the butter and cream cheese for about 30 seconds until creamy, then gradually add the confectioners’ sugar on low speed.
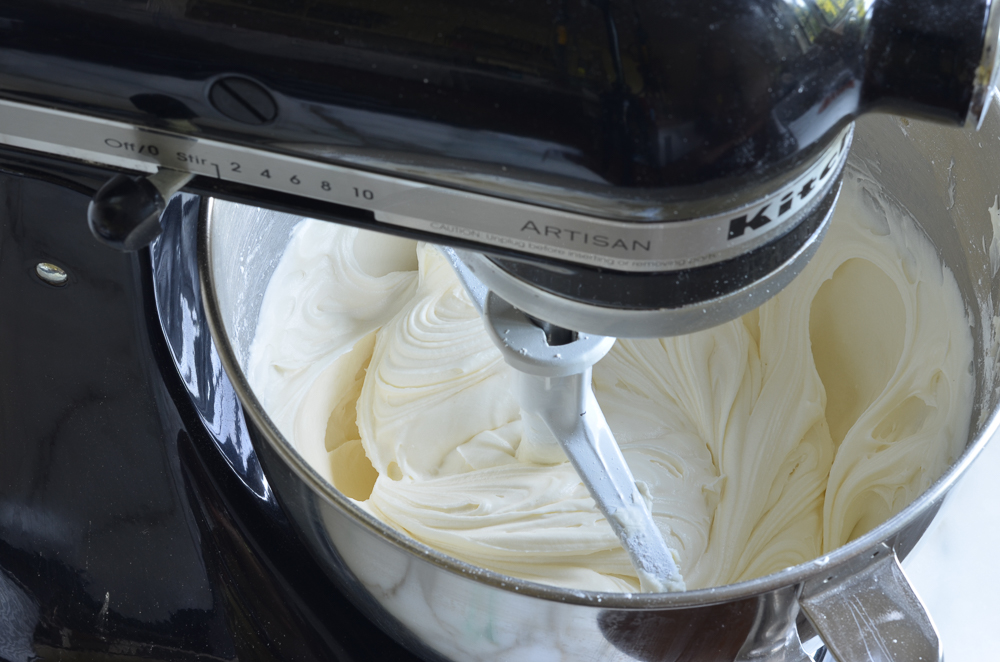
Step 9: Whip the frosting. Beat in the vanilla and salt, then increase the speed to medium-high and beat for about 1 minute until fluffy.
Step 10: Level the layers. Once the cake layers are cool, use a long serrated knife to cut off and discard (or snack on) the domed tops so the layers are completely flat.
Pro Tip: If you’ve got the time, pop the cooled cake layers into the freezer for about 15 to 20 minutes before you cut them. Chilling firms up the cake, making it easier to slice off those domed tops cleanly without tearing or creating too many crumbs.
Step 11: Stack and begin frosting. Place the first layer cut-side up on a stand, spread 1 cup of frosting evenly to the edge, and top with the second layer cut-side down; scoop another cup of frosting onto the center and spread it to the edge.
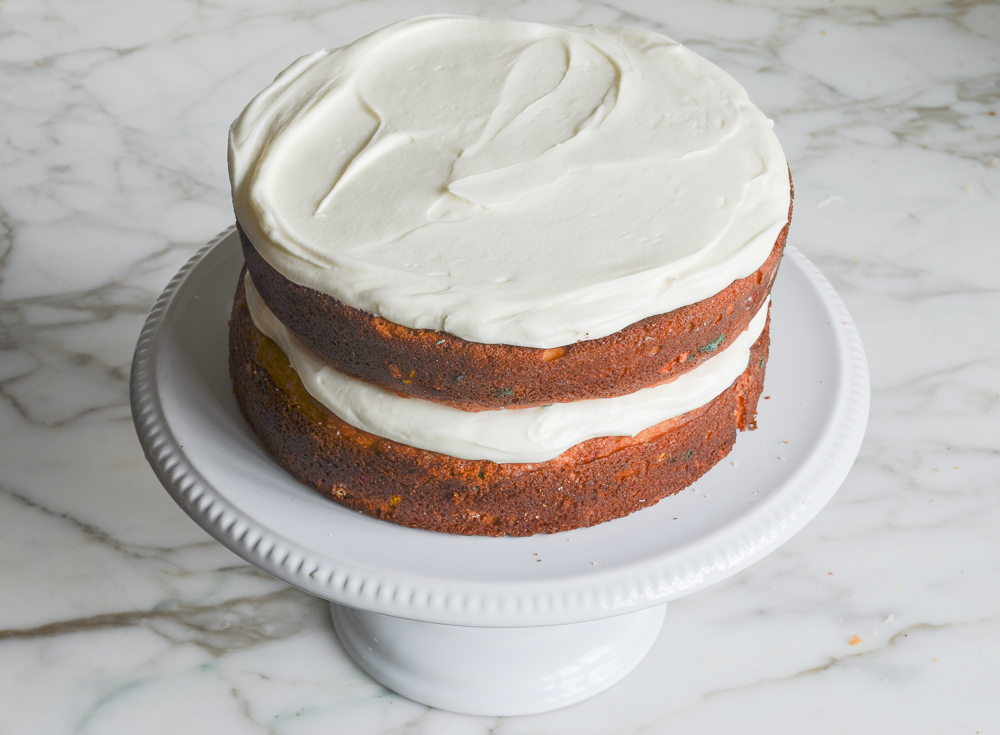
Step 12: Frost the sides and chill. Spread 1/4-cup blobs of frosting around the sides of the cake, rotating the stand until covered (don’t worry about perfection yet), then refrigerate uncovered for 15 to 30 minutes to set.
Pro Tip: What you’re doing here is called a “crumb coat”—a thin, initial layer of frosting that acts like a primer. It traps any loose cake crumbs so they don’t get mixed into your final layer of frosting. Chilling it locks everything in place, so the finish looks clean.
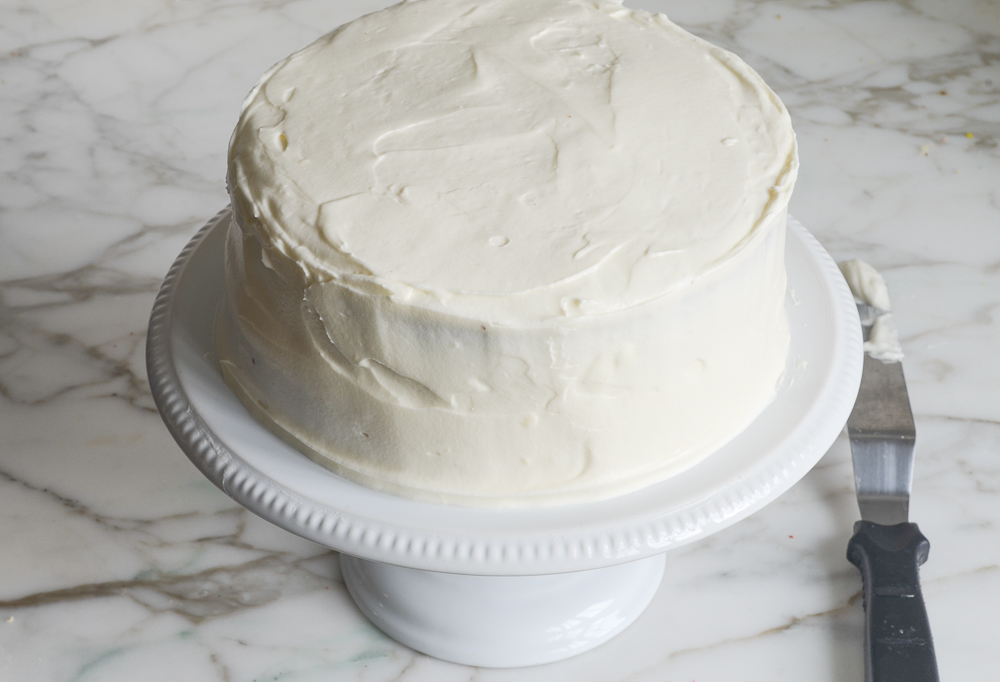
Step 13: Smooth and add side sprinkles. Remove from the fridge, run a warmed, damp offset spatula over the frosting to make it smooth and glossy, then gently press handfuls of sprinkles into the sides of the cake from the bottom up, rotating as you go.

Step 14: Sprinkle the top. Gather another large handful of sprinkles and scatter them over the top of the cake, using a wide metal spatula to gently press them in and even out any remaining bumps.
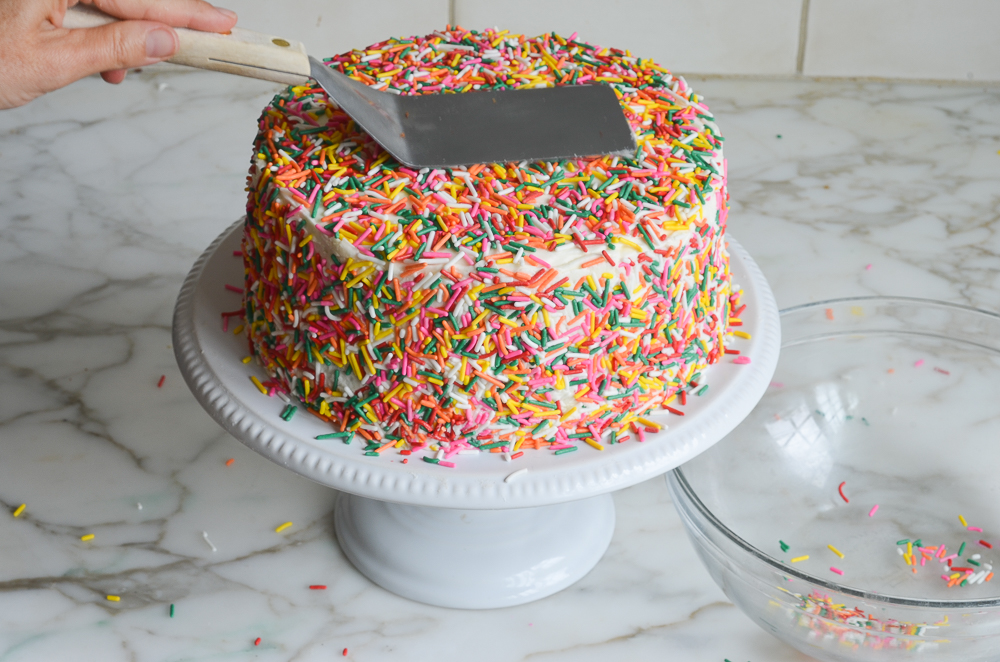
Step 15: Clean up and serve. Scrape away any fallen sprinkles from the cake stand, wipe the edges clean with a damp paper towel, then slice and celebrate. The cake (without frosting) can be baked and frozen for up to 3 months.

Note: I have simplified Lisa’s cake decorating method a bit here. If you’d like to see how a professional pastry chef frosts and decorates a cake, check out Lisa’s excellent tutorial here.
More Classic Cake Recipes for Birthdays and Beyond

Rainbow Sprinkle Funfetti Cake

Ingredients
For the Cake
- 3 cups all-purpose flour, spooned into measuring cup and leveled-off
- ½ teaspoon baking powder
- ½ teaspoon baking soda
- ¾ teaspoon salt
- 1 cup (2 sticks) unsalted butter, softened
- 2 cups sugar
- 4 large eggs
- 2 teaspoons vanilla extract
- 1 cup buttermilk
- ⅓ cup rainbow sprinkles
For the Frosting and Decoration
- ¾ cup (1½ sticks) unsalted butter, softened
- 4 oz cream cheese, at room temperature
- 6 cups confectioners' sugar
- 2 teaspoons vanilla extract
- 2 generous pinches salt
- About 1½ cups rainbow sprinkles
Instructions
- Preheat the oven to 350°F (175°C) and set an oven rack in the middle position. Spray two 8-inch cake pans with nonstick cooking spray. Cut two 8-in (20-cm) rounds of parchment paper and line the bottom of each pan, then spray the paper with nonstick cooking spray. (To measure the parchment paper, just trace the bottom of the pan.)
- In a medium bowl, whisk together the flour, baking powder, baking soda, and salt. Set aside.
- In the bowl of an electric mixer fitted with the paddle attachment (or beaters), cream the butter and sugar on medium speed (or medium-high speed if using a hand-held mixer) until light and fluffy, about 2 minutes. Scrape the bowl once during this process to make sure everything is evenly combined. Scrape the sides of the bowl again.
- With the mixer on low, add the eggs one at a time, beating well after each addition. Don't worry if the batter looks curdled at any point during the mixing process. Mix in the vanilla, then increase the speed to medium (or medium-high if using a hand-held mixer) and beat until the mixture is light and fluffy, about one minute. Scrape the bowl and briefly mix again.
- On low speed, alternately add the whisked dry ingredients in three additions and the buttermilk in two: dry, wet, dry, wet, dry. When everything is just incorporated, remove the bowl from the mixer. Scrape the bowl as necessary, and fold in the sprinkles by hand using a spatula.
- Pour the batter evenly into the cake pans and use the back of the spatula to smooth the batter and bake for 30 to 35 minutes, or until the cakes are golden and set, a cake tester inserted into the middle comes out clean, and the edges are pulling away from the pan. Cool the cakes in the pans on a rack for about 20 minutes. When the pans are cool enough to handle, run an offset spatula or a knife around the rim, and turn the cakes out onto the rack. Let fully cool.
- Once the cake layers are cool, use a long serrated knife to cut off the domed top of the cake layers so that they are flat. Discard (or snack on) the domed top. Repeat with the additional layer, and set aside.
- Put one cake layer on a cake stand or serving platter with the cut-side up. Put about 1 cup of the frosting in the center and, using the the back of an offset spatula (or a butter knife, if you don't have an offset spatula), spread the frosting evenly just to the edge of the cake. Add the second cake layer on top of the first, so that the cut-side is down (and the bottom of the cake is on top). Scoop about 1 cup of the frosting onto the center of the cake and spread it to the edge. Get eye level with the cake to make sure that everything looks even. Put a ¼-cup blob of frosting on the side of the cake, and use your offset spatula to spread it over a section of cake. Rotate the cake stand as you go. Repeat until the entire side of the cake is covered fully. Don't worry about making the frosting too perfect; you will smooth it out again later, and the sprinkles will cover any imperfections.
- Place the cake, uncovered, in the refrigerator for 15 to 30 minutes to set.
- Remove the cake from the refrigerator. If you touch the frosting, you will notice that it has formed a skin; that's normal. Place the cake next to the sink and turn on the hot water. Hold an offset spatula (or butter knife, if you don't have an offset spatula) under the hot water for a few seconds to warm it. Tap off any excess water, and then slowly run the hot spatula over an area of frosting until it is smooth and glossy. Continue this process over the entire cake, warming the spatula under hot water as necessary, until the cake is smooth and glossy all over. This process both evens out any bumps in the frosting and also creates a "sticky" surface for the sprinkles to adhere.
- Place the cake stand on a 13 x 18-in (33 x 46-cm) sheet pan. This will catch the falling sprinkles. Fill a small bowl with about the sprinkles. Gather a handful of sprinkles in your palm and gently press them into the side of the cake, working from the base of the cake to the top edge, opening your palm as you go. Stop at the edge and don’t “round the corner” onto the top of the cake. You want to keep those side edges sharp. Rotate the cake stand in your hand and repeat, going all the way around. Gather another large handful of sprinkles and sprinkle them over the top of the cake. (I like to use a wide metal spatula to gently press the sprinkles into the frosting to even out any remaining bumps.) Scrape any "fallen" sprinkles off the cake stand and wipe the edges of the cake stand clean with a damp paper towel, if necessary.
For the Frosting
- In the bowl of an electric mixer fitted with the paddle attachment (or beaters), beat the butter and cream cheese until creamy and evenly combined, about 30 seconds. With the mixer on low speed, gradually add the confectioners' sugar until incorporated, then beat in the vanilla and salt. Increase the speed to medium-high (or high speed if using a hand-held mixer) and beat until fluffy, about 1 minute.
Notes
Nutrition Information
This website is written and produced for informational purposes only. I am not a certified nutritionist and the nutritional data on this site has not been evaluated or approved by a nutritionist or the Food and Drug Administration. Nutritional information is offered as a courtesy and should not be construed as a guarantee. The data is calculated through an online nutritional calculator, Edamam.com. Although I do my best to provide accurate nutritional information, these figures should be considered estimates only. Varying factors such as product types or brands purchased, natural fluctuations in fresh produce, and the way ingredients are processed change the effective nutritional information in any given recipe. Furthermore, different online calculators provide different results depending on their own nutrition fact sources and algorithms. To obtain the most accurate nutritional information in a given recipe, you should calculate the nutritional information with the actual ingredients used in your recipe, using your preferred nutrition calculator.
My grandson and I will be making this cake for his 8th birthday. I only have 9” round cake pans. Will these work? Thanks.
Hi Lynn, Yes, you can get away with baking this in two 9″ pans though the cake won’t be quite as tall. Also, the bake time will be shorter (5 minutes, give or take) so keep a close eye on it. Hope you and your grandson enjoy making it! 💜
The cake was the best we have ever made! I wish I could post a pic but I am not on social media. My grandson ate a piece everyday and declared it “awesome”! He didn’t even want ice cream with it. It was light, but with good structure. So much better than a box cake and not hard to do. I also made the Swiss meringue buttercream, which was delectable and not too difficult. I like it so much better than the overly sweet buttercream frosting. I kind of hated to cover the cake with sprinkles, as the frosting looked so beautiful! That’s OK, because there will be a next time, when I make it for my own birthday!
So glad to hear it came out nicely — thanks for taking the time to report back!
Hi Jenn!
I’ve made this cake before and it was delicious! I want to try it for my daughter’s first birthday but we have many family members that are gluten free. Do you think it would work with 1:1 King Arthur’s Gluten Free Flour? Do you recommend any modifications?
Thank you!
Hi Caly, I don’t see any comments from readers who’ve made it gluten-free yet, but I think it would work without any modifications other than using the gluten-free flour. I’d love to hear how it turns out!
Hi! Thank you, yes, it did work out fairly well. All the family that weren’t gluten free ate it, too, and enjoyed it! ❤️
Caly, thanks for reporting back – glad to hear it came out well!
Trial made this cake with out the icing just to see what it was like — absolutely delicious! The best recipe I’ve used for this kind of cake. My three year old who seriously dislikes cakes loved it and just kept wanting more and more. Definitely do yourself a favour and make this gem
This cake is the best!
We made it today to celebrate my 4 year old son bday .
Is easy to make and look beautiful he and all of us absolutely loved it !
Thank you
Can this be made without a mixer stand? I only have a hand held beater and a wooden spoon. Lol
Sure, – you can use a hand held mixer — just turn the speed up a bit. Enjoy!
Hello! Could you make this recipe in a Bundt pan? If so what adjustments to the recipe would you recommend?
Hi Paige, I don’t recommend it – I’d worry that it would stick. Sorry!
I am planning on making this for my daughters 2nd birthday but I am wanting to do 4 in rounds (3)…any idea on the baking time, they are 2 inches tall.
Hi Anna, I really don’t know how long they’ll take so I’d just keep a close eye on them — I’m sorry I can’t be more helpful, but happy birthday to your daughter! 😊
Hi Jenn, I’ve been a fan of yours since February 2022 when I made your cheesecake for my birthday. I always make my own cake; that way I know I’ll like what I’m getting. Since then I’ve made many of your recipes and enjoyed every one. I always feel like you’re in my kitchen with me when I make one of them. I made this cake for my granddaughter’s 13th birthday. It won’t be cut until later today but from tasting the samplings it’s another 5 star rating.
Thank you for sharing your gift!
Hi! I’m hoping to make this cake in a 8.5 / 9 inch square pan with 2 layers. Whats your recommendation for quantity of ingredients to do so? Should I double the receipe? And bake for how long?
Yes, I think you should double the cake. The bake time may be a bit different, but I’m not sure by how much, so keep a close eye on it. Please LMK how it turns out!
Hi! I have 2 16cm (6.2 inches, sorry i use metric) cake pans. Will it be too tall or is it okay with this recipe?
Hi Lu, I wouldn’t bake the cake in those pans, you’ll have too much batter to fit in them. Sorry!