Best Beef Chili Recipe


This post may contain affiliate links. Read my full disclosure policy.
Craving comfort food on a chilly day? This hearty, boldly spiced chili is just what you need—perfect for game day, family dinners, or a cozy night in.

This chili recipe is my absolute go-to. It’s everything you want in a classic ground beef chili—rich, flavorful, and perfectly spiced to warm you up. Whether you serve it with cornbread, spoon it over rice, pile it on baked potatoes, or scoop it up with tortilla chips, this homemade chili always hits the spot. Plus, it freezes beautifully, so go ahead and make a double batch.
You’ll notice I don’t add beans to my chili—my kids aren’t fans. But if you love beans in yours, go for it! I recommend 1 to 2 cans of kidney beans, pinto beans, or black beans. Just rinse and drain them, then stir them into the chili during the last half hour of cooking.
“We’re Texans and love your chili! It is so well flavored without being hot…Thank you for another great recipe!”
Video Tutorial
What You’ll Need To Make Beef Chili
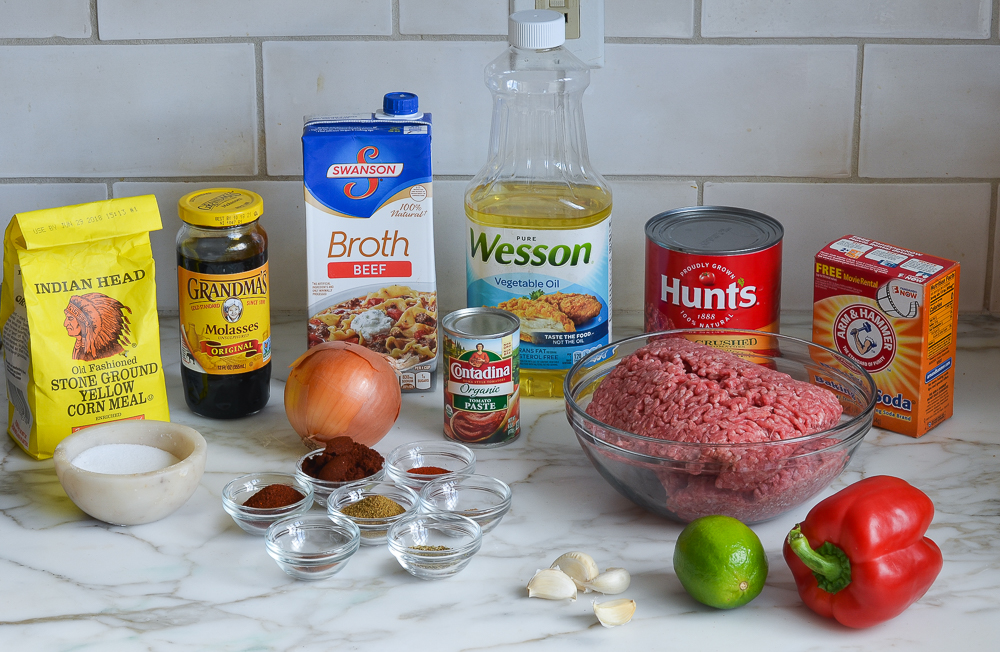
- Ground Beef: Provides the hearty meaty base for the chili. Opt for 85% lean; the fat enriches the meat, enhancing the dish’s overall flavor and texture. And don’t stress about the fat—post-cooking, it’s easy to skim off any excess. If you’d like to use ground turkey as an alternative, I suggest this turkey chili recipe.
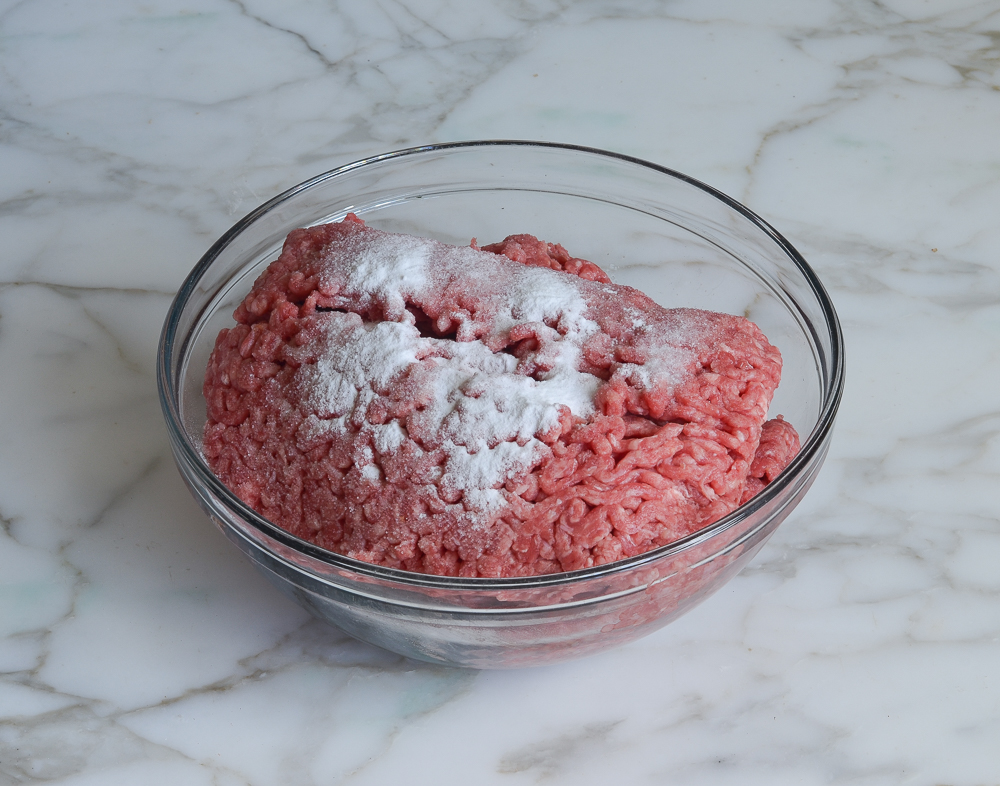
- Baking Soda: Helps tenderize the beef by locking in moisture. Also accelerates browning, resulting in a more flavorful, tender chili.
- Onion, Garlic, Red Bell Pepper: Forms the aromatic base of the chili.
- Spices and Herbs: A mix of ancho chile powder, chipotle chile powder, ground cumin, oregano, ground coriander, smoked paprika, and cinnamon give the chili its distinctive flavor and heat. This recipe has a medium spice level, but you can easily adjust it to suit your taste. For a milder chili, reduce the chipotle chile powder. If you prefer it spicier, add cayenne pepper to taste.
- Cornmeal: Thickens the chili.
- Beef Broth: Provides liquid and enhances the beefy flavor of the chili.
- Crushed Tomatoes and Tomato Paste: Adds a rich tomato flavor and contributes to the chili’s thick texture.
- Molasses: Offers a touch of sweetness to balance the heat and spices.
- Lime Juice: Adds a hint of acidity and brightness.
- Jump to the printable recipe for precise measurements
Step-by-Step Instructions
Step 1: Tenderize the beef. Mix the ground beef, salt, baking soda, and water in a large bowl. Use your hands to combine everything evenly, then let it sit for 20 minutes. The baking soda works its magic by raising the meat’s pH, which helps it stay juicy and brown more quickly.
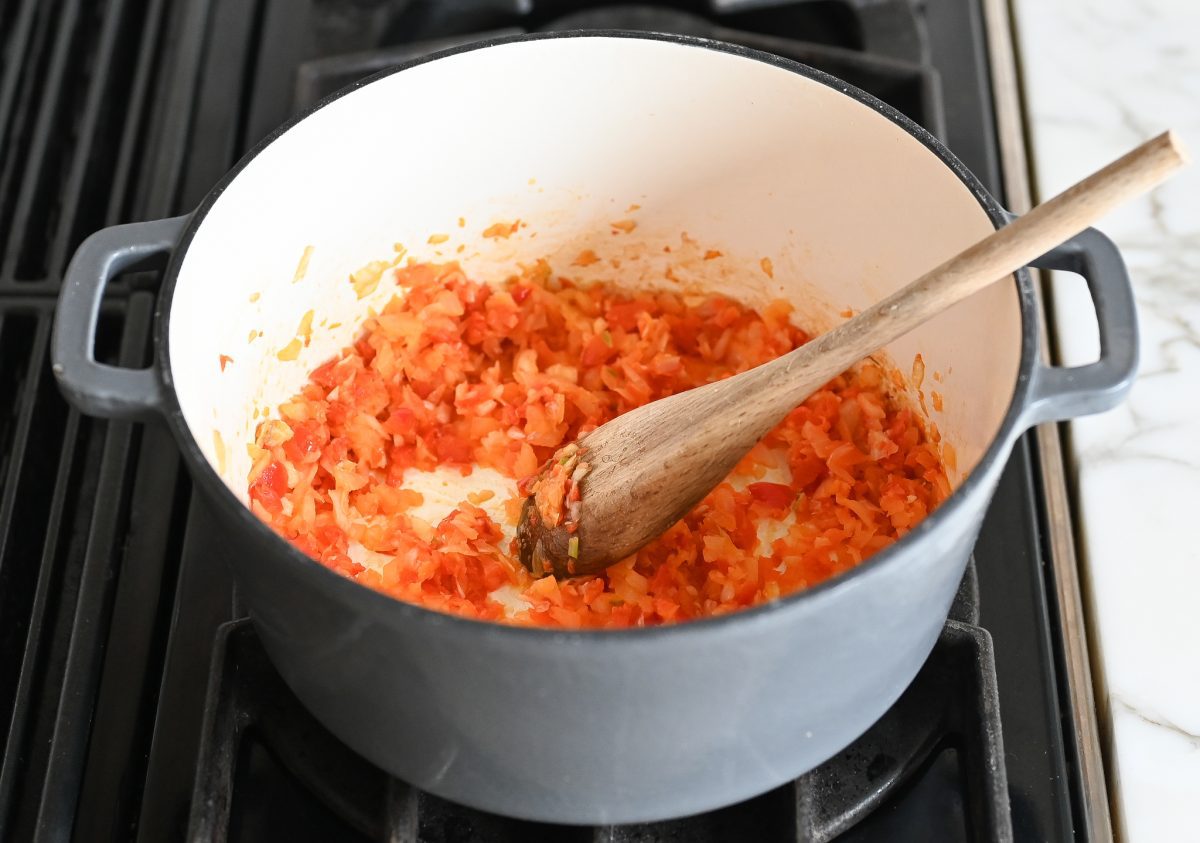
Step 2: Prep the veggies. While the meat rests, finely chop the veggies. I use a food processor to speed this up, but it’s fine to chop by hand too.


Step 3: Cook the veggies. In a large pot over medium heat, heat the oil and add the onions, garlic, and red pepper. Cook, stirring frequently, until the veggies are softened—it will take about 5 minutes.
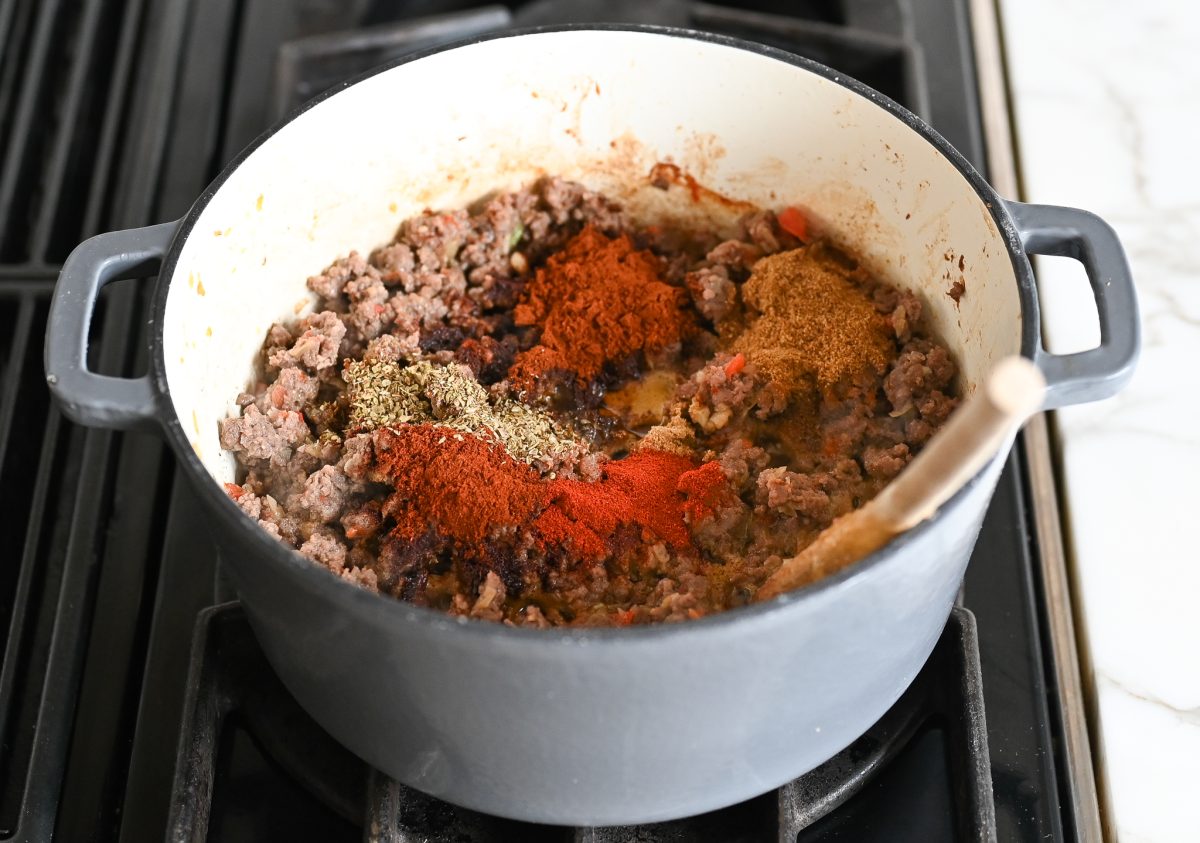
Step 4: Brown the beef and add the spices. Add the beef and cook for 10 to 12 minutes, stirring with a wooden spoon to break up the meat, until it’s nicely browned. The beef will give off quite a bit of fat and liquid—don’t worry, you’ll skim the fat off at the end, so no need to drain it. Stir in the ancho chile powder, chipotle chile powder, cumin, oregano, coriander, smoked paprika, and cinnamon (if you’re using it). Cook until well combined and the spices are fragrant.
Step 5: Add the remaining ingredients and simmer. Add the cornmeal, beef broth, crushed tomatoes, tomato paste, and molasses (if you’re using it). Bring the mixture to a boil, then lower the heat and let it simmer, covered, for 2 hours.
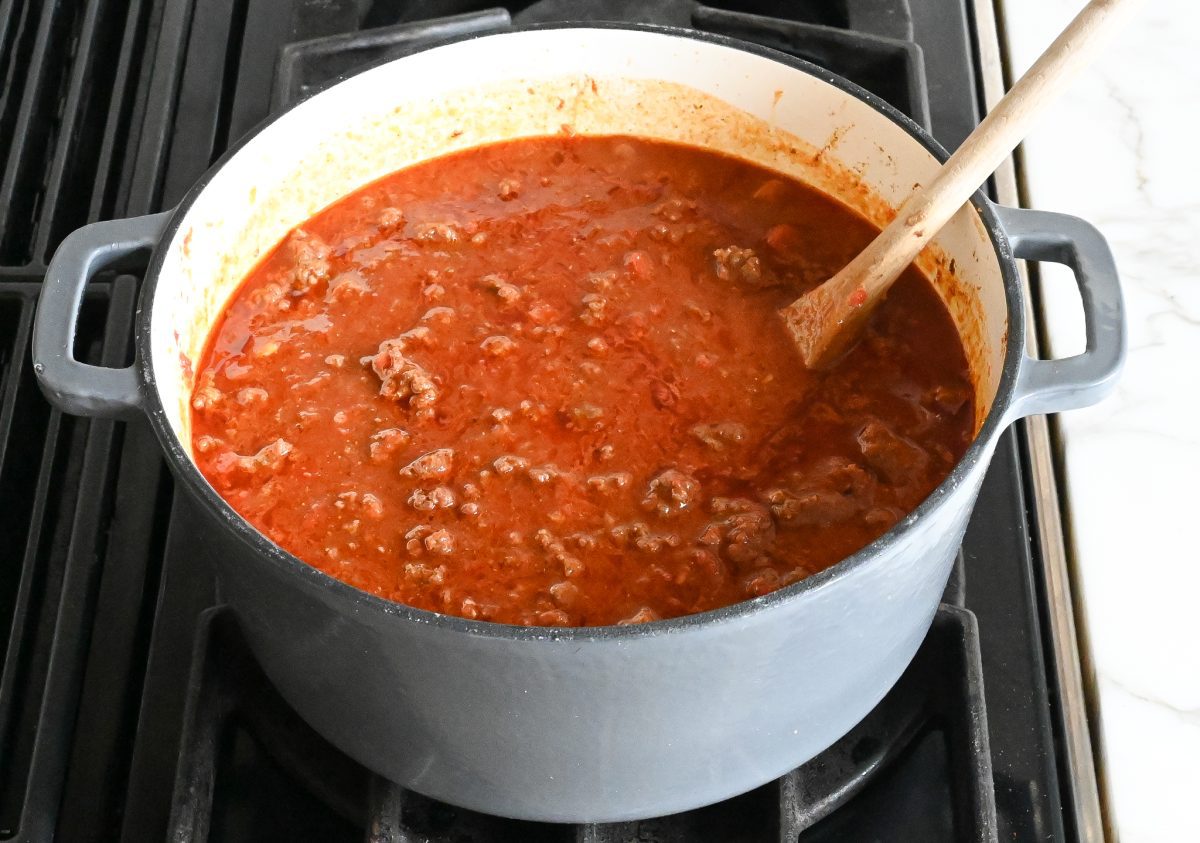
Step 6: Finish and serve. Skim off any excess fat from the surface of the chili—it’ll be a good amount. Then stir in the lime juice, taste, and adjust the seasoning to your liking. Serve the chili with your favorite toppings—sour cream, shredded Cheddar, scallions, corn, avocado, or whatever you love. It keeps well in the fridge for up to 3 days; freeze for longer storage.
You May Also Like


Classic Beef Chili

Ingredients
- 2½ pounds 85% lean ground beef
- 2 teaspoons salt
- ¾ teaspoon baking soda
- 2 tablespoons vegetable oil
- 1 large yellow onion (or 2 small), minced
- 4 cloves garlic, minced
- 1 red bell pepper, minced
- 2 tablespoons ancho chile powder
- 1 tablespoon chipotle chile powder
- 1 tablespoon ground cumin
- 1 teaspoon dried oregano
- ½ teaspoon ground coriander
- 1 teaspoon smoked paprika
- ¼ teaspoon cinnamon, (optional, for a sweeter chili)
- 2 tablespoons cornmeal
- 3 cups beef broth
- 1 (28-oz) can crushed tomatoes
- ¼ cup tomato paste
- 1 tablespoon molasses, such as Grandma's Original (optional, for a sweeter chili)
- 1 tablespoon fresh lime juice, from 1 lime
For Serving (optional)
- Cilantro, lime wedges, sour cream, cheese, scallions
Instructions
- In a large bowl, combine the beef, salt, baking soda, and 1 tablespoon of water. Using your hands, mix until evenly combined. Let the beef mixture sit on the counter for 20 minutes.
- In a large pot over medium heat, heat the oil. Add the onions, garlic, and red pepper; cook, stirring frequently, until softened, 4 to 6 minutes. Add the beef and increase the heat to high; cook, stirring with wooden spoon to break the meat into ¼-inch (6-mm) pieces, until the beef is browned, 10 to 12 minutes. The beef will release a lot of liquid—do not drain it; you'll skim the fat off at the end.
- Add the ancho chile powder, chipotle chile powder, cumin, oregano, coriander, smoked paprika, and cinnamon (if using); cook, stirring frequently, for 1 to 2 minutes, until well combined and fragrant.
- Stir in the cornmeal, broth, crushed tomatoes, tomato paste, and molasses (if using); bring to a boil. Reduce the heat to low and simmer, covered, for 2 hours.
- Skim any excess fat off the surface of the chili. There will be quite a bit; don't worry about getting all of it, as it adds flavor. Stir in the lime juice, then taste and adjust seasoning, if necessary. For a thinner chili, you can add a bit of water. To thicken the chili, continue simmering, uncovered, until desired consistency is reached.
Notes
Pair with

Nutrition Information
This website is written and produced for informational purposes only. I am not a certified nutritionist and the nutritional data on this site has not been evaluated or approved by a nutritionist or the Food and Drug Administration. Nutritional information is offered as a courtesy and should not be construed as a guarantee. The data is calculated through an online nutritional calculator, Edamam.com. Although I do my best to provide accurate nutritional information, these figures should be considered estimates only. Varying factors such as product types or brands purchased, natural fluctuations in fresh produce, and the way ingredients are processed change the effective nutritional information in any given recipe. Furthermore, different online calculators provide different results depending on their own nutrition fact sources and algorithms. To obtain the most accurate nutritional information in a given recipe, you should calculate the nutritional information with the actual ingredients used in your recipe, using your preferred nutrition calculator.
Does salt affect anything but the taste? You’ve sold me on the need for baking soda to ensure moist hamburger, but I have to reduce total sodium given hubby’s heart condition. We’ve gotten used to the taste of un- or under-salted food and guests know to add their own salt.
Hi, the salt won’t impact anything other than the taste so feel free to reduce as needed. 🙂
Excellent. This is our new favorite chili. Perfect consistency and flavor. Thank you.
Does it really need to cook for 2 hours? Thanks. Most other recipes seem to be ready in an hour or less unless using dried beans.
Hi Justin, While technically, the chili will be cooked before two hours time, simmering it, low and slow helps to thicken the texture and deepen the flavors, so for the best results, I’d recommend sticking with that.
I really like this chili no matter what name you put on it 😉.
Love to hear from folks that screwed with the recipe by adding beans. I’m thinking of Pinto Beans myself. I going to rinse the beans and add one can the first time around, and then add another if I think I’d prefer it that way. I’m going to start by putting the beans in for in for the last half an hour and see if that’s enough.
Sure would like to hear some advice in advance…
Hi Michael, I think that pinto beans are a great option for chili. You actually can put them in just for the last few minutes of cooking time so they get heated through. Hope that helps!
We’re Texans and love your chili! Try this! It is so well flavored without being hot. The hint of cinnamon and molasses balance out the spice. ❤️ Thank you for another great recipe!
Oh no. I don’t have molasses. Should I run out and get it or is their a sub?
Hi Amy, It’s totally fine to leave it out. If you’d like a little sweetness, a pinch or two of sugar will work.
I always substitute light brown sugar for the molasses. I don’t like the strong flavor of molasses, but the thing that makes brown sugar brown IS molasses. So I get the subtle sweetness without being overpowering (for my palate.) Try some brown sugar!
Hi Jenn! This is one of my very favorite chili recipes – it is delicious! This weekend, I will be making it for a group of hungry college kids and want to double the recipe. How will that change the cooking time? Thanks so much – I just LOVE your blog and both of your cookbooks!
So glad you enjoy it, Jill! I think the cook time should be about the same, maybe 15 to 20 min longer. I would just cook it til the consistency looks right and the meat is nice and tender.
One of my winter ‘go to’ recipes- my guys love it. Two are allergic to beans so when I first tried it and they loved it, well, there just isn’t a better feeling. Thanks so much Jen. You always come through!
Hi Jenn,
I’ve always used a chili mix before, but never again. This was yummy, just the perfect balance of spices. I usually like things on the very spicy side, but I followed your recipe exactly. Delish as is.
My friends that I shared some with now want the recipe, even my friend that doesn’t cook.
Thanks again for another superb recipe.
Outstanding recipe, as always, Jenn. Like many other followers, I added beans and upped the spice level, but that’s just about personal preferences. In my opinion, the ancho and chipotle chili powders, and the cumin, are essential. My new go-to chili recipe. Thanks for a keeper.
I should have known that this recipe would be just plain awful: who puts chili over rice (gross)
uses vegetable oil, cinnamon, no beans?? I had to keep adding more chili powder and other spices..it is bland..I added kidney beans to try to salvage it.
I’ve been making and eating chili this way for 25 years: no beans and served over rice. I like to kick up the heat and top it with some sour cream. The rice and sour cream both temper the heat. I haven’t made this specific recipe yet but I prefer this style. Different strokes. Bon Apetit!
Gail..
what a way with words. You come across as so angry.
BTW, depending on where in the U.S. you live, it is not uncommon for chili to be served over rice. I don’t care for it, but it is popular in various regions.
But back to the chili, perhaps you missed a step or your chili powder wasn’t fresh.
This is very, very good chili!
Maybe try it again….good luck.
Lisa
Gail,
For those with ulcerative colitis, and perhaps other medical issues, beans are a GI nightmare!! We loved finding a recipe without beans and complex flavorings.
As with any recipe, tweak it to your liking.
Good grief Gail. If you want beans in your chili, then add them. If you don’t want it served over rice, then don’t serve it over rice. If you knew this recipe was so “awful” why did you make it? My guess is that you just wanted something to complain about.
Very adaptable chili. And the tenderizing method was a game changing tip!