Florentine Cookies

This post may contain affiliate links. Read my full disclosure policy.
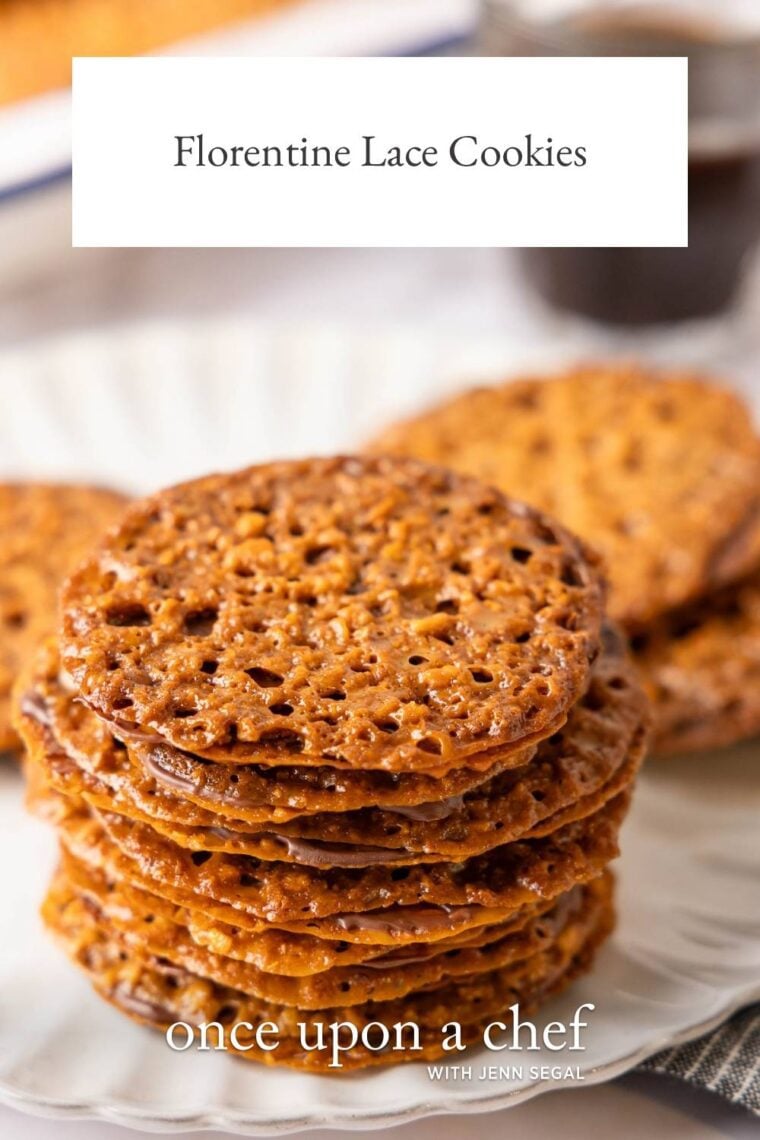
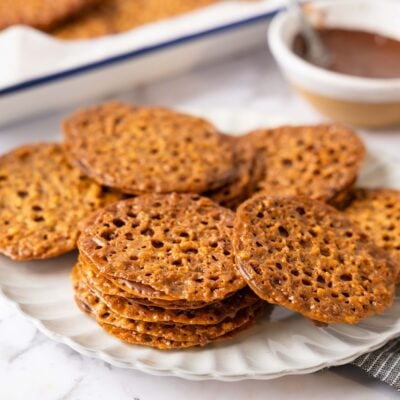
Florentine cookies have a delicate, lacy look and a buttery, caramelized flavor—plus a layer of chocolate that makes them even better.
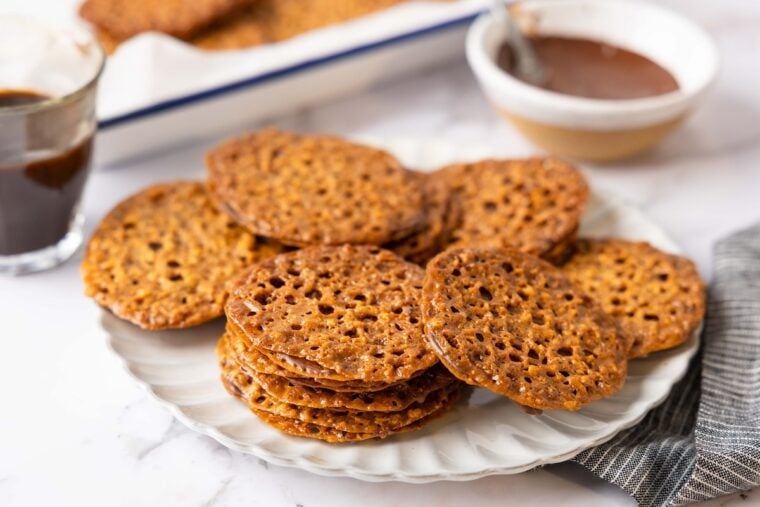
Florentine cookies, sometimes called lace cookies, are one of those treats that feel special the minute they come out of the oven. Made primarily from finely chopped almonds, butter, and brown sugar, they bake up ultra-thin with a toffee-like flavor that’s hard to beat. Then comes the best part: sandwiching them with melted chocolate, which adds richness and makes them much easier to handle (they’re delicate!).
I like to use a mix of milk and bittersweet chocolate for the filling; the combination keeps the flavor well-balanced and lets the cookie itself shine. Florentines are a always a hit on a holiday cookie tray, and they keep beautifully, which makes them ideal for gifting or making ahead.
What You’ll Need To Make Florentine Cookies

You’ll need slivered almonds, butter, brown sugar, corn syrup, salt, vanilla, flour, milk chocolate, and bittersweet chocolate. See the recipe card for precise measurements.
Step-By-Step Instructions
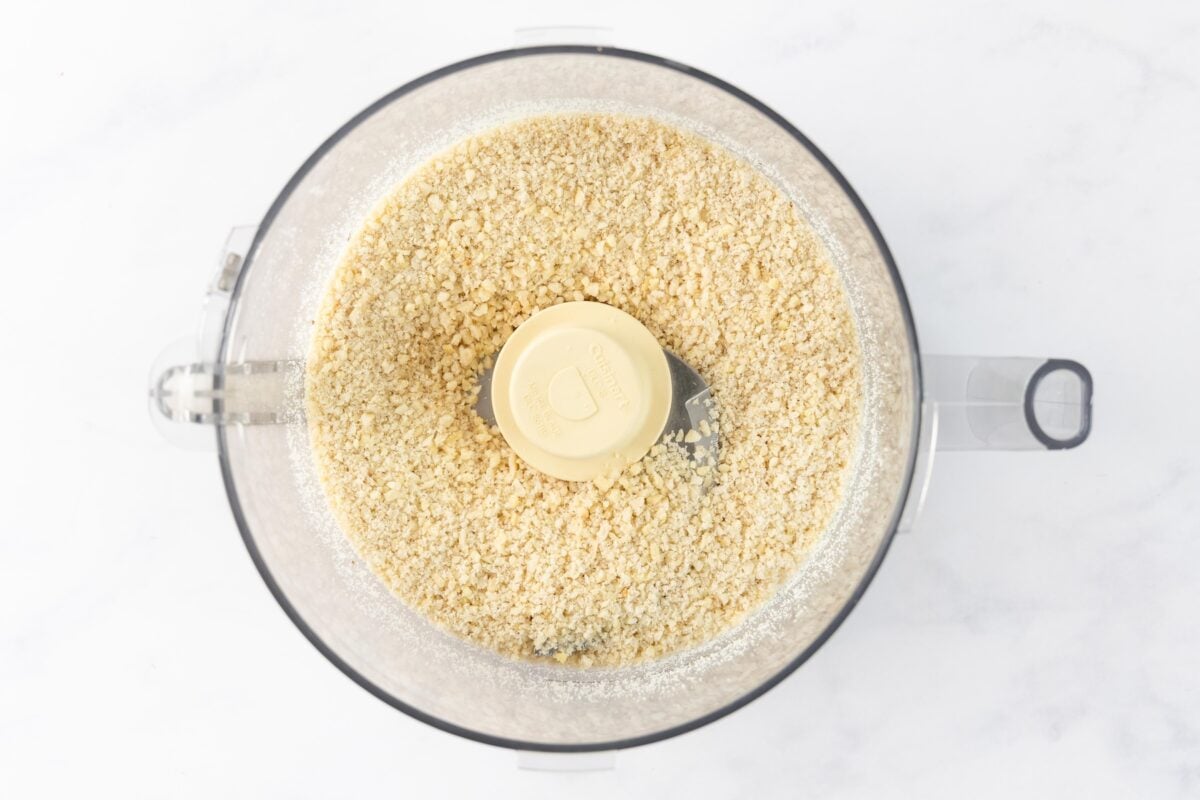
Step 1. Chop the almonds. Place the almonds in a food processor with the metal blade and pulse until finely chopped and crumb-like (between almond flour and very fine nuts; don’t let it turn pasty).
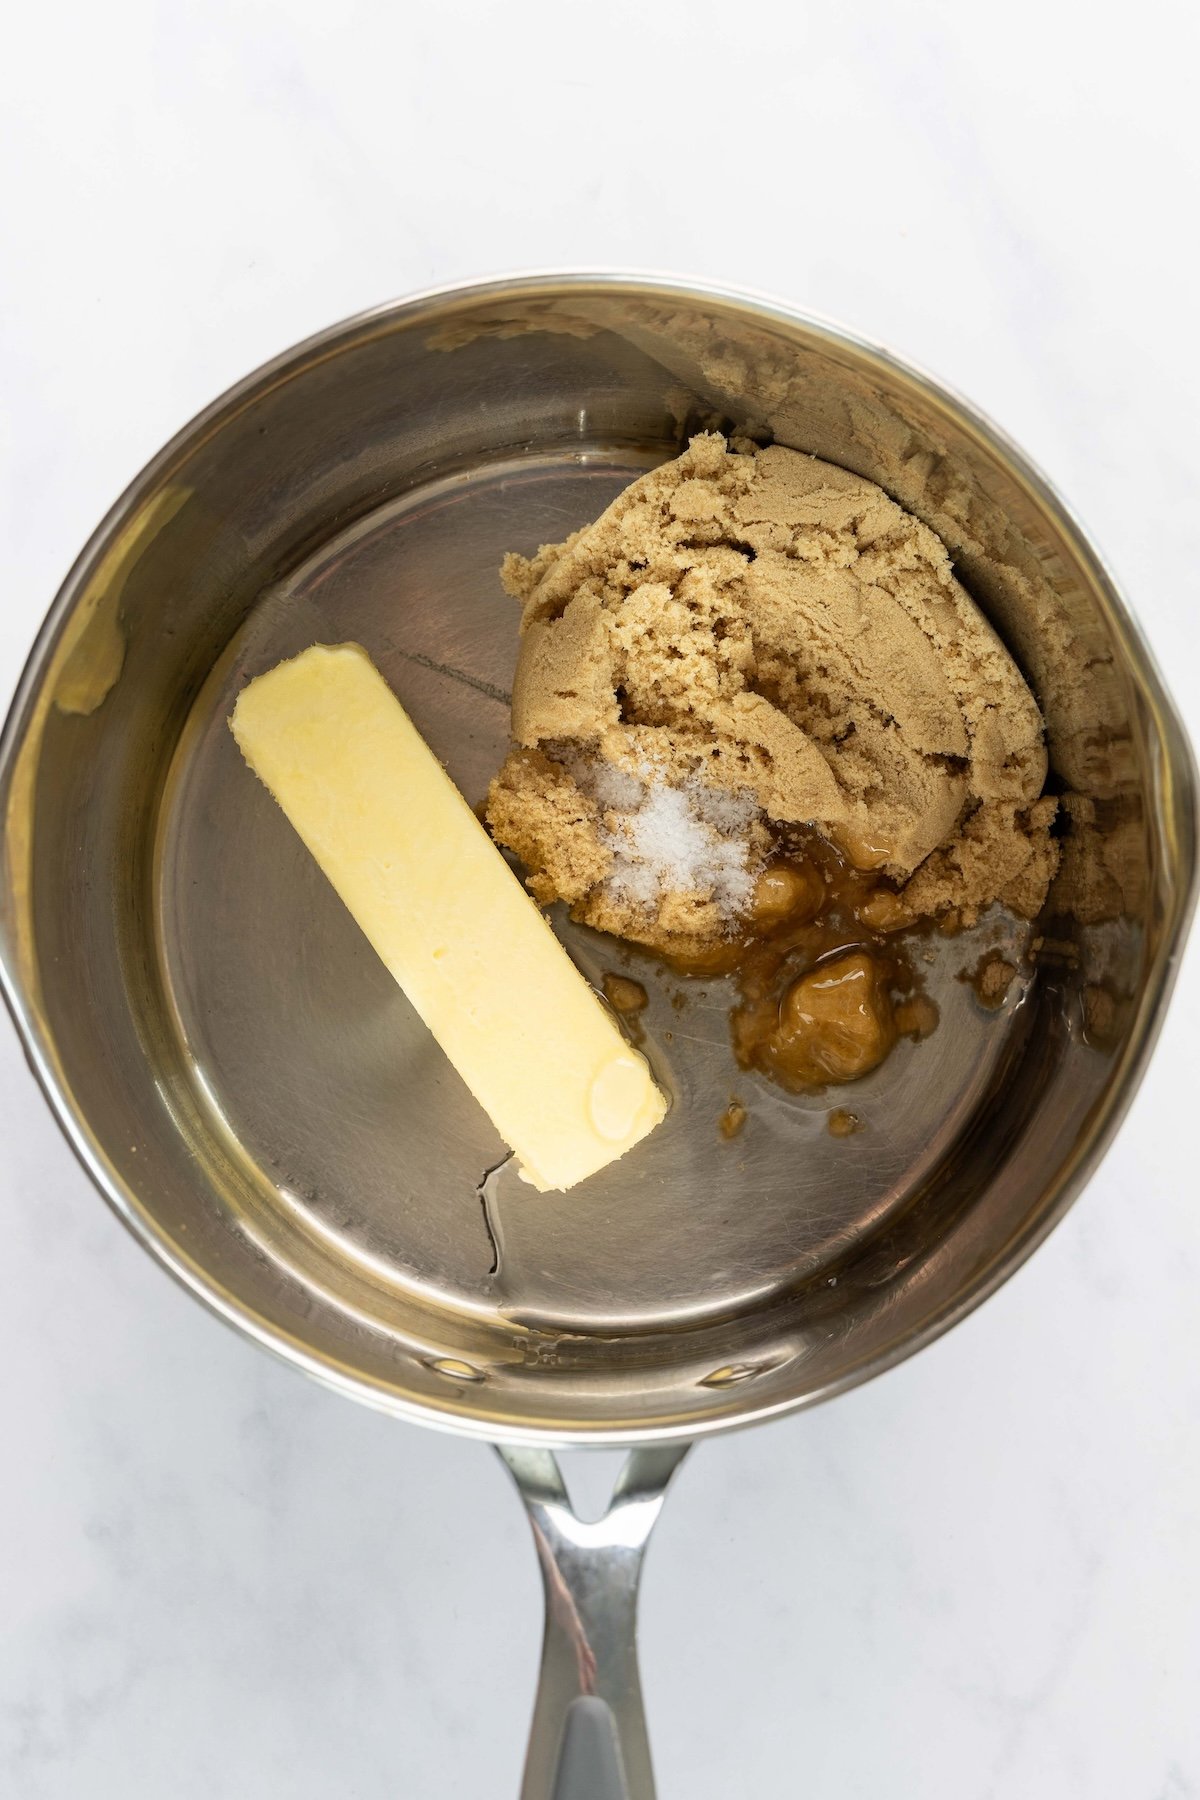
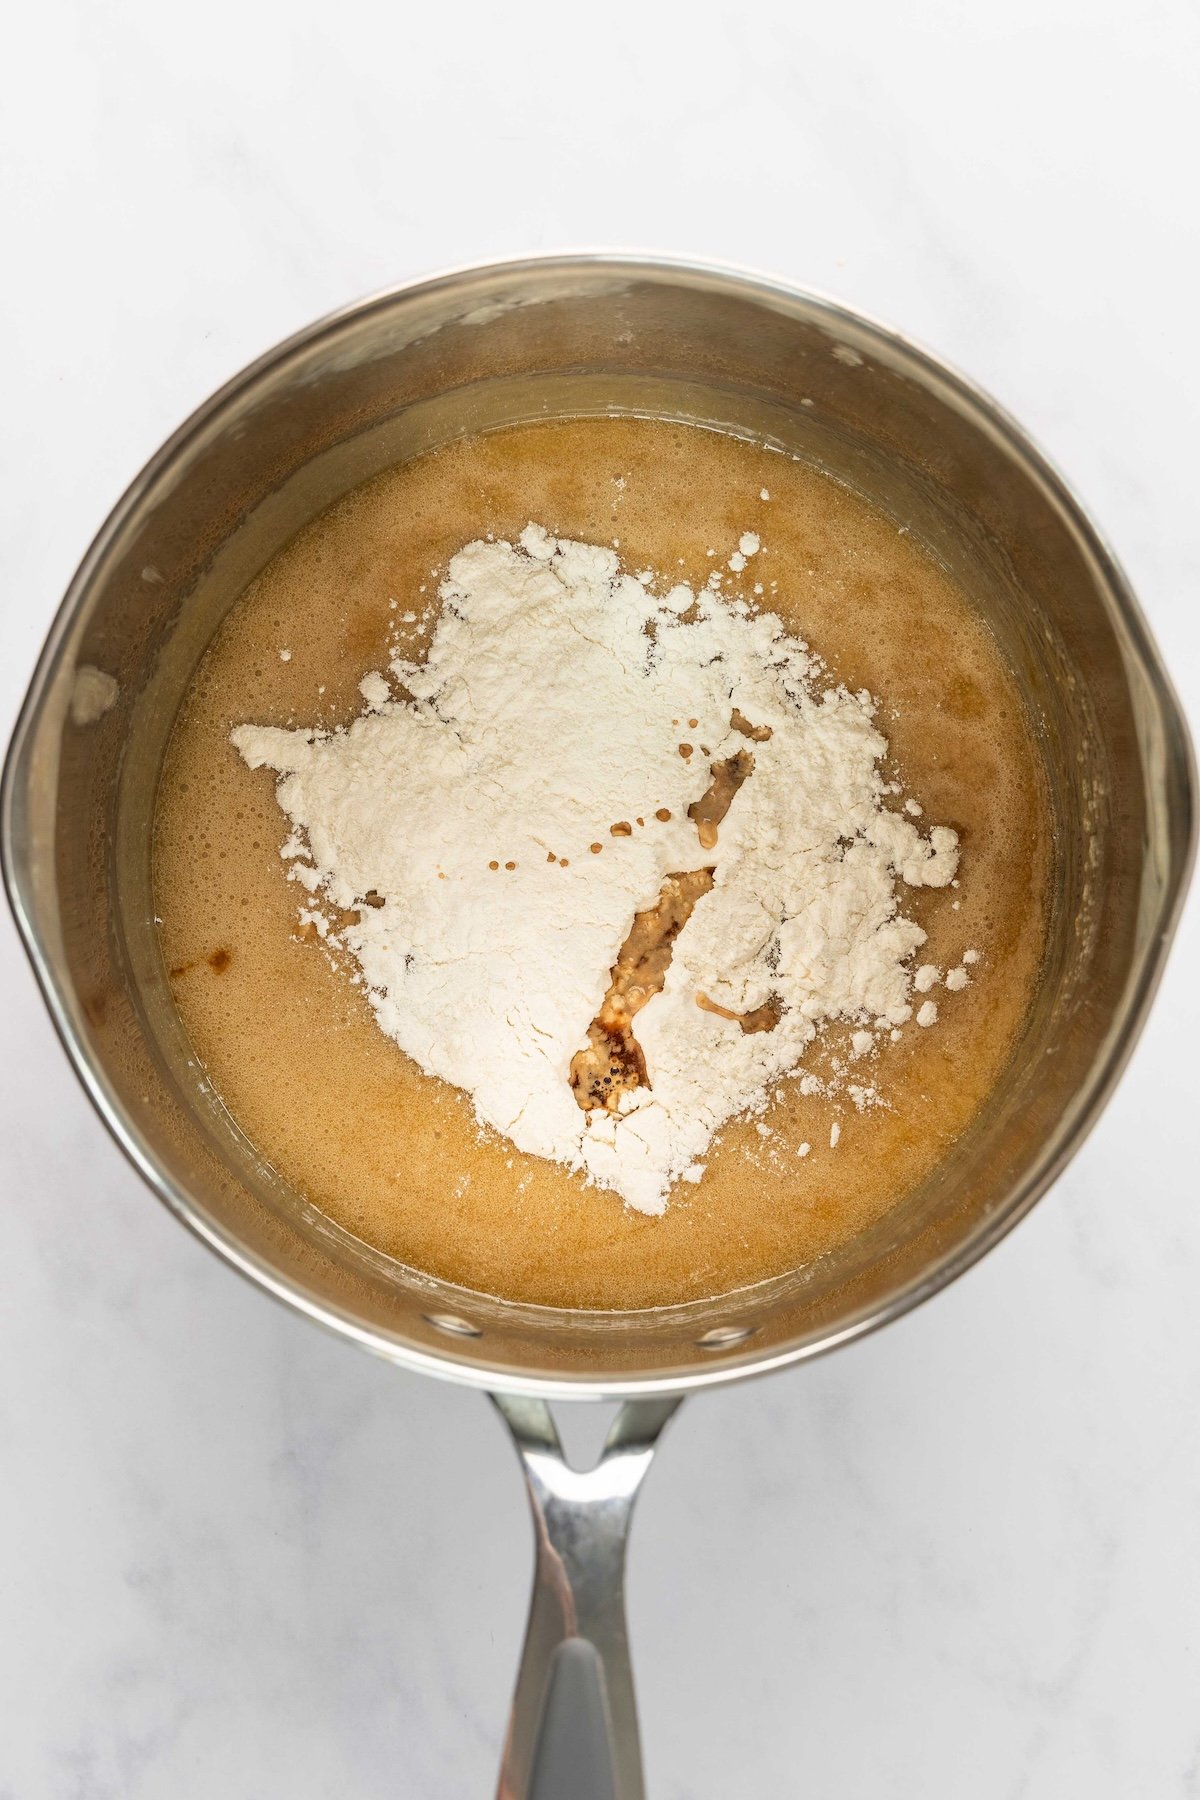
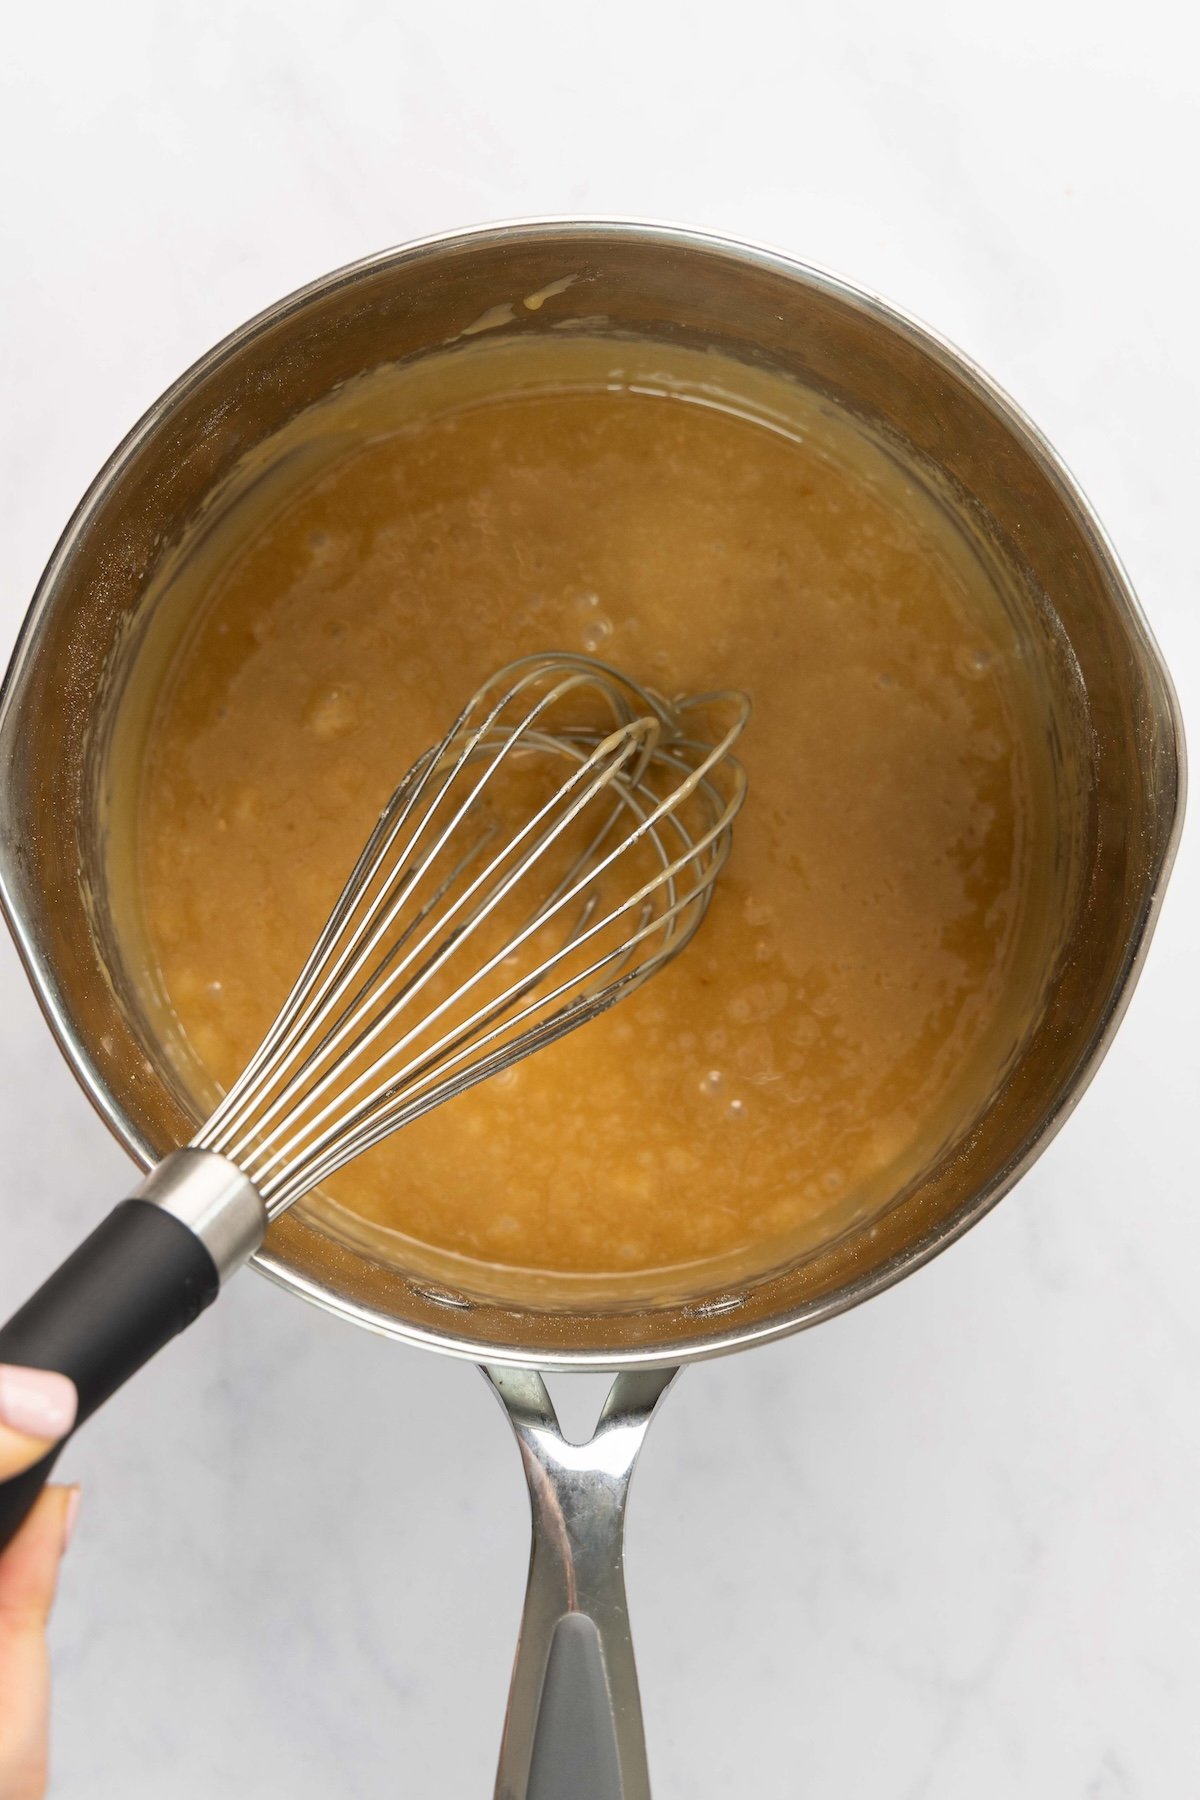
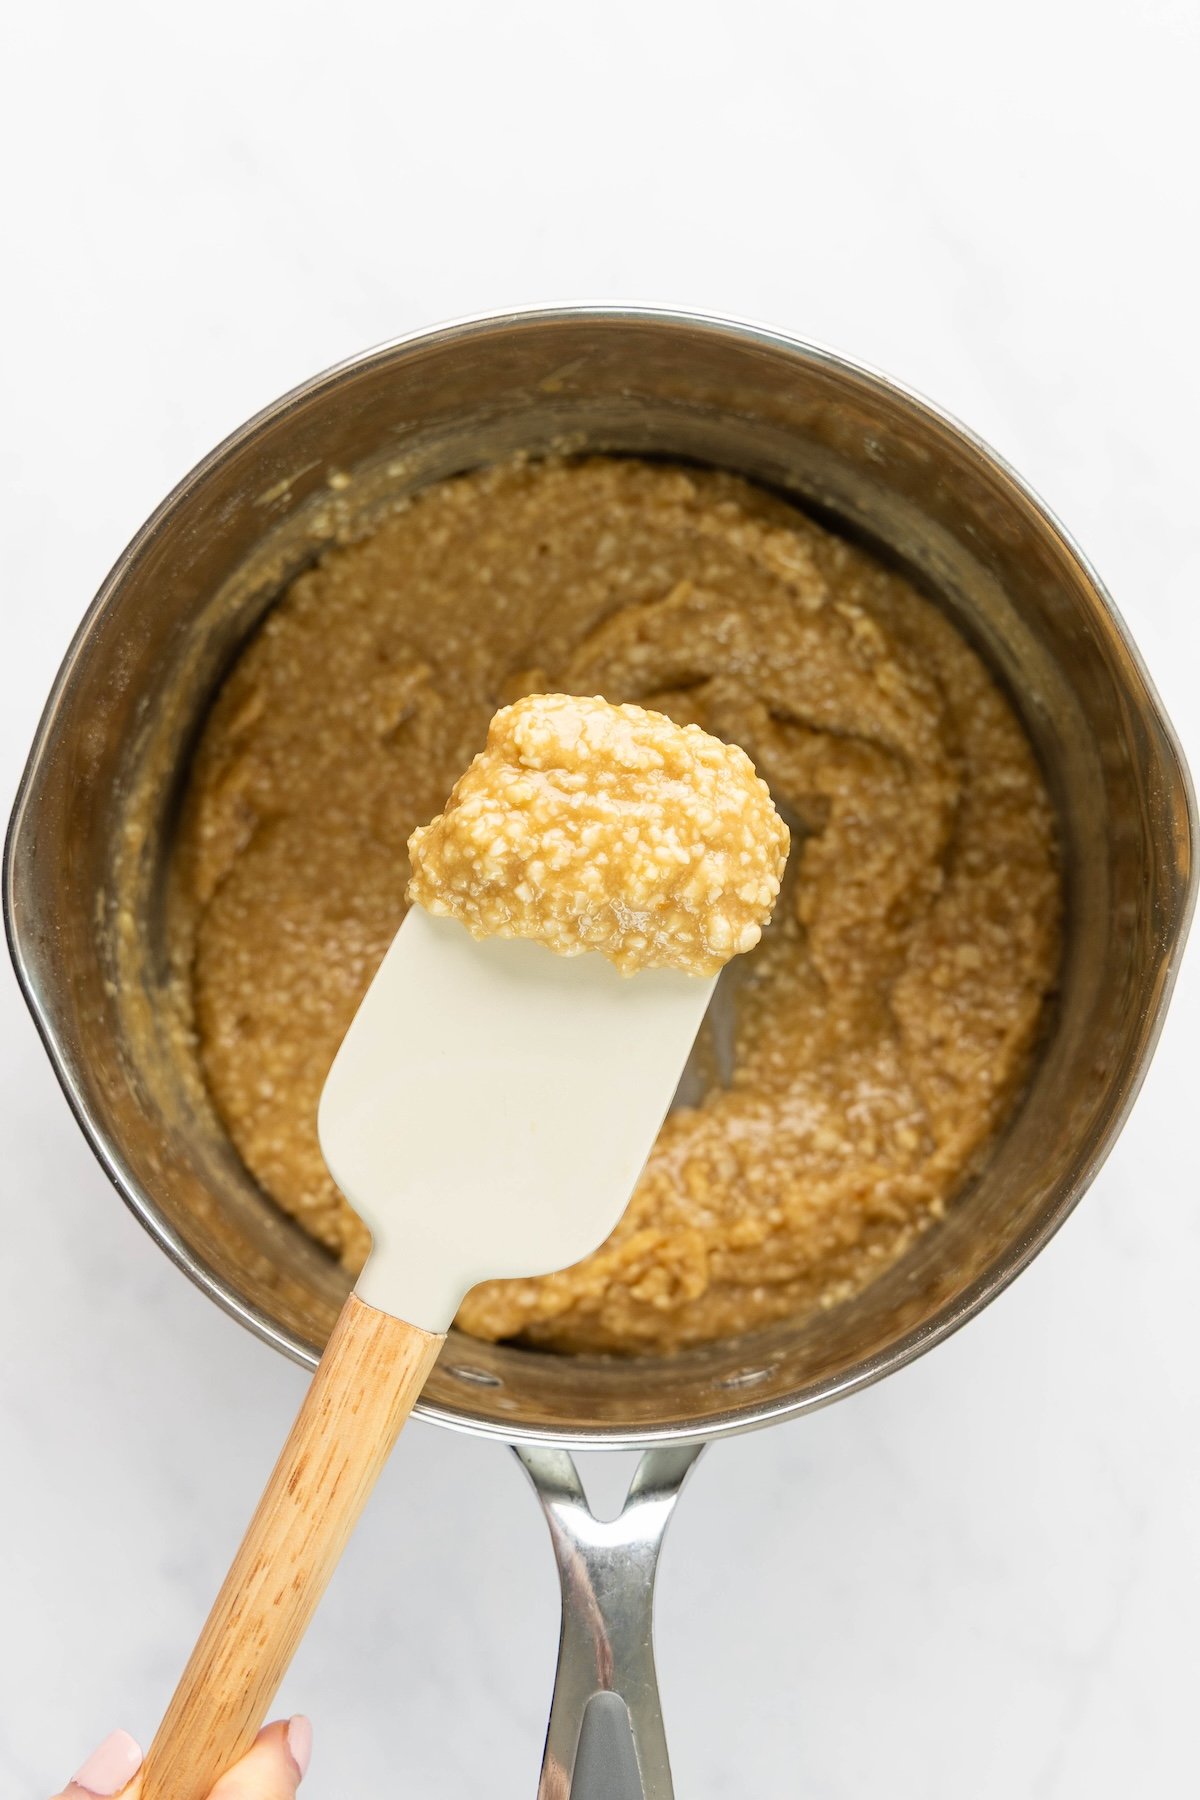
Step 2. Prep the Base. In a medium saucepan, combine the butter, brown sugar, corn syrup, and salt. Set over medium heat and bring to a boil, stirring occasionally, until the sugar dissolves. Whisk in the vanilla and flour until smooth, then stir in the chopped almonds with a spatula.
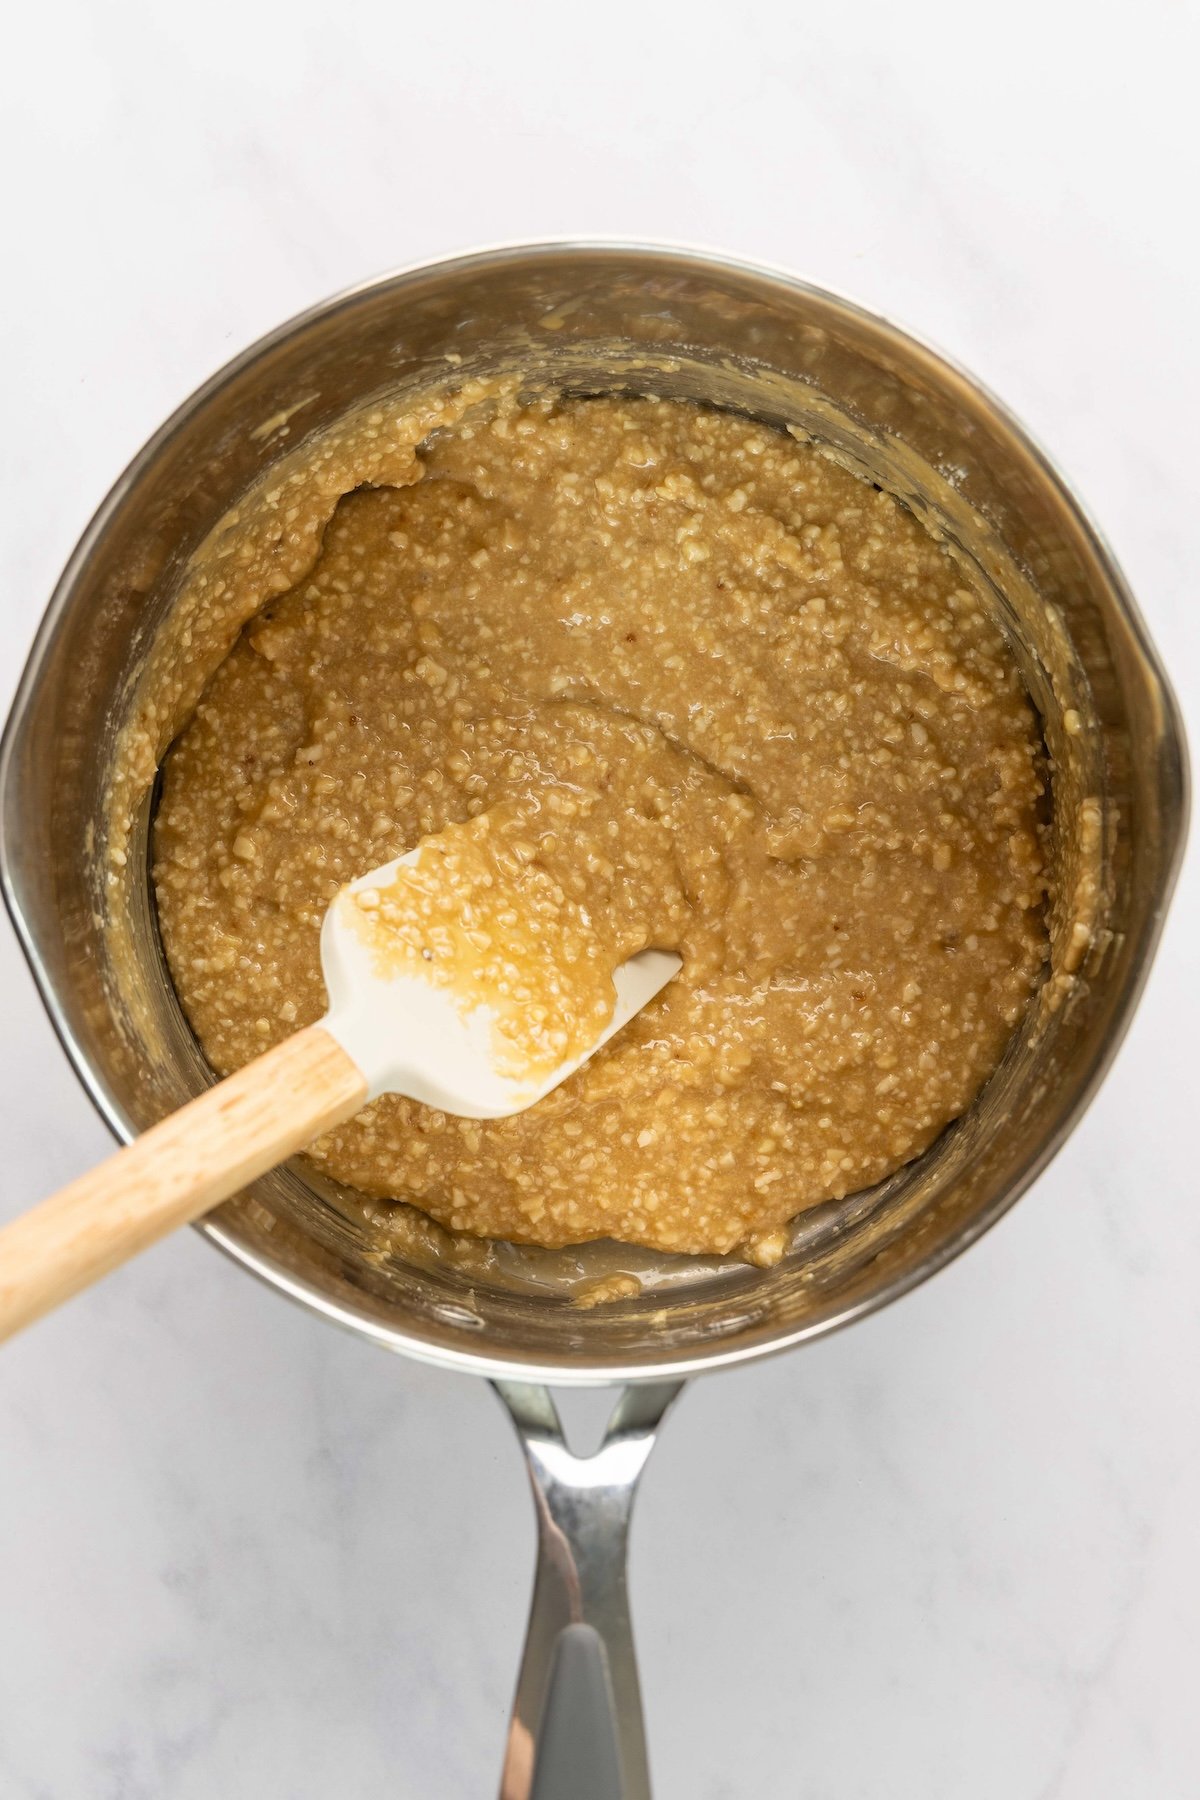
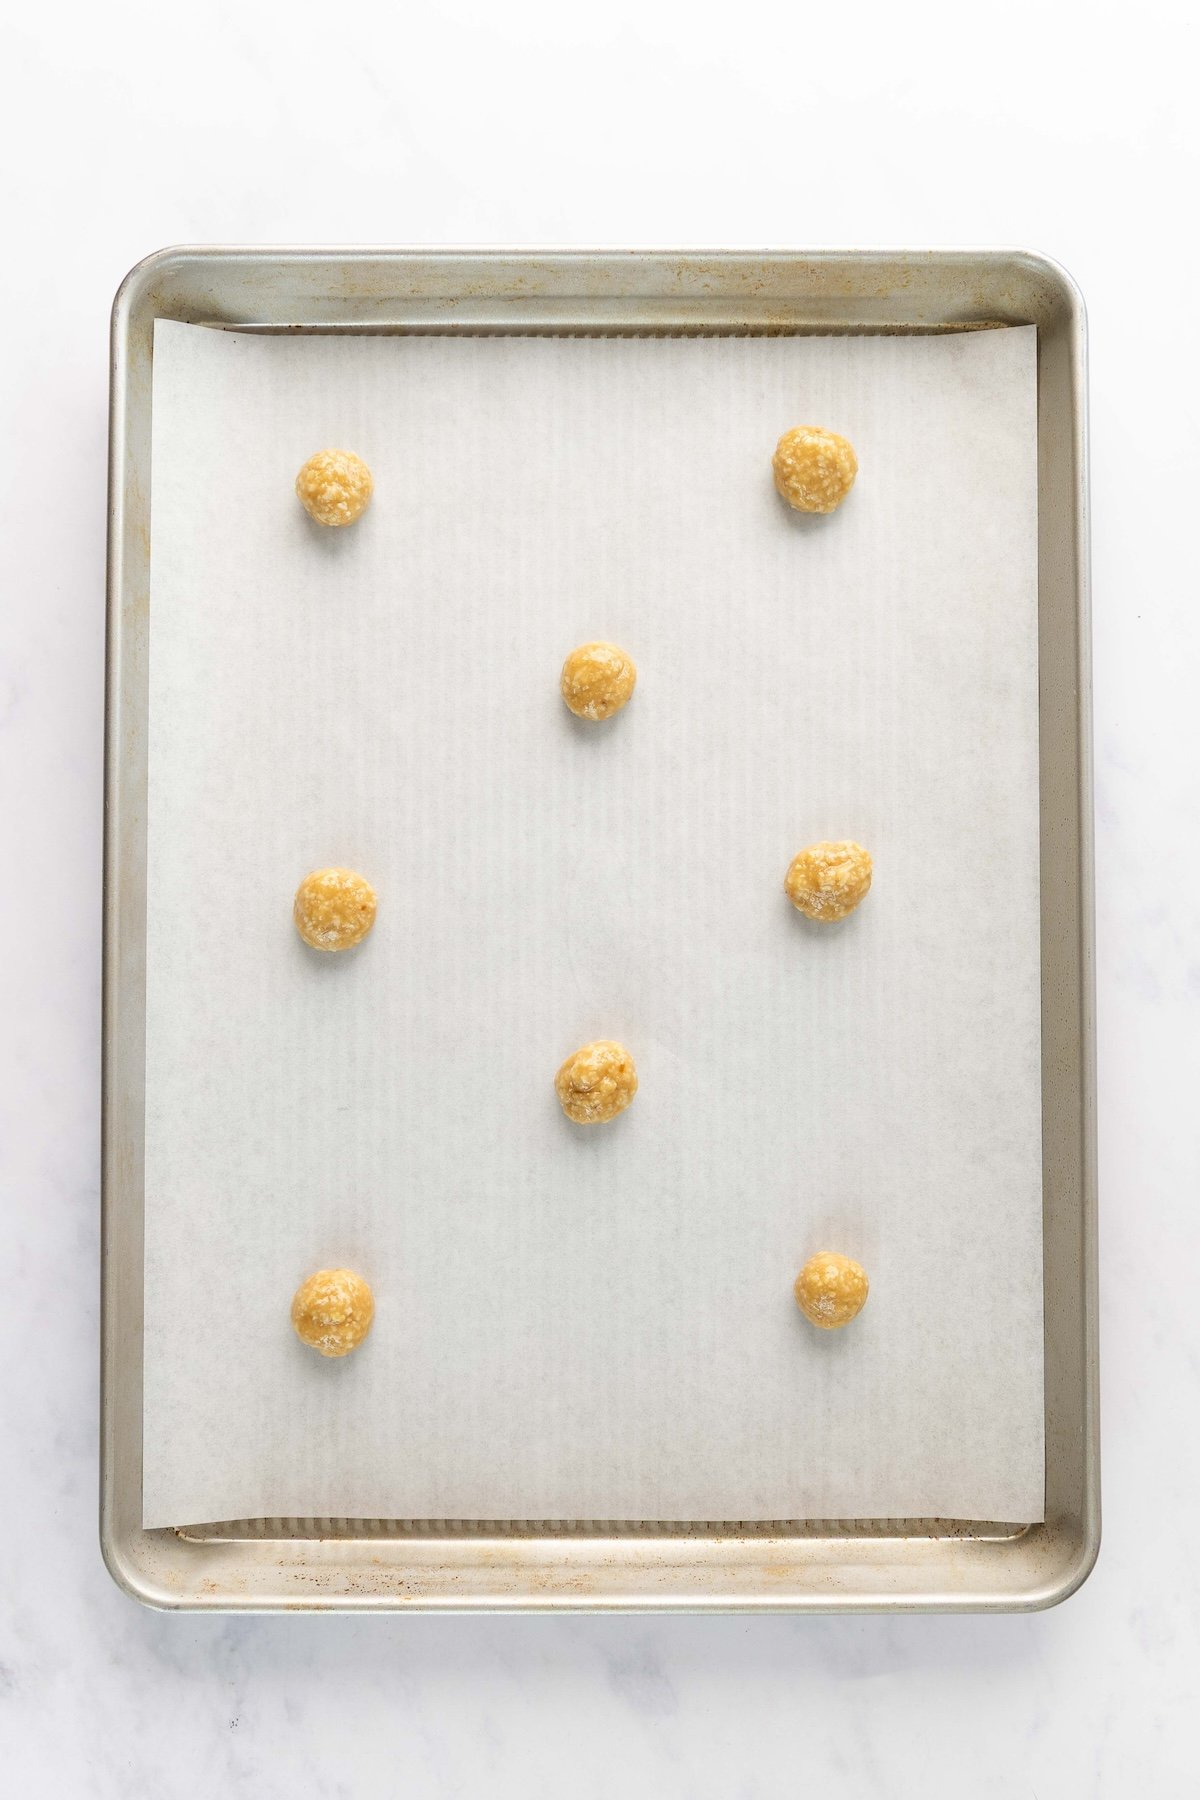
Step 3. Cool and portion. Remove from the heat and let sit 20 to 30 minutes to cool and thicken slightly. Drop 1½-teaspoon portions onto a parchment-lined baking sheet, spacing about 3 inches apart (8 per sheet). Shape edges into neat rounds.
Pro Tip: Think “tiny.” It’s tempting to make bigger scoops, but small is the sweet spot—anything larger than 1½ teaspoons can turn into one giant cookie. If a cookie spreads unevenly while baking, use a spoon to nudge the edges back into a neater circle right as it comes out of the oven (you’ve got 10 to 15 seconds before it firms up).
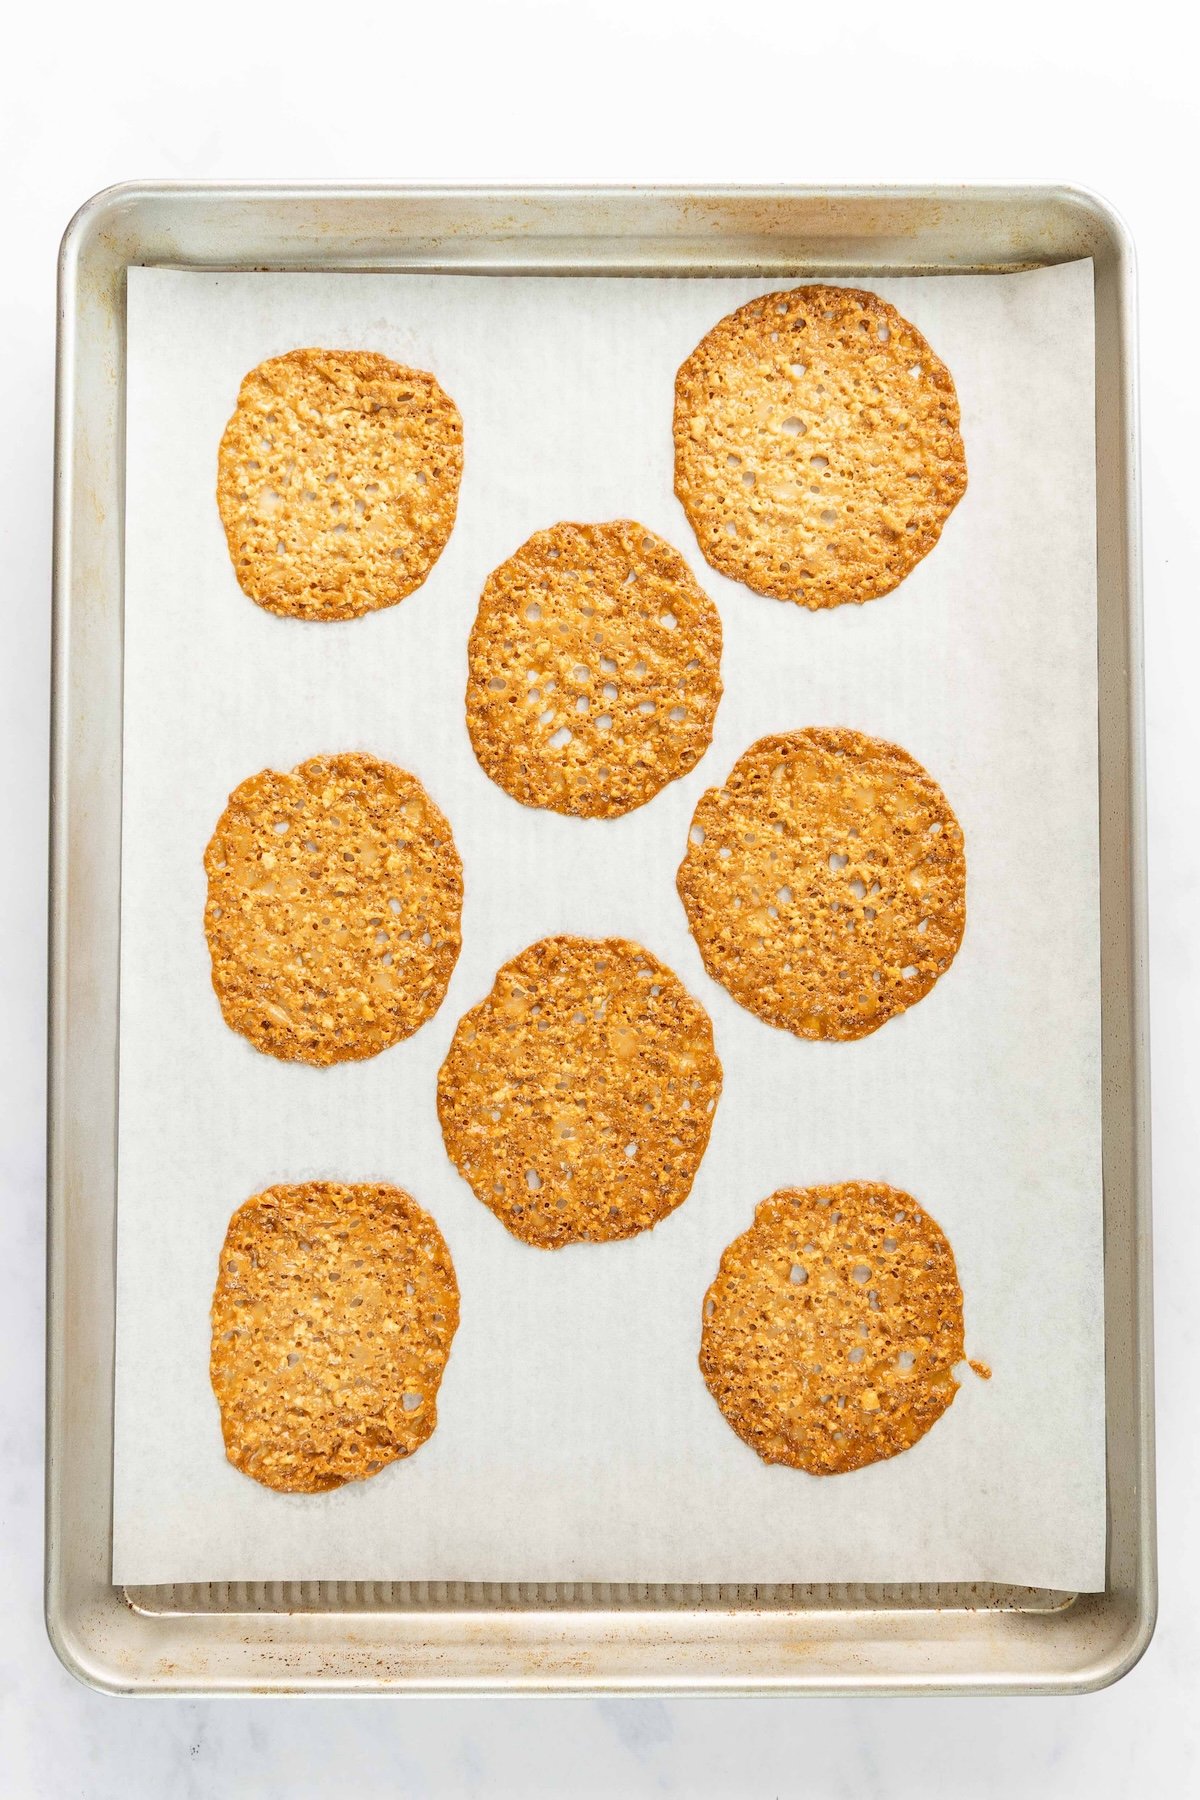
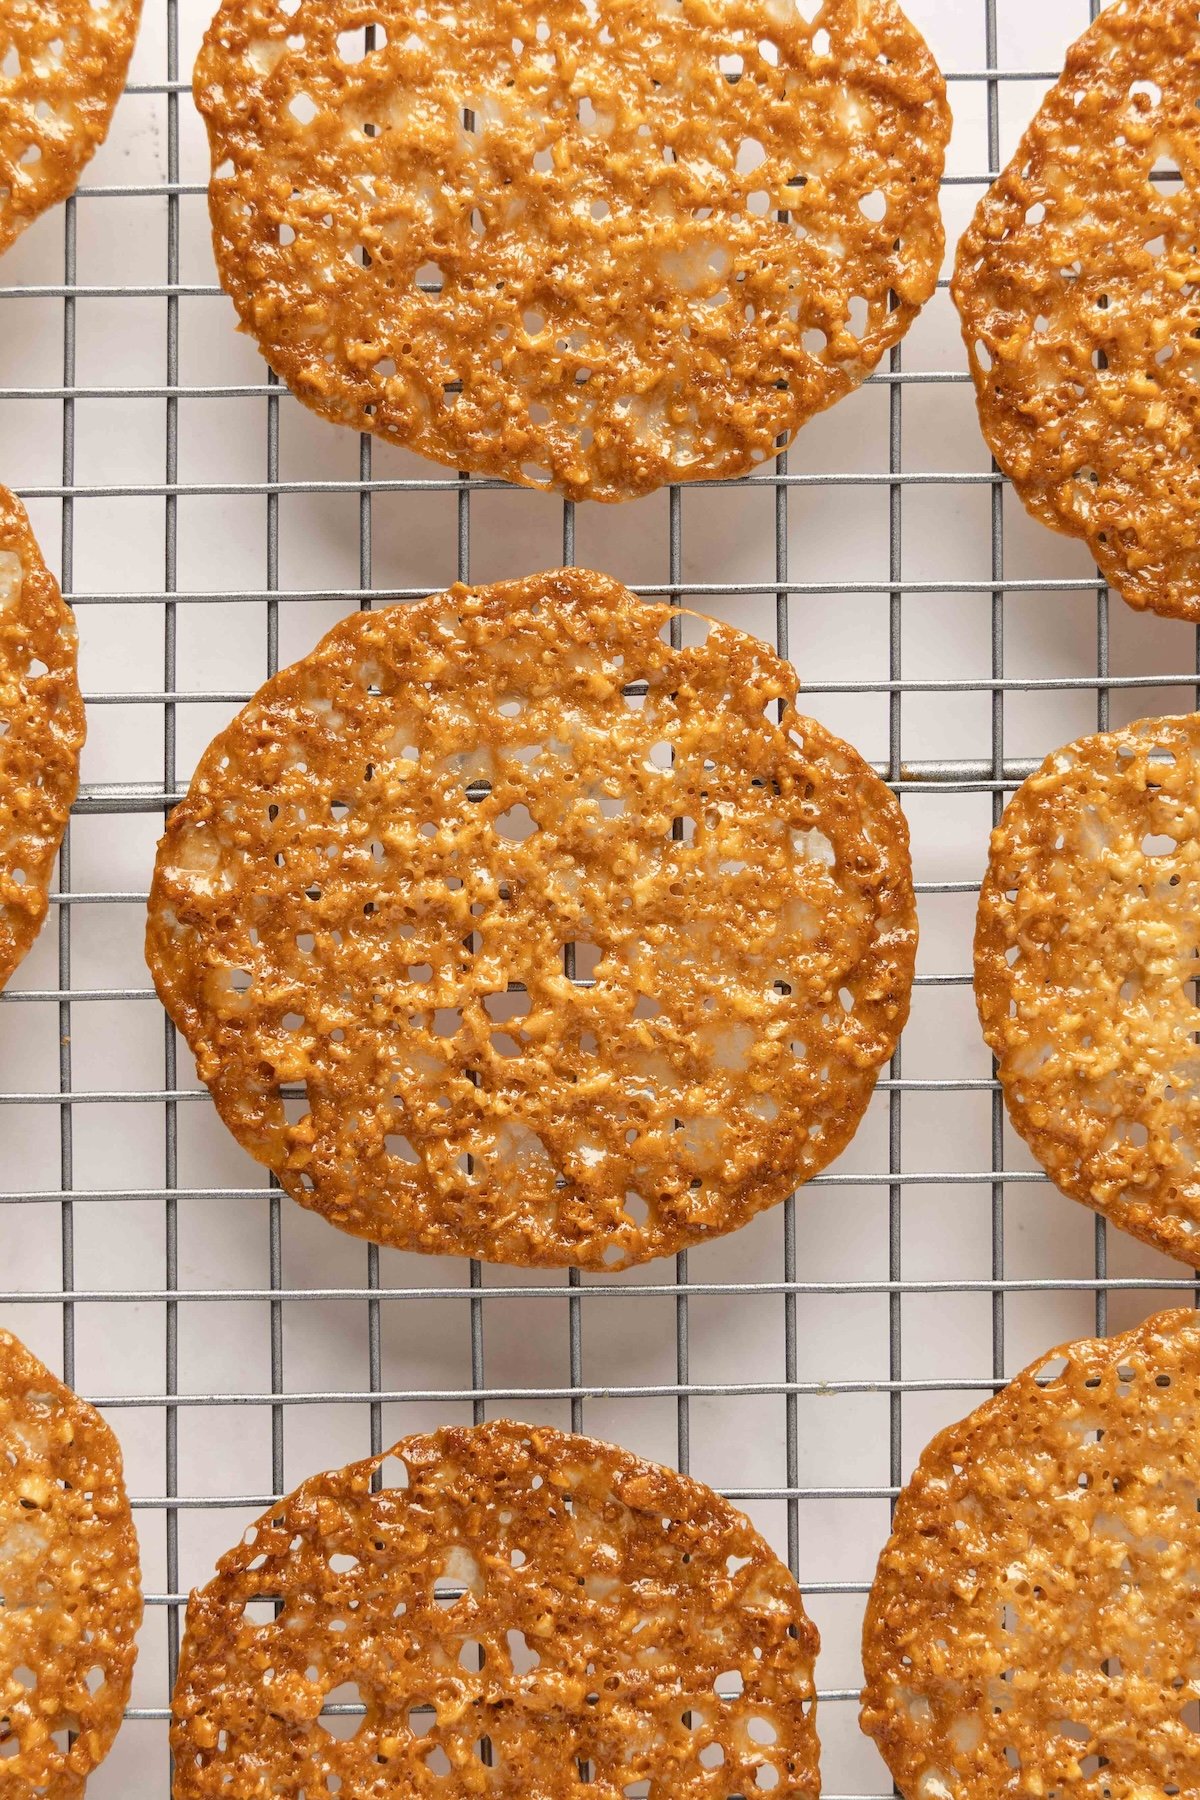
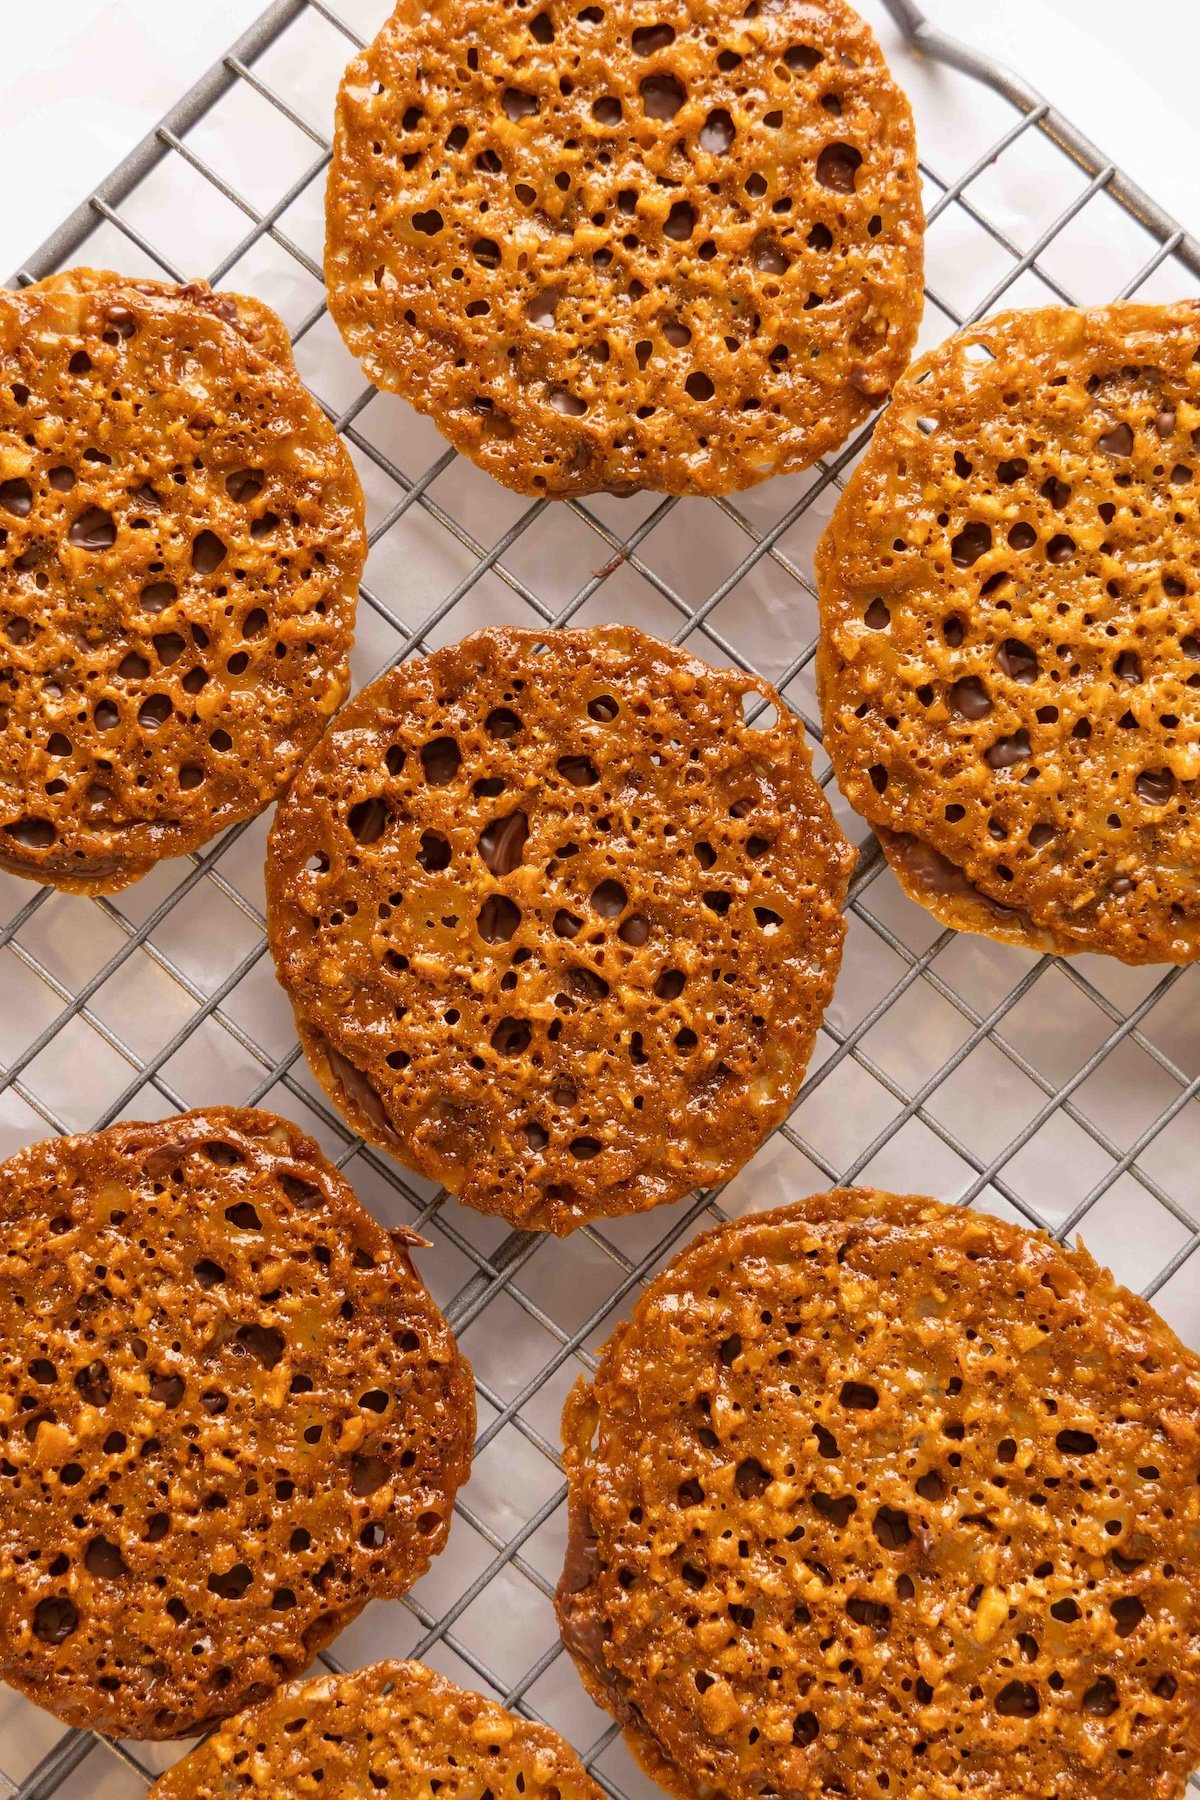
Step 4. Bake and cool. Bake at 350°F for 8 to 11 minutes, until evenly golden with a butterscotch color. Slide the parchment onto the counter to cool. Once crisp, about 5 minutes, gently peel off and transfer to a rack. Repeat with remaining batter.
Pro Tip: For the most even results, bake one sheet at a time. These cookies are delicate and need steady heat to brown and spread evenly. If you really want to bake two sheets at once, you can, but be sure to rotate the pans and swap oven racks halfway through. And if you’re baking one at a time, use the downtime to prep and portion the next batch so it’s ready to slide in.
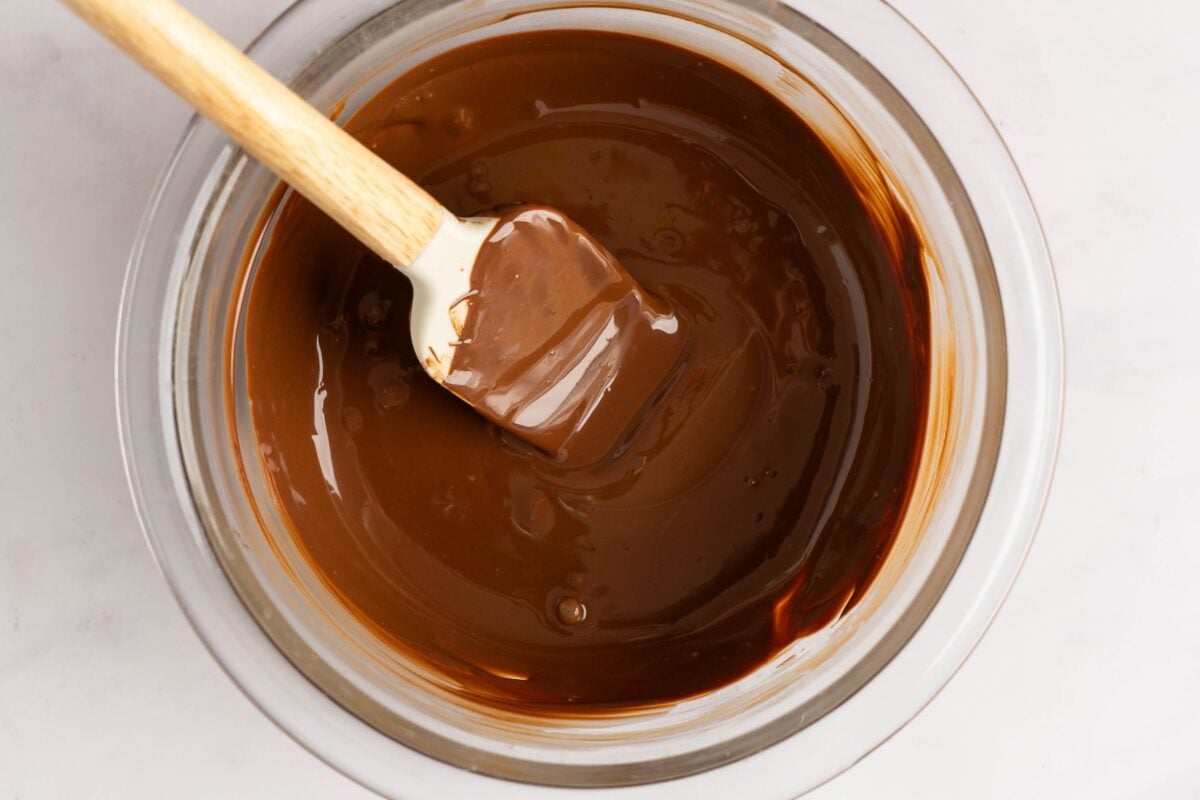
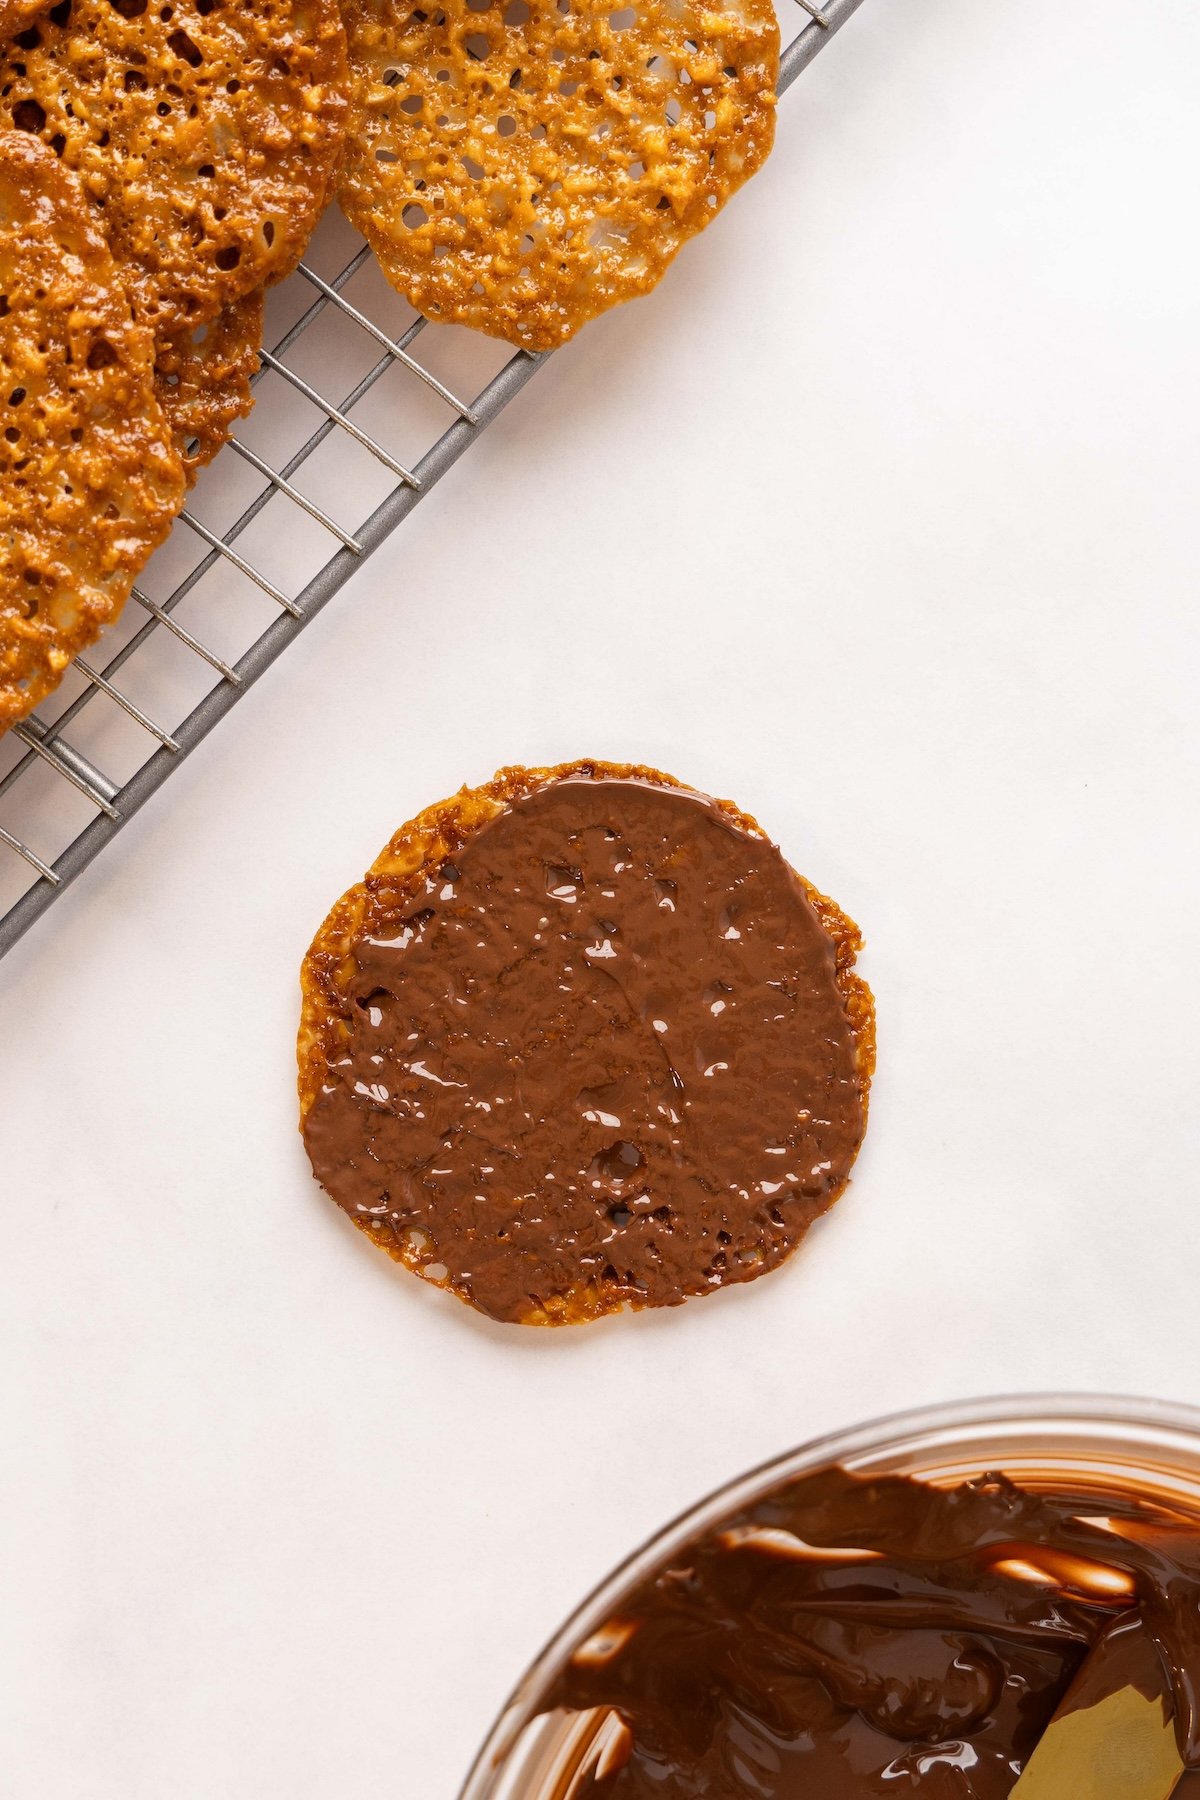
Step 5. Melt the chocolate. Place both chocolates in a small microwave-safe bowl. Microwave in 20-second bursts, stirring between each, until ~75% melted, then stir until fully smooth (residual heat finishes the job).
Step 6. Sandwich the cookies and let set. When the cookies are completely cool, spread a thin layer of chocolate on the flat side of one cookie and press another on top, flat-side down. Repeat. Let sit until the chocolate sets, about 30 minutes. They’re even better after a few hours or the next day, when they soften slightly to that crisp-but-not-brittle stage.
Pro Tips: Want perfectly even sandwiches? Match cookies in pairs before you start assembling—since each one spreads differently, this saves time, reduces breakage, and makes prettier sandwiches.
More Cookie Recipes You’ll Love


Florentine Cookies
Ingredients
For the Cookies
- 1½ cups slivered almonds
- ½ cup (1 stick) unsalted butter
- ⅔ cup (packed) light brown sugar
- ¼ cup light corn syrup
- Heaping ¼ teaspoon salt
- 1 teaspoon vanilla extract
- ¼ cup all-purpose flour, spooned into measuring cup and leveled-off
For the Filling
- 3 oz milk chocolate, chopped
- 3 oz bittersweet or semisweet chocolate, chopped
Instructions
- Preheat the oven to 350°F (175°C) and set a rack in the middle position. Line a baking sheet with parchment paper.
- Place the almonds in the bowl of a food processor fitted with the metal blade and pulse until finely chopped and crumblike. You want a texture somewhere between almond flour and finely chopped nuts—don’t let it turn pasty.
- In a medium saucepan, combine the butter, brown sugar, corn syrup, and salt. Set over medium heat and bring to a boil, stirring occasionally, until the sugar is dissolved. Whisk in the vanilla and flour until smooth, then stir in the chopped almonds with a spatula. Remove from the heat and let sit for 20 to 30 minutes to cool and thicken slightly.
- Drop 1½-teaspoon spoonfuls of batter onto the prepared baking sheet, spacing them about 3 in (8 cm) apart (you should fit 8 per sheet). These look like tiny mounds, but don’t be tempted to make them bigger—they spread a lot. Use your fingers to shape the edges into neat rounds.
- Bake for 8 to 11 minutes, until evenly golden with a rich butterscotch color—don’t let them get too dark. Slide the parchment off the baking sheet and onto the counter to cool. Once the cookies are crisp, about 5 minutes, gently peel them off the parchment and set on a rack to cool. Repeat with remaining batter.
- For the filling, place both chocolates in a small microwave-safe bowl. Microwave in 20-second intervals, stirring in between, until about 75% melted. Stir until completely smooth (the residual heat will finish the job—don’t overheat or the chocolate may scorch).
- Once the cookies have cooled completely, hold one cookie in your hand and spread a thin layer of melted chocolate over the flat side. (The chocolate may poke through the holes—that’s totally fine.) Top with another cookie, flat-side down, and press gently to sandwich. Do your best to match the cookies in size and shape, but don’t make yourself crazy over it; it won’t matter much in the end. Repeat with the remaining cookies.
- Let sit until the chocolate is set, about 30 minutes. The texture is best after a few hours—or even the next day—when the cookies soften slightly to that perfect crispy-but-not-brittle stage.
Notes
Nutrition Information
This website is written and produced for informational purposes only. I am not a certified nutritionist and the nutritional data on this site has not been evaluated or approved by a nutritionist or the Food and Drug Administration. Nutritional information is offered as a courtesy and should not be construed as a guarantee. The data is calculated through an online nutritional calculator, Edamam.com. Although I do my best to provide accurate nutritional information, these figures should be considered estimates only. Varying factors such as product types or brands purchased, natural fluctuations in fresh produce, and the way ingredients are processed change the effective nutritional information in any given recipe. Furthermore, different online calculators provide different results depending on their own nutrition fact sources and algorithms. To obtain the most accurate nutritional information in a given recipe, you should calculate the nutritional information with the actual ingredients used in your recipe, using your preferred nutrition calculator.
Great recipe. Thanks! It works well with gluten-free flour. I look forward to trying it with regular flour as it probably will taste even better.
Excellent! I had to hide them so we would have some for Christmas Day.
Dinner and dessert were a hit between your classic lasagna recipe (everyone raved over the meat sauce). The Florentine cookies, your Linzer tarts, crumb cake and chocolate crème pie recipes.
You made our Christmas!!
Thank you so much.
Your recipes never fail.
Hope you had a wonderful holiday.
❣️
Easy recipe for a novis like myself. As you suggested I did one pan at a time and the first two batches came out nice and round, almost like your pictures. I reused the parchment and that was definitely a mistake because the fat left over from the first batch allowed the batter to spread unevenly and I ended up with 2 trays of Florintines shaped like all the countries of the world LoL
Jenn, I have been looking for a recipe like this and was so glad to see it shining “NEW” on your homepage! They are delicious and will absolutely go into my “Holiday Cookie Favorites” collection.
I’m also a big fan of darker chocolate, so I skipped the milk chocolate and substituted for dark. Chocolate chips work well and I upped the quantity from 3 oz to 4 oz for each type. In my oven, 9 minutes was the perfect amount of baking time. The cookies definitely continue to get more golden right out of the oven. I also found that a few of my cookies broke, so I’d call this a solid 24 (2 dozen) sandwich cookie recipe.
Tips:
1.) I found that setting up the assembly line is important to keep the batches baking and cooling.
2.) You will want to work quickly as the batter hardens quickly after 20 minutes of cooling. I scooped with a teaspoon and rolled all the dough onto one piece of parchment paper and then transferred 8 to each parchment lined baking pan.
3.) I needed to loosen up some of the dough, so I put it back on the stovetop on low and used a spatula to capture the remaining batter.
4.) After baking, transferring the parchment paper to a cool counter immediately is important to keep them flat (which is helpful when you make them into sandwiches).
These take a fair amount of time and TLC as they are delicate, but they are so worth it! I wonder if doubling the recipe makes good sense since these can be frozen.
Jenn, do you think you could make mini/bite-size versions of these? (Maybe use 1/2 the batter? If so, would you cut the cooking time?)
Hi Ellen, so glad you enjoyed these! Yes, I think you could make mini versions of these, and that the bake time would be a touch shorter. I’d love to hear how they come out!
I made these for a Christmas dinner dessert to pair with your egg nog. They are delicious, but definitely delicate! I accidentally broke several, so I didn’t quite get to 30 sandwich cookies (keep that in mind if you need a specific amount). Some also spread into weird shapes, not perfect discs (my fault, I’m sure!). Certainly doesn’t affect taste, just the aesthetics. I think it might have been because I used pre-cut parchment paper that was folded. I think the creases in the paper made the cookies spread differently. All in all, definitely a unique and worthy cookie! Thanks, Jen, for your amazing recipes! Merry Christmas!
Hello and thank you for all your fantastic recipes
Do you think it would be fine to sub with pecans or even walnuts?
TYIA
Thanks for your nice words about the recipes – so glad you like them! I haven’t tried the cookies with pecans or walnuts, but I think it should work. Please LMK how they come out if you try it!
These are amazing! I rarely see these on anyone’s cookie tray, but they will be on mine this year, thanks to you! I took samples to work with me and everyone was raving about how yummy they were! Thank you for another great recipe Jen!
I have not tried this recipe, although, it sounds wonderful. I have been making these cookies for years. The proper recipe helps but experience and technique is key. I was determined to make these cookies, the one everyone wants extra of when getting the mix of holiday cookies at the bakery. My recipe calls for almond flour instead of AP flour but I am excited to try this one. I also just dip or gently spread chocolate on one side of the cookie and leave them single, this can be tricky. They must be handled gently as they can be very fragile.
Could this be made gluten free using almond flour or gluten free flour in lieu of all purpose flour? Thank you. I look forward to making these cookies.
Hi Diana, I think it would work best with gluten-free flour. Please LMK how they turn out if you try it. 🙂
Yes, please let us know. I also have a gluten-free person in my family.
Also, can I substitute maple syrup for the corn syrup, which I never have around?
Thanks for all your delicious recipes, Jennifer!
Hi Anne, Corn syrup plays a structural role in Florentines, not just a sweetening one. It helps create that smooth, glossy caramel base that lets the cookies spread evenly and bake up thin and lacy. I worry that maple syrup may cause the cookies to spread unpredictably, brown too quickly, or turn soft and sticky instead of crisp. Sorry!
Thanks for your detailed response. Happy holiday!
I was just wondering if you couldn’t put chocolate squares in between each cookie while the cookies are still hot to melt the chocolate. I’m excited to try these.
Oh, never mind, I see the photo😊
Thank you for sharing another one of your wonderful recipes! These look amazing! Can I use sliced almonds instead of slivered? I look forward to trying these.
Sure, Janet, that should be fine. Enjoy the cookies!