Perfect Pumpkin Pie

This post may contain affiliate links. Read my full disclosure policy.
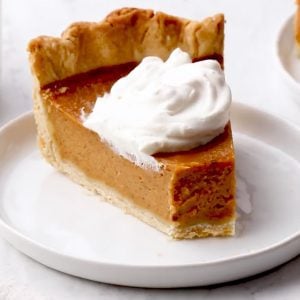
If you’re looking for a pumpkin pie that sets beautifully, tastes absolutely delicious, and always gets a “wow,” this recipe delivers every time.

Pumpkin pie is a Thanksgiving classic, and when it’s made well, it’s hard to beat—a silky, warmly spiced pumpkin filling baked into a flaky, buttery crust. But for a dessert that seems so simple, pumpkin pie can be surprisingly finicky. Over the years, I’ve tried dozens of recipes and run into just about every issue: fillings that won’t set, unsightly cracks, and soggy crusts. Let’s just say the person who coined the phrase “easy as pie” had clearly never baked a pumpkin pie!
The good news is that all that testing paid off. This pumpkin pie recipe checks every box: a crisp, sturdy crust, a smooth, rich filling, and no cracks. And the best part? It’s truly easy to make.
If you’re planning your dessert lineup for the holidays, don’t miss my pecan pie, sweet potato pie, or apple crisp—they’re all wonderful alongside this pumpkin pie.
“I’ve been baking pumpkin pie for what seems like an eternity. The custard always cracks. Not this time…it’s absolutely delicious!”
What You’ll Need To Make Homemade Pumpkin Pie
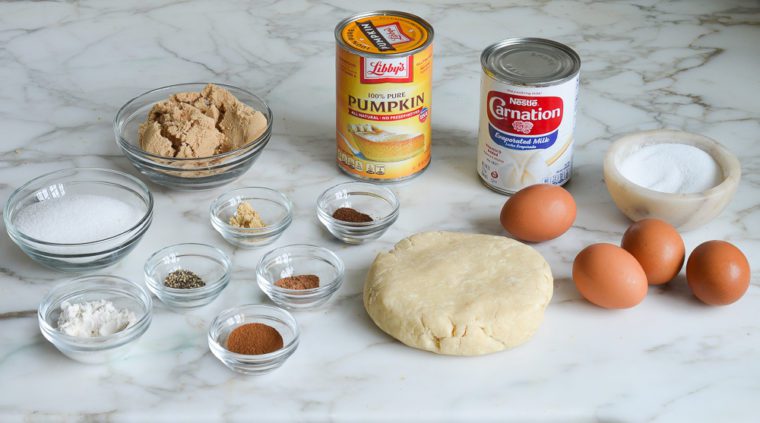
- Pie Crust – Use a homemade pie crust or store-bought—whichever you prefer. If using store-bought, opt for the frozen kind in an aluminum pie pan; it’s easier to blind bake and less likely to shrink.
- Pumpkin – Adds rich flavor and a smooth texture. For the best results, go with Libby’s canned pumpkin puree.
- Egg & egg yolks – The whole egg binds the filling, while the yolks bring extra richness and a silky texture.
- Granulated sugar & Light brown sugar – A combination of sugars adds complex sweetness; the brown sugar lends a deeper, molasses-like flavor.
- All-purpose flour – Slightly thickens and stabilizes the filling to prevent unsightly cracks.
- Spices (ground cinnamon, ginger, nutmeg, cloves, black pepper) – This classic pumpkin pie spice blend gives the dessert its warm, signature flavor, with just a hint of heat from the black pepper.
- Evaporated milk – Makes the filling creamy and smooth, giving the pie a luscious, velvety texture.
- Jump to the printable recipe for precise measurements
Step-By-Step Instructions
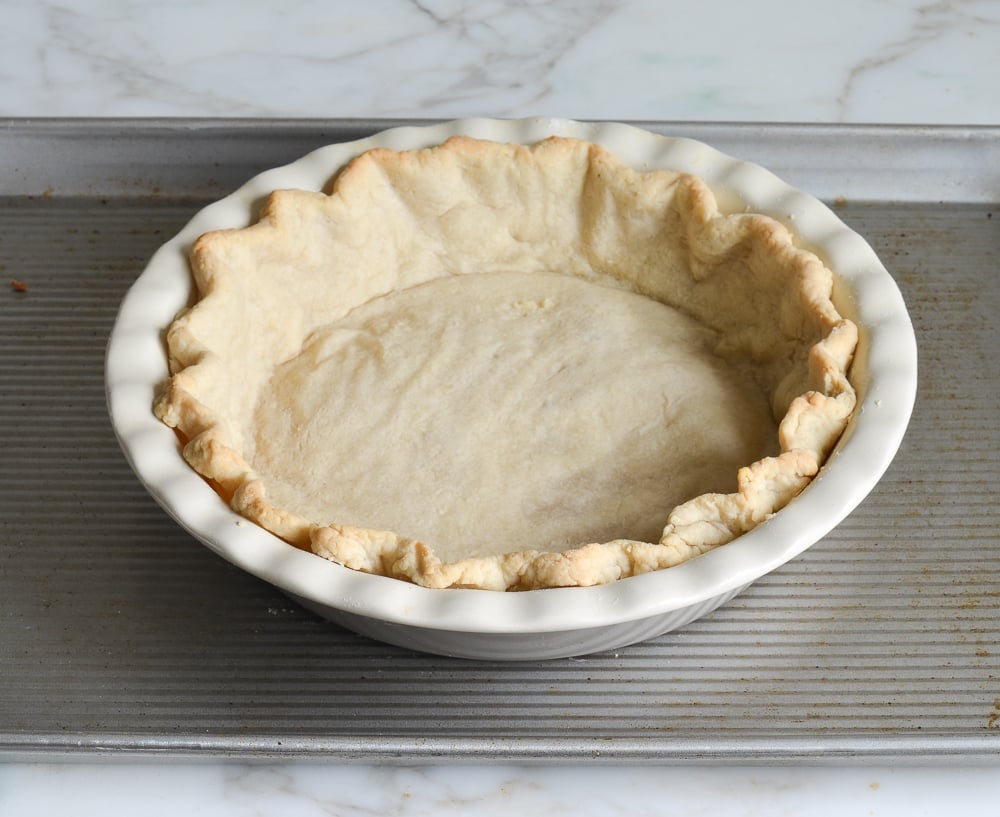
Step 1: Blind bake the crust. If you’re using a store-bought crust, just follow the package directions. For homemade dough, fit it into a 9-inch deep-dish pie pan and chill it. Line the chilled crust with parchment, fill it with pie weights (or dried beans), and bake at 375°F until the edges look set. Remove the weights and bake a bit longer until the bottom looks dry and lightly golden. Then drop the oven temp to 325°F and you’re ready for the filling.
Pro Tip: Blind baking—or baking the crust before the filling goes in—gives it a head start so it stays nice and crisp once the wet pumpkin filling is added.


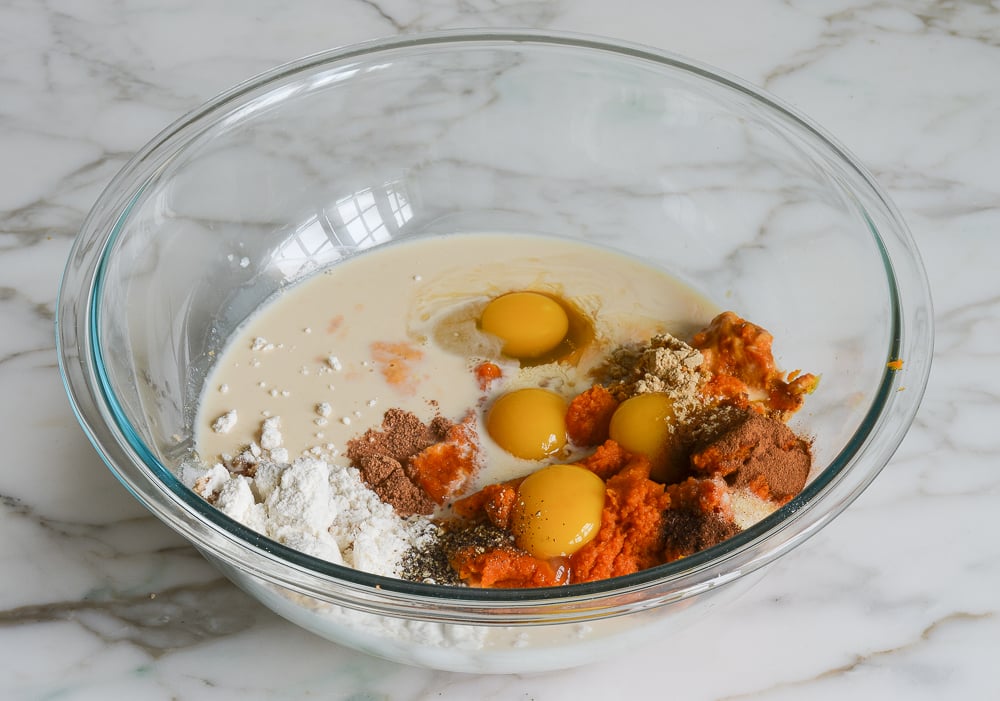
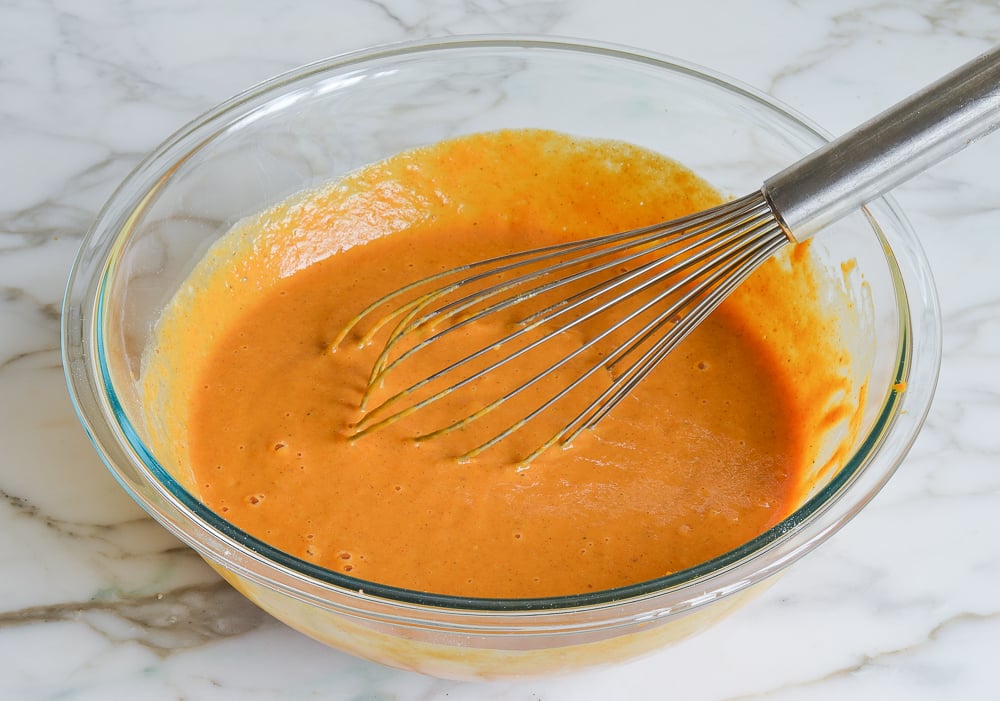
Step 2: Make the filling. In a large bowl, combine the pumpkin, egg, egg yolks, both sugars, the flour, salt, cinnamon, ginger, nutmeg, cloves, pepper, and evaporated milk. Whisk until the mixture is smooth.
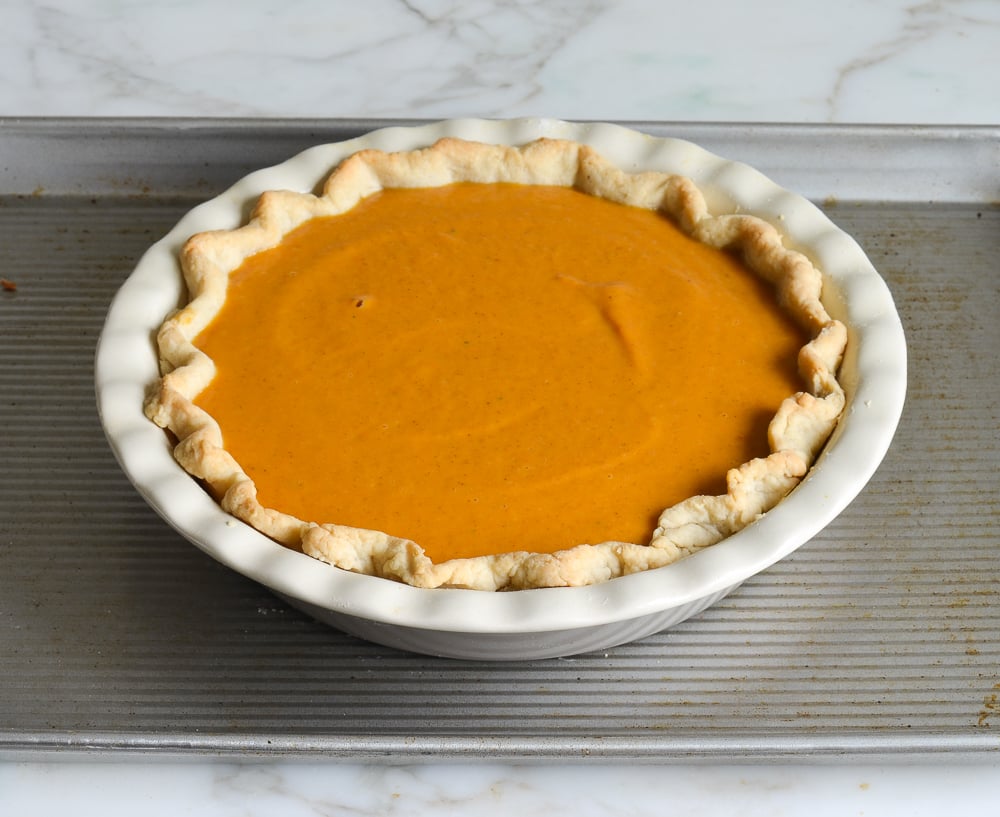
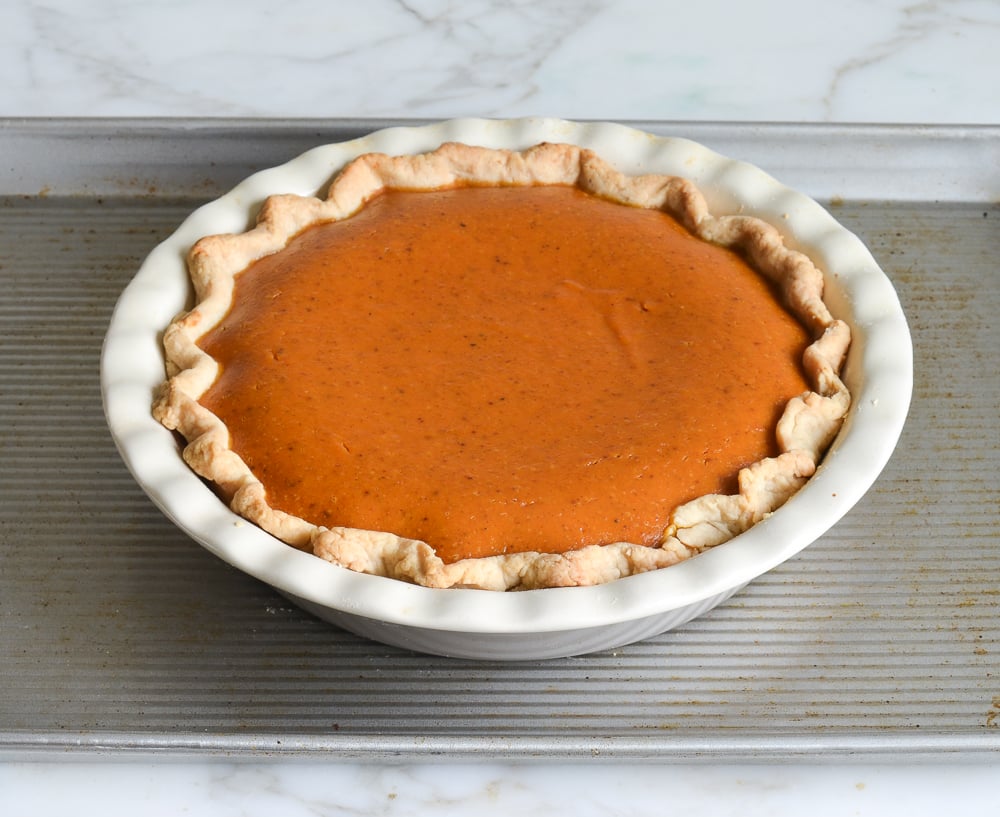
Step 3: Assemble and bake. Pour the filling into the warm, pre-baked crust and bake for 50 to 60 minutes, or until the center is just set. Let the pie cool on a wire rack until it reaches room temperature.
Step 4: Serve. Slice and serve right away, or refrigerate the pie for up to a day before serving. For longer storage, you can freeze pumpkin pie for up to 1 month—just wrap it well. Enjoy!

Video Tutorial
More Holiday Desserts You’ll Love


Perfect Pumpkin Pie
Ingredients
- 1 homemade pie crust or 9-inch deep-dish frozen pie crust shell thawed
- 1 (15-oz) can pure pumpkin (about 1¾ cups)
- 1 large egg
- 3 large eggs yolks
- ½ cup granulated sugar
- ½ cup (packed) light brown sugar
- 2 tablespoons all-purpose flour
- ½ teaspoon salt
- 1 teaspoon ground cinnamon
- 1 teaspoon ground ginger
- ½ teaspoon ground nutmeg
- ⅛ teaspoon ground cloves
- ⅛ teaspoon ground black pepper
- 1¼ cups evaporated milk (you'll need one 12-oz can but you won't use all of it)
Instructions
- Blind Bake the Crust: If you’re using a store-bought frozen crust, follow the blind-baking instructions on the package. If you’re using a homemade crust, roll out the dough and gently fit it into a 9-inch deep-dish pie pan, making sure it’s snug against the bottom and sides. Chill the crust for at least 30 minutes.Meanwhile, preheat the oven to 375°F and set an oven rack in the middle position. Place the chilled crust on a baking sheet (it makes it much easier to move in and out of the oven). Line the crust with a piece of parchment paper and fill it about three-quarters full with dried beans or pie weights.Bake for 20 minutes. Remove the crust from the oven, lift out the parchment and weights, and tent the edges with a few strips of foil folded in half lengthwise to keep them from getting too dark. Return the crust to the oven and bake for another 15 to 20 minutes, until the bottom looks dry and lightly golden. If it puffs up a bit, just press it down gently with a flat spatula—try not to puncture it. Remove the foil, but keep it nearby in case you need it again later.After blind-baking the crust, reduce the oven temperature to 325°F.
- Make the Filling: In a large bowl, combine the pumpkin, egg, egg yolks, granulated sugar, brown sugar, flour, salt, cinnamon, ginger, nutmeg, cloves, pepper, and evaporated milk. Whisk until smooth, then pour the filling into the pre-baked crust.
- Bake and cool: Bake the pie for 50 to 60 minutes (at 325°F), until the filling is just set. It should look dry around the edges, but the center should jiggle just slightly if you nudge the pan. Keep a close eye on the pie as it bakes; if ever the crust looks like it's browning too quickly, tent the edges with foil strips. Let the pie cool on a rack (leave it on the baking sheet) to room temperature, a few hours. Slice or refrigerate until ready to serve.
Notes
Nutrition Information
This website is written and produced for informational purposes only. I am not a certified nutritionist and the nutritional data on this site has not been evaluated or approved by a nutritionist or the Food and Drug Administration. Nutritional information is offered as a courtesy and should not be construed as a guarantee. The data is calculated through an online nutritional calculator, Edamam.com. Although I do my best to provide accurate nutritional information, these figures should be considered estimates only. Varying factors such as product types or brands purchased, natural fluctuations in fresh produce, and the way ingredients are processed change the effective nutritional information in any given recipe. Furthermore, different online calculators provide different results depending on their own nutrition fact sources and algorithms. To obtain the most accurate nutritional information in a given recipe, you should calculate the nutritional information with the actual ingredients used in your recipe, using your preferred nutrition calculator.
Followed the recipe exactly as stated. I had to bake an additional 20minutes for center to be slightly jiggly. Unfortunately when I served the pie the center of pie was creamy-almost pudding consistency. It tasted delicious however no one touched it after the first slice was removed. 😕
So sorry to hear that BB — is there any chance you may have made a measuring error?
The same thing happened to me. I added ingredients just as mentioned. I had to bake for nearly an hour more for it to set.
Hi! Going to bake this tomorrow and was wondering if any cooking instructions change if I use a disposable aluminum pie dish versus the typically glass? Thank you!
Hi Emily, I don’t think any changes will be necessary. Hope you enjoy!
how would cooking times change for a 5 inch pie? Do you think I could I make (3) 5 inch pies out of this recipe?
Hi Kathleen, I think this will likely make two 5-inch pies. Not sure about baking time, but it will definitely be less — I’d start checking at 30 – 35 minutes. Please LMK how they turn out!
My oven heats hotter than normal, with the blind baking, do you think bottom of the crust will be overcooked?
Thanks in advance!
Hi Jessica, if your oven predictably runs a bit hot, you may want to reduce the oven temperature just a little. Also, if you notice the edges of the crust are getting a little browner than you’d like while the pie bakes with the filling, cover the edges with a little foil like this. Hope that helps!
I want to make a 12 inch pie instead of 9 inch. How much do i add to everything??
Hi Jenny, the math may be a bit of a challenge, but I’d multiply all the ingredients by 1.3.
That’s not how the area of a circle works. A 12-inch pie is about twice the size of a 9-inch pie. (Pi*radius^2) Double the ingredients!
You’re right Ashley — clearly Math was not my strong suit! Jenny, I hope you see this prior to baking the pie – sorry (and thank you Ashley)!
Love this recipe. I made it twice, once with the black pepper and once without. I prefer it without. The pepper left an after-taste that I didn’t like. Will make this over and over again.
This was my first ever time making pumpkin pie and pastry and it turned out absolutely perfect! Hosted a thanksgiving for uni friends in New Zealand and wanted it to be great and it did not disappoint!! So good!
I’ve made this recipe several times and my husband, who is a self-proclaimed pumpkin pie connoisseur, said it is the best pumpkin pie ever. His mom was a professional baker, and he even says it’s better than hers! I have a question though. I’d love to make this into mini pies using a muffin tin. Would you recommend still blind baking the mini crusts? Any suggestions? Thank you so much for a husband-approved recipe!
Wow- that’s a high compliment- so glad this was a hit!! Yes, if you’d like to make mini versions of this, I would still blind bake the crust(s). Please LMK how they turn out! 🙂
This was my first, PERFECT, pumpkin pie! I had grown pie pumpkins in my garden and wanted to use them in making a pie. The last pie I made was edible, but the crust a little raw and having beaten everything with my mixer, the top of the pie looked cruddy with air bubbles. Following all the suggestions here gave me the perfect pie, and I was thrilled (so was my husband).
Love, love, love this recipe! It was my first attempt at a pumpkin pie, and it did not disappoint. I have made other pie doughs in the past, but this one is a keeper, the shortening made all the difference! So flaky and crispy, not soggy at all!
The first time I made this pie was for Canadian Thanksgiving/my birthday, and the stated baking time was not quite long enough for me, so the centre was not completely set. We just scraped it off and ate the rest! The second time, I baked it closer to 75 to 90 minutes, and it was much better. I’m currently making it a third time for our family dinner tonight (pumpkin goes with spaghetti, right?).
I love the addition of the pepper, which adds a subtle flavour and isn’t too overpowering. I’ve never tasted pumpkin pie filling like this. I feel like every pumpkin pie before this one was bland and underwhelming!
This recipe will stay in my repertoire for years to come! Thank you for sharing it with us 🙂
I also increased the amounts of the pie dough by 25% since I found that I had trouble rolling without going too thin. Works perfectly now!