Brazilian Cheese Bread
- By Jennifer Segal
- Updated August 11, 2025
- 53 Comments
- Leave a Review


This post may contain affiliate links. Read my full disclosure policy.
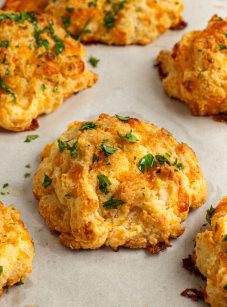
Pão de queijo, Brazilian cheese bread, is crisp on the outside, cheesy and chewy inside, and impossible to resist warm from the oven. Bonus: they’re naturally gluten-free.

If you’ve been to a Brazilian steakhouse (churrascaria) or visited Brazil, chances are you’ve tried pão de queijo—irresistible little cheese breads with a golden crust and a melty, chewy center. Their uniquely light, stretchy texture comes from tapioca flour, which is made from cassava root and naturally gluten-free.
This Brazilian cheese bread recipe couldn’t be easier. The batter comes together in minutes in a blender and bakes quickly in a mini muffin pan. At steakhouses, the rolls are served alongside the meat-heavy meal, but in everyday Brazilian life they’re more often enjoyed as a snack or for breakfast. Similar to popovers, they’re also perfect with soups and salads. And fair warning: fresh from the oven and still warm, it’s nearly impossible to stop at just one.
“Easy, quick and versatile! Making them again tonight. . .they seem to go with everything.”
What You’ll Need To Make Brazilian Cheese Bread

- Eggs, vegetable oil & milk: These wet ingredients work together to form a rich, cohesive batter.
- Tapioca flour: Also referred to as tapioca starch, this ingredient is what gives Brazilian cheese bread its signature chewy, stretchy texture. You can typically find it in the baking, gluten-free, or natural foods section of your supermarket. I use the Bob’s Red Mill brand.
- Baking powder: Gives the rolls a little lift.
- Pecorino Romano or Parmigiano Reggiano & mozzarella or cheddar: The cheese duo adds salty, nutty depth and just the right amount of melty richness.
- Jump to the printable recipe for precise measurements
Note on the ingredients and method
Traditional Brazilian cheese bread is made with two types of tapioca flour—sweet and sour—which give it that perfect chewy-puffy balance. In the U.S., we typically only have access to one kind (closer to the sweet version). Instead of a dough you roll by hand, this version uses a thinner batter and bakes up beautifully in a mini muffin tin. After lots of testing, I found this method gives the best results using ingredients you can easily find here.
Step-By-Step Instructions
Step 1. Blend the wet ingredients. In a blender, add the eggs, oil, and milk. Blend for about 5 seconds to combine.
Pro Tip: Add the wet ingredients in the order listed to help the blender catch everything quickly. Starting with eggs helps break things up so the milk and oil blend more easily.

Step 2. Add the dry ingredients and cheese. Add the tapioca flour, Parmesan, mozzarella (or Cheddar), salt, and baking powder. Blend for another 5 seconds, scrape down the sides (don’t skip this step; tapioca flour loves to cling to the sides and corners), then blend briefly again. Don’t over-blend—the batter should stay pourable.

Step 3. Fill the muffin tin. Spray a mini muffin tin with nonstick spray, then pour in the batter, filling each well about three-quarters full.

Step 4. Bake. Bake at 400°F for 15 to 18 minutes, until puffed and lightly golden. Some sinking in the center, either in the oven or as they cool, is normal.
Pro Tip: If you’re unsure about whether the breads are done, tap one gently—it should feel set and sound hollow inside.

Step 5. Serve warm. Let the cheese breads cool slightly, then remove from the pan and serve warm.

Jenn’s pro tips
- Mini vs. regular muffin tins. A mini muffin pan gives the best texture—crispy on the outside, soft and chewy inside. But if it’s all you’ve got, a regular muffin pan works too. Just grease it well, fill the cups ¾ of the way, and bake for 20 to 25 minutes.
- No blender? No problem. A food processor or immersion blender also works—just make sure you blend until the batter is smooth and cohesive.
More Bread Recipes You May Like
Brazilian Cheese Bread

Ingredients
- 2 large eggs
- ¼ cup vegetable oil
- ½ cup milk
- 1 cup tapioca flour (also called tapioca starch; see note)
- ½ cup grated Pecorino Romano or Parmigiano Reggiano cheese
- ½ cup shredded Mozzarella (or Cheddar) cheese
- Heaping ½ teaspoon salt
- ½ teaspoon baking powder
Instructions
- Preheat the oven to 400°F (205°C) and set an oven rack in the middle position. Spray a mini muffin pan with non-stick cooking spray.
- In a blender, combine the eggs, oil, and milk. Blend for about 5 seconds to combine. Add the tapioca flour, Parmesan cheese, mozzarella (or Cheddar) cheese, salt, and baking powder. Blend for another 5 seconds to combine, then scrape down the sides of the jar and blend very briefly again. Avoid over-blending to prevent incorporating too much air, which can make the batter difficult to pour.
- Pour the batter into the muffin wells, filling them about three-quarters full.
- Bake for 15 to 18 minutes, until puffed and lightly golden. The cheese breads may fall slightly in the center, either in the oven or as they cool; that’s normal.
- Remove the cheese breads from the muffin pan and serve warm.
Notes
Nutrition Information
This website is written and produced for informational purposes only. I am not a certified nutritionist and the nutritional data on this site has not been evaluated or approved by a nutritionist or the Food and Drug Administration. Nutritional information is offered as a courtesy and should not be construed as a guarantee. The data is calculated through an online nutritional calculator, Edamam.com. Although I do my best to provide accurate nutritional information, these figures should be considered estimates only. Varying factors such as product types or brands purchased, natural fluctuations in fresh produce, and the way ingredients are processed change the effective nutritional information in any given recipe. Furthermore, different online calculators provide different results depending on their own nutrition fact sources and algorithms. To obtain the most accurate nutritional information in a given recipe, you should calculate the nutritional information with the actual ingredients used in your recipe, using your preferred nutrition calculator.
Gluten-Free Adaptable Note
To the best of my knowledge, all of the ingredients used in this recipe are gluten-free or widely available in gluten-free versions. There is hidden gluten in many foods; if you're following a gluten-free diet or cooking for someone with gluten allergies, always read the labels of your ingredients to verify that they are gluten-free.
Comments
Add a Comment Cancel reply
This site uses Akismet to reduce spam. Learn how your comment data is processed.


These were DELISH! A perfect, super-easy app to whip up for happy hour. I served to friends and they all wanted the recipe 🙂
Can the batter be made up say an hour ahead and sit until cooked?
Sure, you can get away with that. Enjoy!
These little babies were delicious! I can making these on a regular basis.
Hi Jenn,
These Brazilian cheese breads were so easy to make and delicious! We love tapioca flour in general as it’s so much healthier. The only part about this bread I didn’t like was the somewhat unpleasant smell of the oil lingering in the air. I know the Brazilians all use oil – but I was wondering if I could substitute it with butter and if so, how much butter do you think I should use?
Hi Kate, So glad you enjoyed! I do think an equal amount of melted butter would work as a substitute for the oil. I’d love to know how they turn out if you try it!
Thanks so much for your quick reply, Jenn! I’ll be sure to try and let you know. We love this bread!😅
Another easy and delicious recipe from Jenn, and so cool to have a dupe of the ones I usually buy from the freezer section! I used Pecorino Romano and mozzarella, and took them out at 15 minutes. I thought they could use a little more salt, so next time I’ll add an extra 1/2 tsp. This might have been due to a kind of flavorless mozzarella, so I”m also going to try a batch of Parmingiano and cheddar, as written. (Also, my husband was super impressed that they came together in the time it took him to run a quick errand! A feat of dinner heroics!)
This recipe is fantastic. No more buying them at the grocery store. I used almond milk instead of regular milk and whatever cheese I had in my refrigerator – – Aldi’s aged yellow cheddar and a Parmesan cheese. The outside is nice and crisp while the inside is smooth and moist. Gobble them up while they’re warm. Thanks Jenn for sharing this recipe.
I can’t wait to try these!!
Can I make these in a food processor?
I don’t have a blender.
Thanks in advance…
Hi Wendy, It should work. Just keep in mind that the bowl might be pretty full when all of the ingredients are in there, so just make sure you don’t go over the fill line, or the bowl may leak. Hope you enjoy them!
Like another Jenn Segal fan, I ran out immediately to buy the Tapioca Flour (btw, just google Tapioca Flour near me, and if a store near you has it, Google will show it. No guarantees though!) to make these nuggets. It was SO EASY to make and using an Immersion Blender just makes it all the easier. Only had a 12 mini muffin pan so saving the leftover batter and trying it out the next day (will report back.) Only had Trader Joe’s Unexpected Cheddar so used that with Romano. Took them out of the oven at 15 mins and they were beautiful and delicious. I might add a little more cheese next time and try Parmesan.
Jenn, what do you think about adding things like: Pesto, fresh Herbs, those tubes of herb pastes, liquid Chocolate, a pulverized fruit etc? Thanks Jenn!
So glad you enjoyed, Tissa! I think you could add herbs but I probably wouldn’t add anything that would alter the consistency of the batter. I’d love to know how any additions turn out!
Delicious and so easy to pull together – it took longer for the oven to preheat than to mix & pour the batter. I’ve done a similar recipe in standard size tins and it worked fine. The only difference I noted is the ratio of crust to insides – I (slightly) prefer the smaller size and higher crust ratio of the mini size.
I haven’t made these yet but I’m know they’ll be great (‘cause Jenn’s recipes ALWAYS are)! Question before I try – I don’t have a blender (gasp) only stand and handheld mixers and a food processor. Of those options, which do you think would yield the best result? Can’t wait to try these!
Hi Liz, thanks for your nice words about the recipes! Four these I’d opt for the food processor; the bowl might be pretty full when all of the ingredients are in there, so just make sure you don’t go over the fill line, or the bowl may leak. Please LMK how they turn out!