22 Quick and Easy Recipes in 30 Minutes (or less) + 5 Chef Secrets To Make You A Better Cook!

Challah

Tested & Perfected Recipes Cookbook Recipe

This post may contain affiliate links. Read my full disclosure policy.

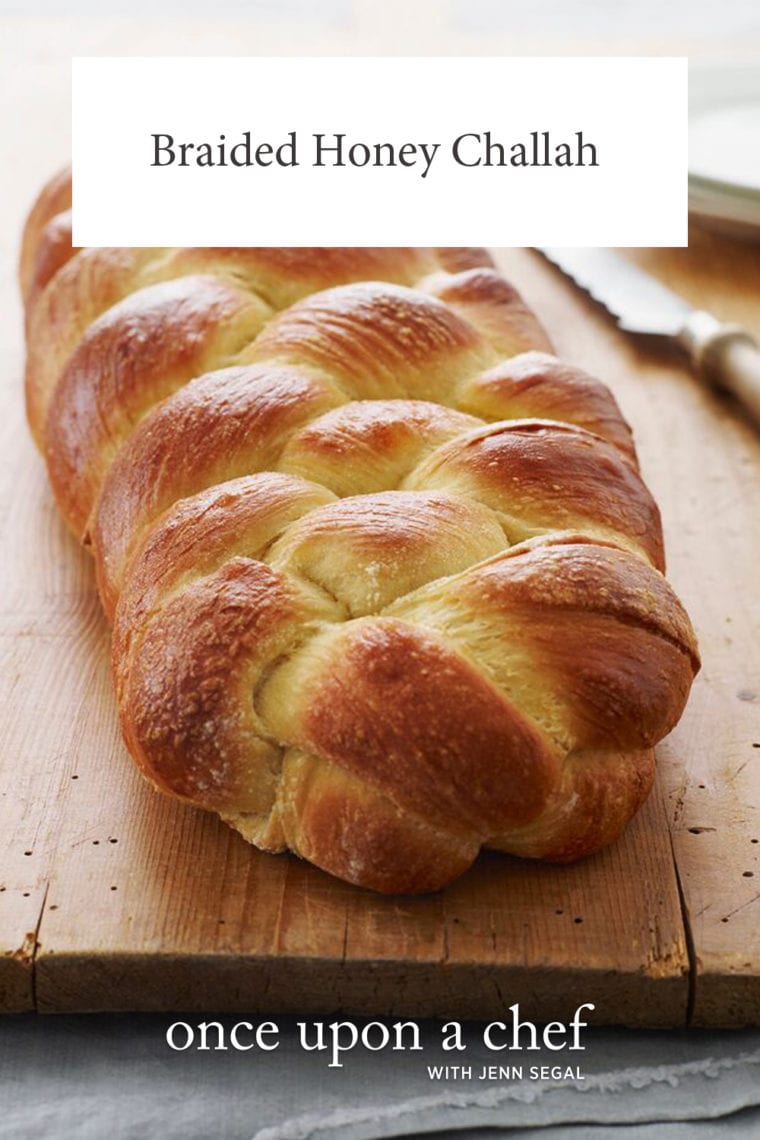
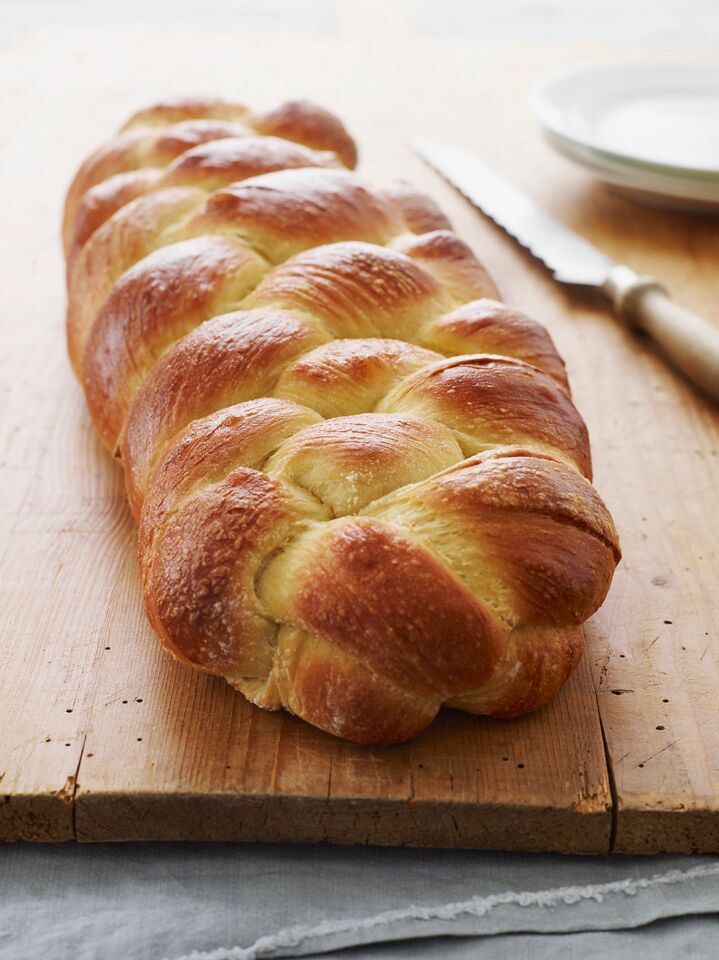
With its rich, slightly sweet flavor, shiny golden crust, and pillowy interior, challah isn’t just for the Jewish holidays — it appeals to everyone, any time!

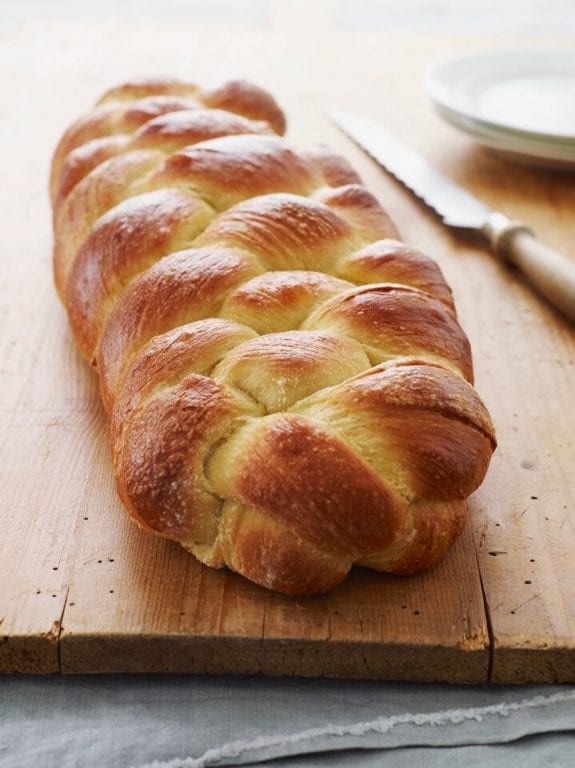
Challah on a wooden surface.

Photo by Alexandra Grablewski (Chronicle Books, 2018)

Challah is the bread of celebration in Jewish tradition, but I put it in the matzo ball soup and bagel category: it appeals to everyone. It’s a rich, slightly sweet loaf with a shiny, golden crust and pillowy-soft interior. But what makes it truly special is its distinctive braid, which symbolizes, among other things, the joining together of family and friends. Rest assured, challah looks like far more trouble than it actually is. Think of it as a once-in-a-while baking therapy project. Kneading and braiding the dough, smelling the challah baking in the oven—it really is satisfying. And when the long braided loaf is presented at the dinner table, it is a sight to behold!

I owe much of the credit for this recipe to Nanci Hirschorn, one of my lovely readers, who has been perfecting her challah recipe for over thirty-five years. Thank you, Nanci, for all the pointers! Heads up: this recipe makes one 16-in loaf. It’s huge! If you have leftovers, use it to make French toast.

Challah is part of my yeast bread collection, which includes other enriched bread recipes, like brioche and babka – rich-tasting breads with a higher proportion of eggs, sugar, butter, and milk – as well as classics like no-knead artisan bread, focaccia, dinner rolls, and naan.

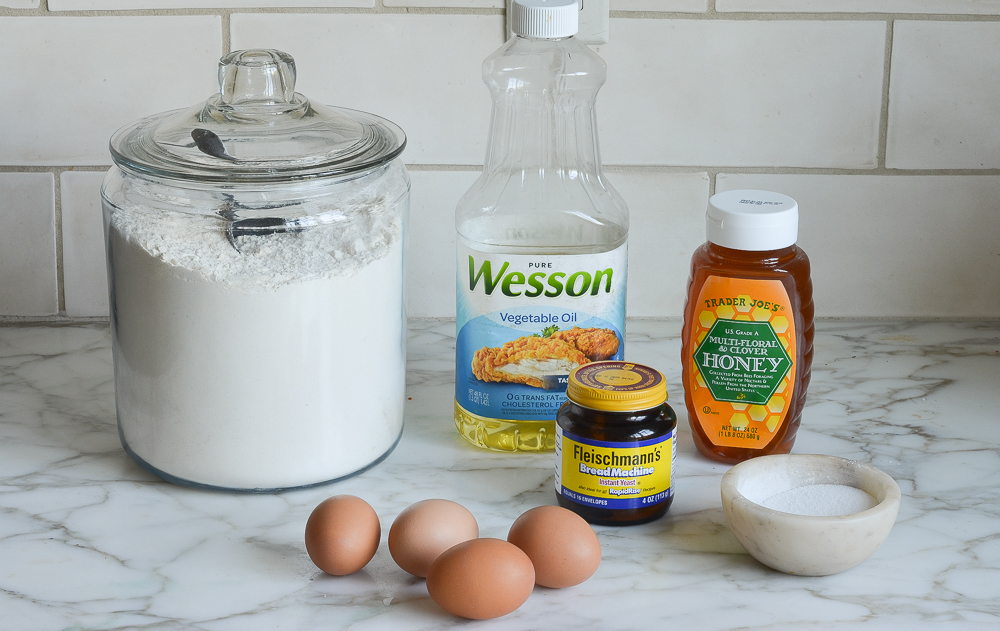
What you’ll need to make Challah

Challah ingredients including yeast, eggs, and honey.

The recipe calls for instant or rapid-rise yeast, which rises faster than regular active dry yeast. Once opened, yeast will keep in the refrigerator for three to six months. Yeast is sold in jars (as pictured) or individual packets. If you don’t do a lot of bread baking, it’s best to buy the packets; just note that the quantity required for this recipe (1 tablespoon) is more than one packet.

Be sure your eggs are room temperature; this dough is slow to rise and cold eggs will slow it down even further.

How To Make Challah

Step 1: Make The Dough

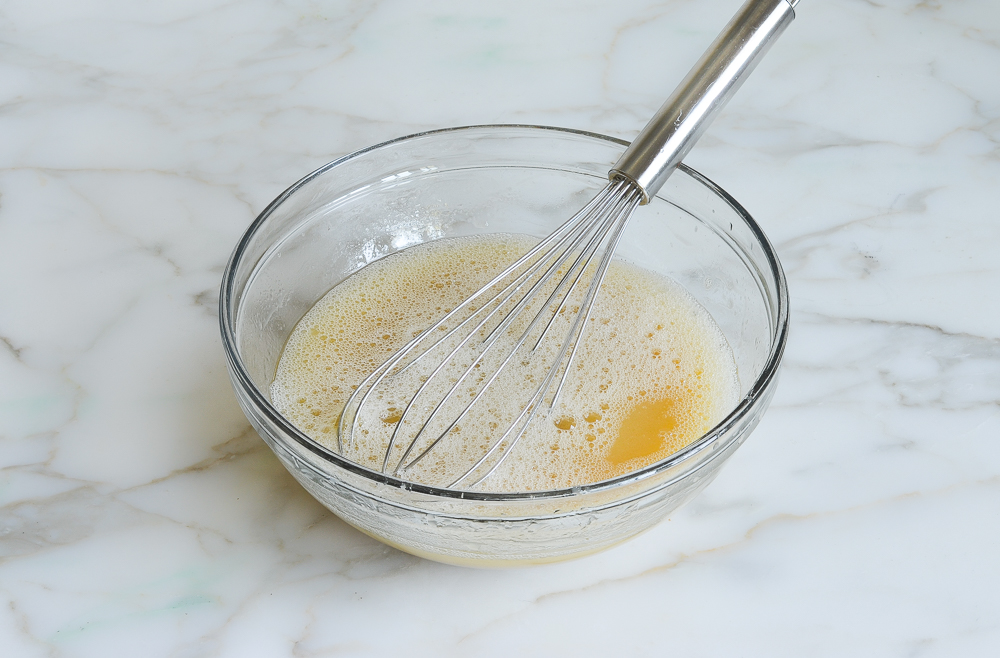
Eggs, water, oil, and honey in a mixing bowl.

Begin by combining the lukewarm water, oil, honey, 2 of the eggs, and the egg yolk; whisk well and set aside.

whisked wet ingredients

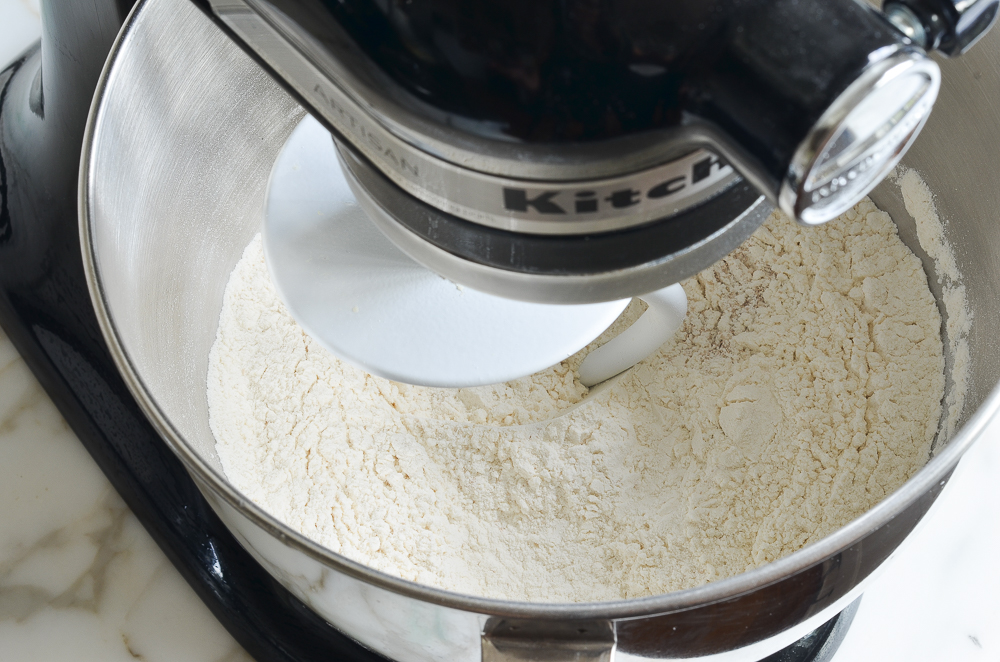
In a stand mixer fitted with the dough hook, combine the flour, yeast, and salt.

flour, salt, and yeast in mixer

Mix to combine.

whisked flour, salt, and yeast

Add the liquid ingredients to the dry ingredients.

adding liquid ingredients to dry ingredients in mixer

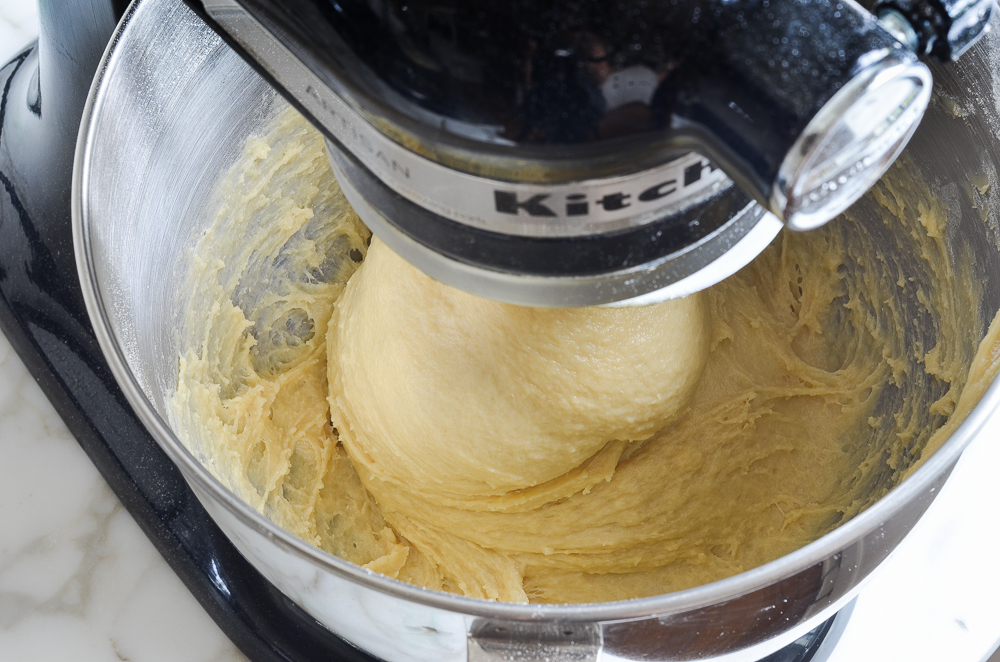
Knead on medium-low speed until you have a sticky dough that clings to the bottom of the bowl, 5 to 7 minutes. The dough may seem too wet but have faith—it’s supposed to be.

kneaded sticky challah dough

Dust your hands generously with flour, then scrape the sticky, elastic dough out onto a lightly floured work surface. Dust the top of the dough lightly with flour.

challah dough on floured countertop

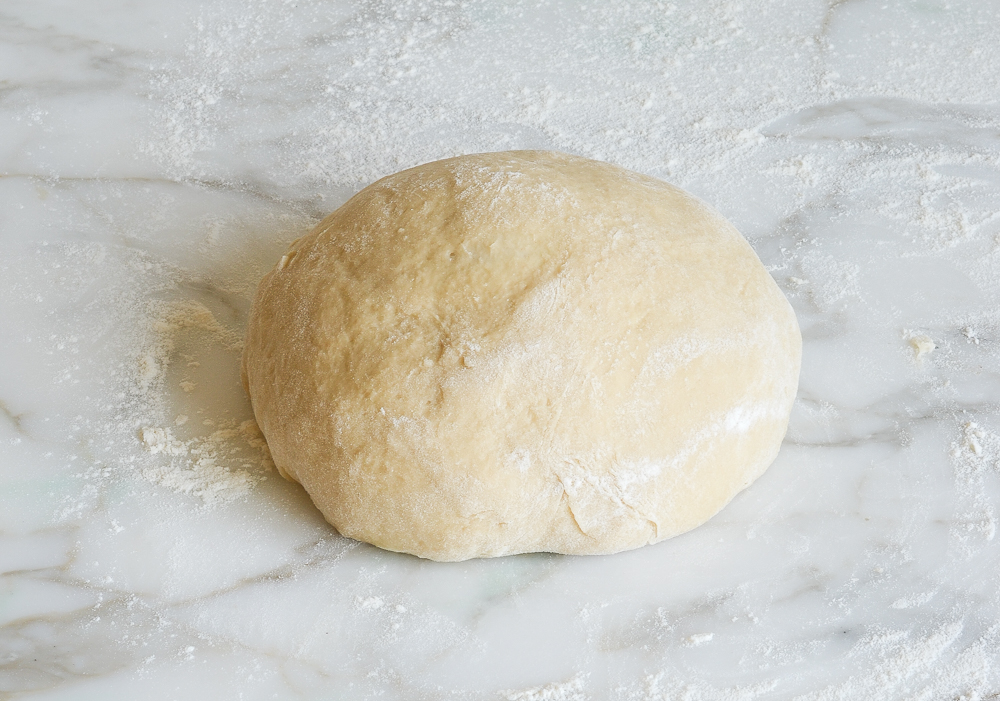
Knead into a soft, smooth ball.

challah dough kneaded into a ball

Step 2: Let it Rise

Lightly grease a large bowl with oil or nonstick cooking spray. Place the dough in the bowl, flip it over once so the top is lightly oiled, and then cover the bowl with plastic wrap.

dough in bowl ready to rise

Allow the dough to rise in a warm, draft-free spot until it’s puffy and doubled in size, 2 to 3 hours. Keep in mind that when baking yeast breads, rising times are only a guide. The temperature in your kitchen, the humidity level outdoors, and how you knead the dough will all affect the rising time.

challah dough after first rise

Step 3: Braid the Dough

If you have a little girl in your life, or were ever a summer camp counselor, you have an advantage with braiding challah. But even if not, I assure you it’s easy to do. There are dozens of methods, but I think this 4-strand braid is the easiest and the prettiest.

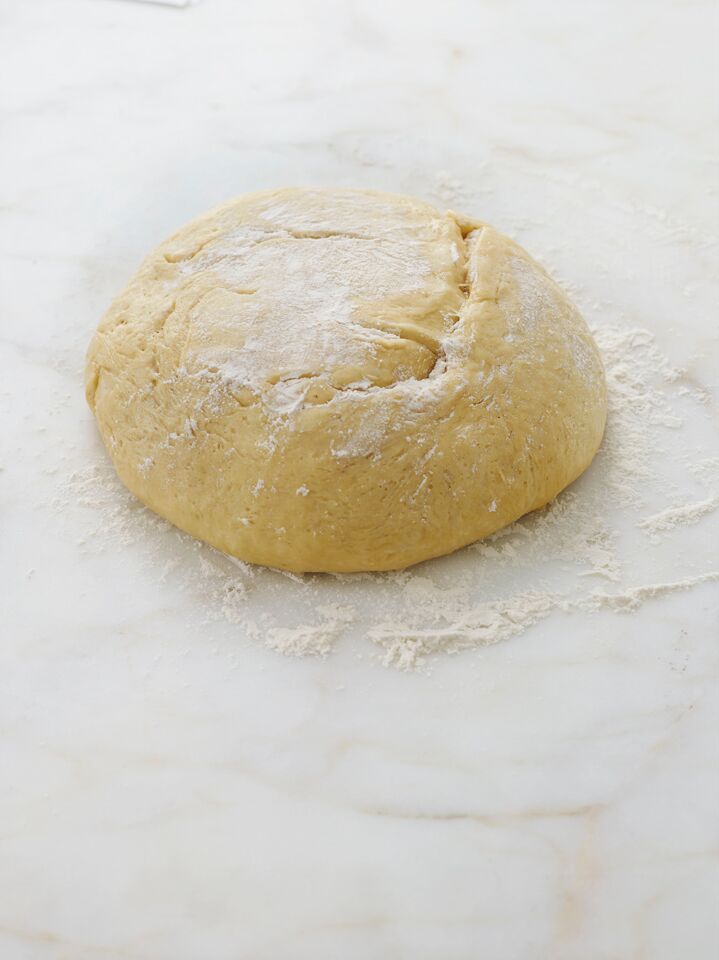
To begin, invert the risen dough onto a lightly floured work surface and dust with flour. It will deflate.

Ball of challah dough.

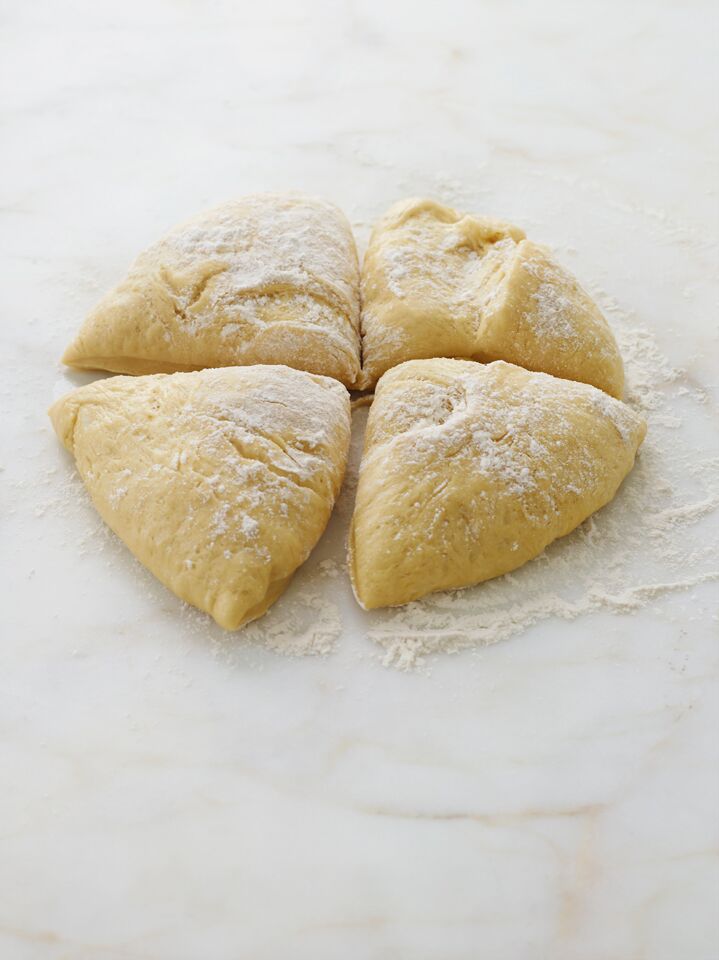
Cut the dough into four even pieces. (If you want to be exact, each piece should weigh approximately 9 oz or 260 g.)

cut challah dough

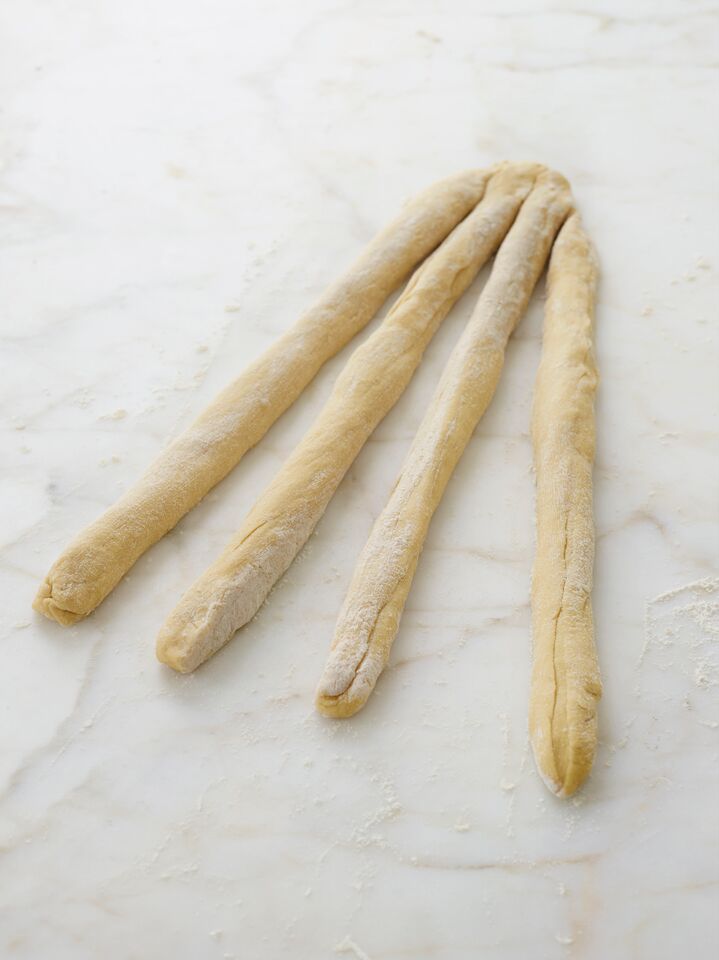
Stretch and roll each piece into a rope about 20-inches long. Lay the ropes parallel to one another (vertically). Pinch them tightly together at the top, and then fan them out. If the ropes shrink a bit, just work them back into their original length.

four strands of challah dough

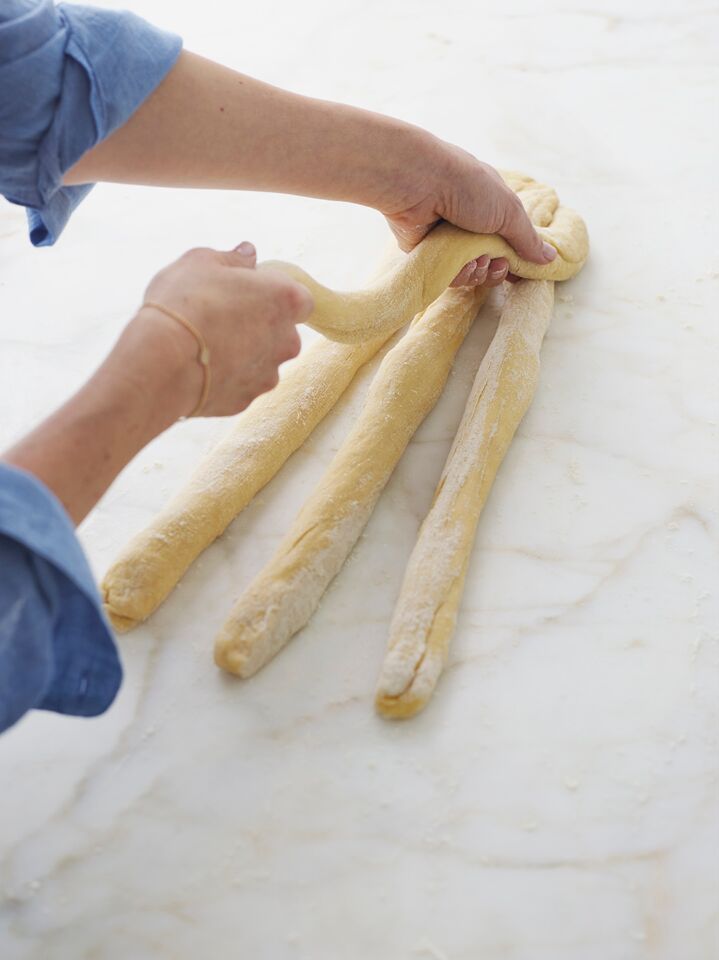
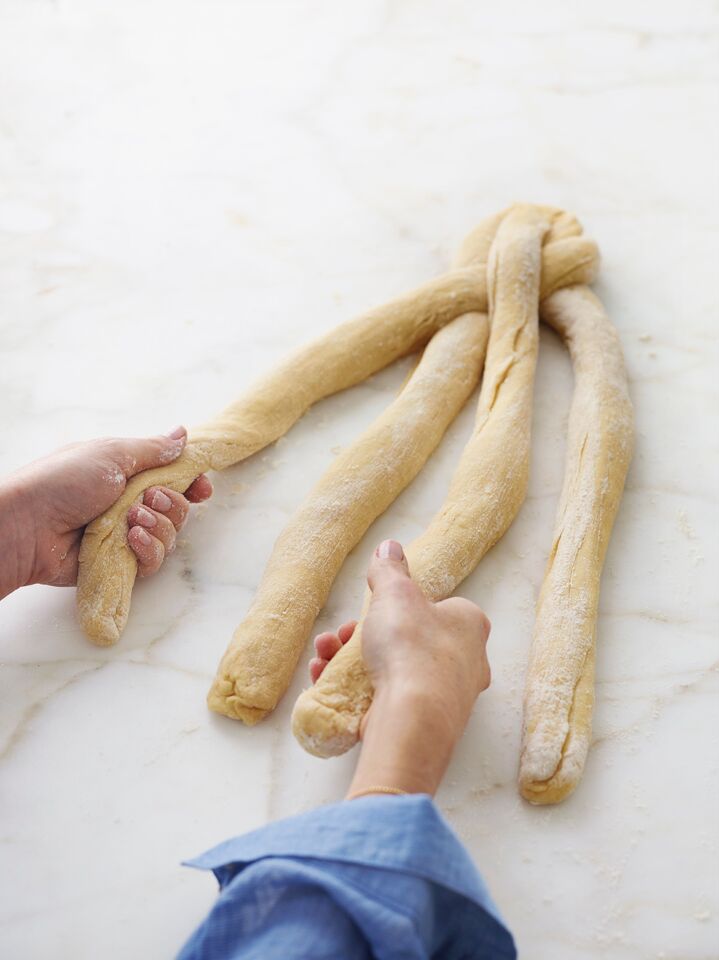
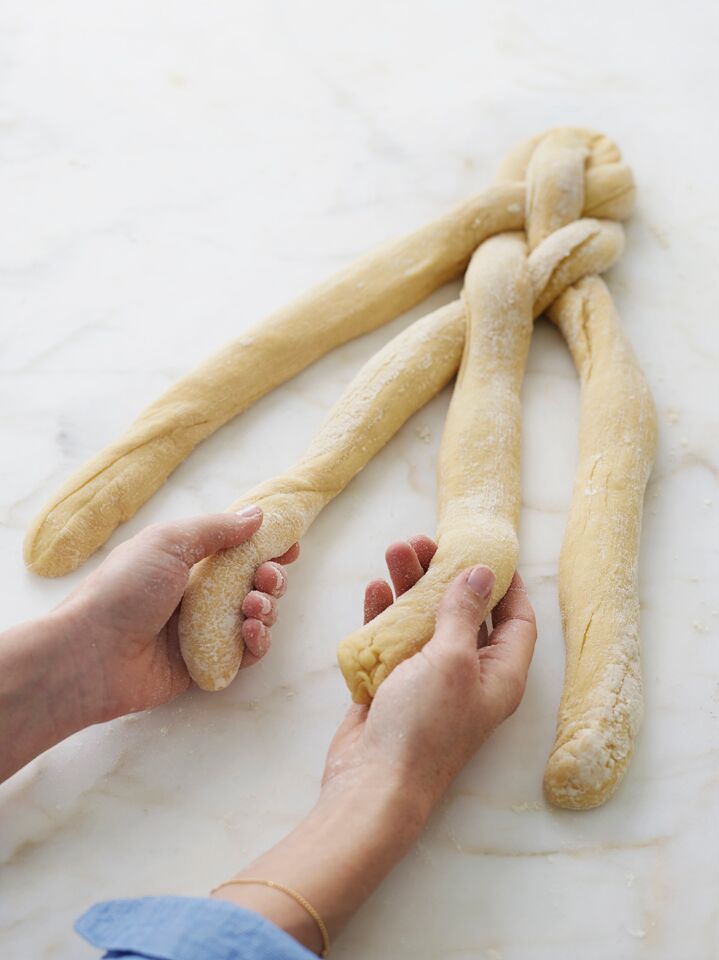
Begin by taking the strand farthest to the right and weave it toward the left through the other strands using this pattern: over, under, over.

starting challah braidstarting challah braidTake the strand furthest to the right and repeat the weaving pattern again: over, under, over. Person grabbing the third of four strands of challah dough.

Person grabbing the two middle strands of challah dough out of four.

Person grabbing the first and second strands of challah dough out of four.

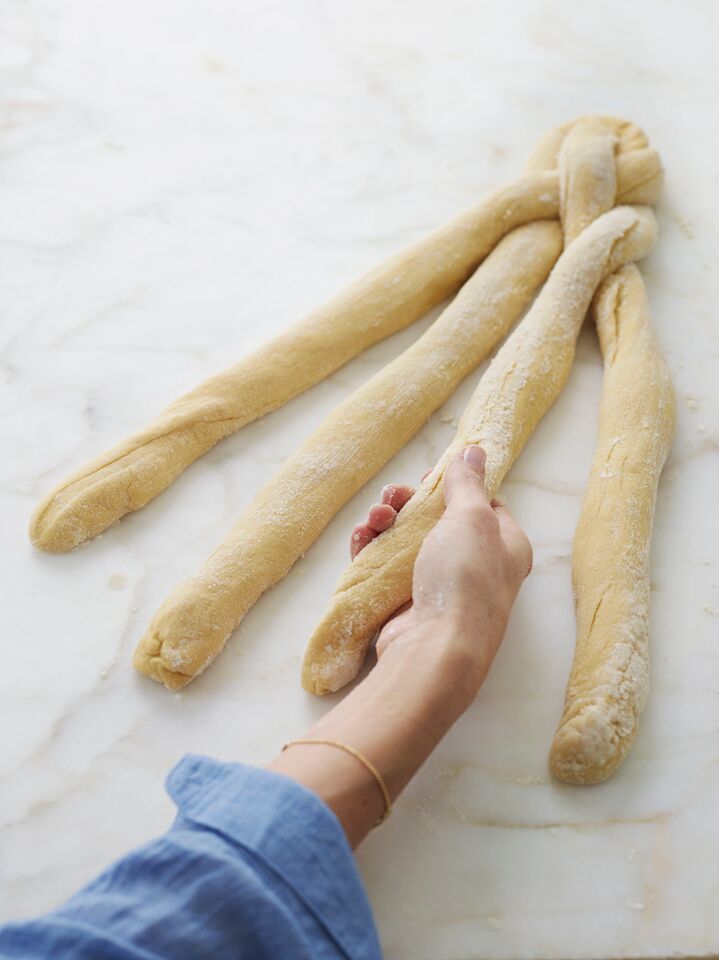
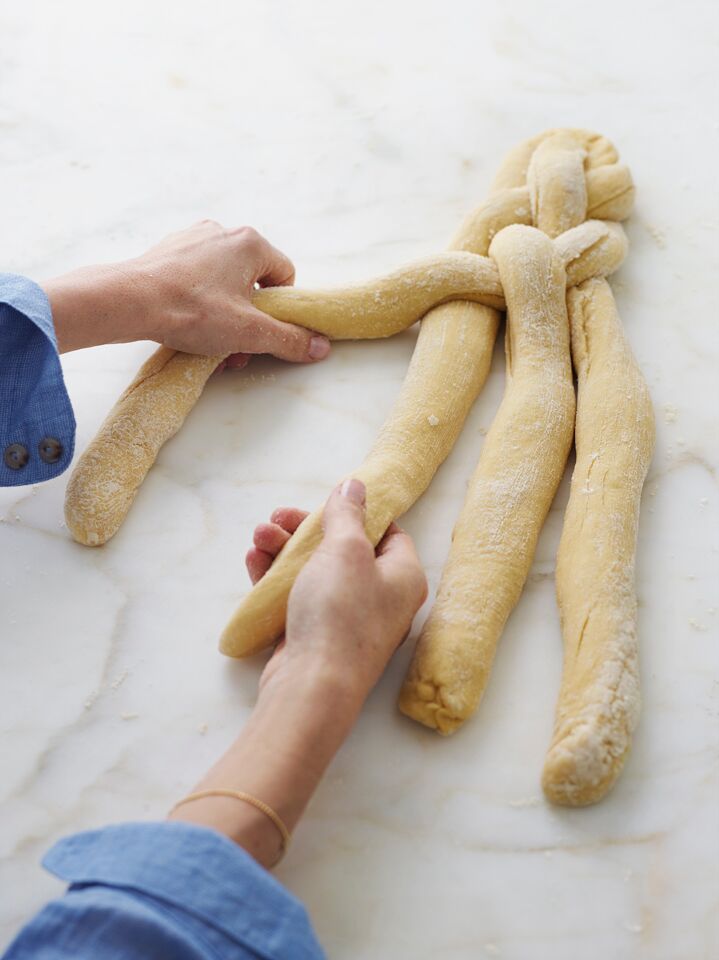
Repeat this pattern, always starting with the strand farthest to the right, until the whole loaf is braided.

Person grabbing the third out of four strands of challah dough.

Person grabbing the two middle strands of challah dough out of four.

Person grabbing the first two strands of challah dough out of four.

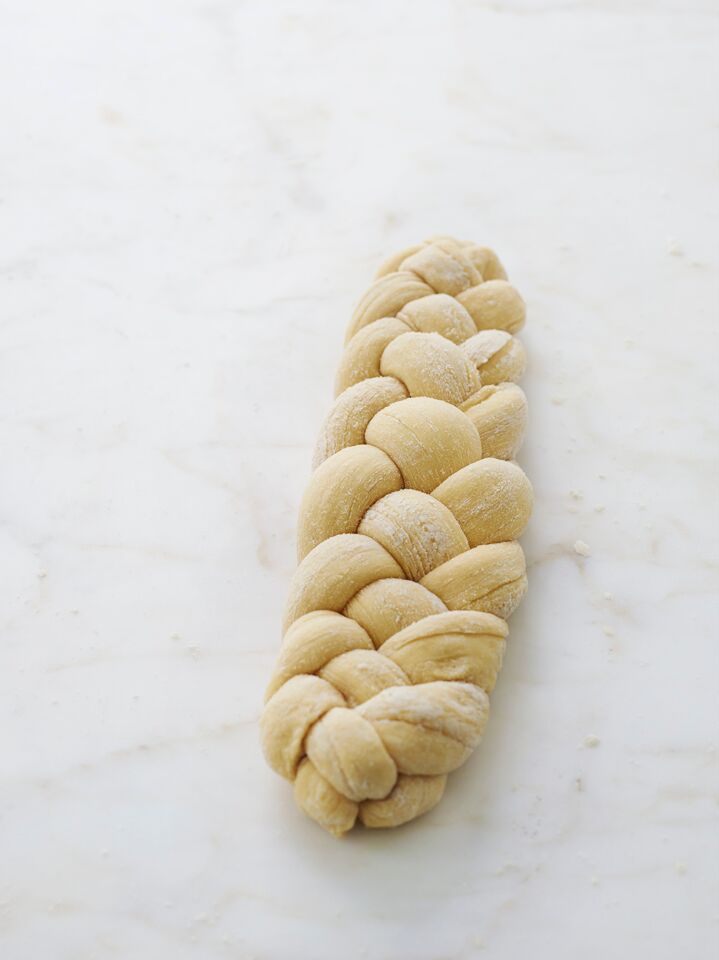
Tuck the ends under the loaf to give it a finished look.
Braided challah dough.

Step 4: Let the Braided Dough Rise

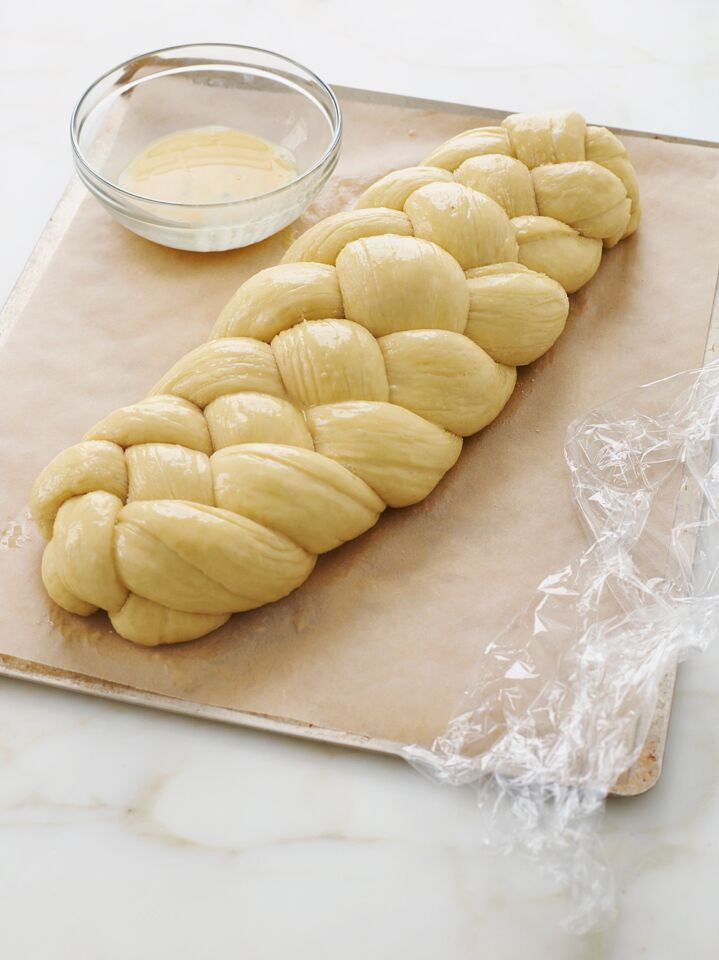
Carefully transfer the braided loaf to a parchment-lined 13 x 18-inch baking sheet. Cover the loaf loosely with plastic wrap and let it rise in a warm, draft-free spot until about 1.5 times the size, 1 to 2 hours. Toward the end of the rising time, preheat the oven to 350°F and set an oven rack in the middle position. (Note that the loaf will continue to rise a bit in the oven.) In a small bowl, beat the remaining egg and brush the beaten egg generously over the risen dough. (Note: If you like, sprinkle poppy or sesame seeds onto the challah before putting it in the oven.)

Braided challah dough on a lined baking sheet.

Step 5: Bake

Place the baking sheet atop another baking sheet; this will prevent the bottom crust from browning too much. Bake for 30 to 35 minutes, until the crust is a rich brown color and the internal temperature is between 190°F and 200°F on an instant-read thermometer. Remove the bread from the oven and place it on a rack to cool. Challah is best enjoyed fresh, but leftovers will keep for a few days in a sealed plastic bag.

Challah on a wooden surface.

Photo by Alexandra Grablewski (Chronicle Books, 2018)

You May Also Like


Challah

With its rich, slightly sweet flavor, shiny golden crust, and pillowy interior, challah isn’t just for the Jewish holidays — it appeals to everyone, any time!

Servings: One 16-inch [40 cm] loaf

Ingredients

  • 4¼ cups all-purpose flour, spooned into measuring cup and leveled-off, plus more for dusting
  • 1 tablespoon instant/rapid-rise yeast (see note)
  • 2 teaspoons salt
  • ¾ cup lukewarm water
  • ¼ cup + 2 tablespoons vegetable oil
  • ¼ cup + 2 tablespoons honey
  • 3 eggs, at room temperature
  • 1 egg yolk, at room temperature

Instructions

  1. In a stand mixer fitted with the dough hook, combine the flour, yeast, and salt. Mix on low speed for 30 seconds to combine. In a separate bowl, combine the lukewarm water, oil, honey, 2 of the eggs, and the egg yolk. Add to the dry ingredients and knead on medium-low speed until you have a sticky dough that clings to the bottom of the bowl, 5 to 7 minutes. The dough may seem too wet but have faith—it’s supposed to be.
  2. Dust your hands generously with flour, then scrape the sticky, elastic dough out onto a lightly floured work surface. Dust the top of the dough lightly with flour and knead briefly into a soft, smooth ball. Lightly grease a large bowl with oil or nonstick cooking spray. Place the dough in the bowl, flip it over once so the top is lightly oiled, and then cover the bowl with plastic wrap. Allow the dough to rise in a warm, draft-free spot until it's puffy and doubled in size, 2 to 3 hours.
  3. Invert the dough onto a lightly floured work surface and dust with flour. It will deflate. Cut the dough into four even 9-oz pieces, and then stretch and roll each piece into a rope about 20-inches long. Lay the ropes parallel to one another (vertically). Pinch them tightly together at the top, and then fan them out. If the ropes shrink a bit, just work them back into their original length.
  4. Begin by taking the strand farthest to the right and weave it toward the left through the other strands using this pattern: over, under, over. Take the strand furthest to the right and repeat the weaving pattern again: over, under, over. Repeat this pattern, always starting with the strand farthest to the right, until the whole loaf is braided. Tuck the ends under to give the loaf a finished look.
  5. Carefully transfer the braided loaf to a parchment-lined 13 x 18-inch baking sheet. Cover the loaf loosely with plastic wrap and let it rise in a warm, draft-free spot until about 1.5 times the size, 1 to 2 hours. Toward the end of the rising time, preheat the oven to 350°F and set an oven rack in the middle position. (Note that the loaf will continue to rise significantly in the oven.)
  6. In a small bowl, beat the remaining egg and brush the beaten egg generously over the risen dough. (Note: If you like, sprinkle poppy or sesame seeds onto the challah before putting it in the oven.) Place the baking sheet atop another baking sheet; this will prevent the bottom crust from browning too much. Bake for 25 to 35 minutes, until the crust is a rich brown color and the internal temperature is between 190°F and 200°F on an instant-read thermometer. Remove the bread from the oven and place it on a rack to cool. Challah is best enjoyed fresh, but leftovers will keep for a few days in a sealed plastic bag.
  7. Note: If you're using yeast that comes in the packets, the quantity required for this recipe (1 tablespoon) is more than one packet.
  8. Note: Active dry yeast may be used instead of instant/rapid-rise yeast, however, the dough will take longer to rise.
  9. Note: When baking yeast breads, rising times are only a guide; the temperature in your kitchen, the humidity level outdoors, and how you knead the dough will all affect the rising time.
  10. Make-Ahead Instructions: Prepare the loaf up to the point where it's braided and on the pan. Cover it with greased plastic wrap, and place it in the refrigerator overnight. The next day, remove the braided dough from the refrigerator and set it on the countertop (keep it covered). Let it come to room temperature and rise for about 1 hour before baking as directed.
  11. Freezer-Friendly Instructions: Challah can be baked, cooled, tightly wrapped, and frozen for up to 3 months. Allow it to thaw at room temperature for at least 3 hours before serving.

Nutrition Information

Powered by Edamam

  • Per serving (16 servings)
  • Serving size: 1 slice
  • Calories: 206
  • Fat: 7 g
  • Saturated fat: 1 g
  • Carbohydrates: 32 g
  • Sugar: 7 g
  • Fiber: 1 g
  • Protein: 5 g
  • Sodium: 126 mg
  • Cholesterol: 35 mg

This website is written and produced for informational purposes only. I am not a certified nutritionist and the nutritional data on this site has not been evaluated or approved by a nutritionist or the Food and Drug Administration. Nutritional information is offered as a courtesy and should not be construed as a guarantee. The data is calculated through an online nutritional calculator, Edamam.com. Although I do my best to provide accurate nutritional information, these figures should be considered estimates only. Varying factors such as product types or brands purchased, natural fluctuations in fresh produce, and the way ingredients are processed change the effective nutritional information in any given recipe. Furthermore, different online calculators provide different results depending on their own nutrition fact sources and algorithms. To obtain the most accurate nutritional information in a given recipe, you should calculate the nutritional information with the actual ingredients used in your recipe, using your preferred nutrition calculator.

See more recipes:

Comments

  • Can the recipe be used to make 2 smaller loaves?

    • — Kay on March 9, 2024
    • Reply
    • Sure!

      • — Jenn on March 11, 2024
      • Reply
      • Idk what happened but my dough was the opposite of sticky – could it really matter that much mixing by hand as opposed to with a mixer? Added more water but idk how this is going to turn out 😬

        • — Meg on March 13, 2024
        • Reply
        • Hi Meg, this should definitely not be dry regardless of how you mixed it. Might you have made a measuring error with the flour or water?

          • — Jenn on March 14, 2024
          • Reply
  • It would be so helpful if the ingredients are in metric also. Thank you 🙏

    • — Monika on March 8, 2024
    • Reply
    • Hi Monika, The great majority of my recipes (including this one) include conversions to metric/weight measurements. To view them, scroll down to the recipe, and immediately under the recipe title on the right side, you’ll see a little toggle. If you move it from “cup measures” to metric, you’ll see measurements that will work for you. Hope that helps!

      • — Jenn on March 8, 2024
      • Reply
  • Hello,
    I would like to ask what type of salt you use for the challah recipe?

    • — Diana on February 28, 2024
    • Reply
    • Hi Diana, this calls for table salt. (When a recipe of mine says salt in the ingredient list, I am referring to regular/table salt. If it calls for something else like kosher salt, I will specify that in the recipe.) Hope that helps and that you enjoy the challah if you make it!

      • — Jenn on February 28, 2024
      • Reply
  • I I followed the directions but The dough didn’t come out nice and sticky like on the picture it came out kind of hard and I have made other breads,so I no what soft and sticky is

    • — Olga talivaa on February 19, 2024
    • Reply
    • Hi Olga, I’m sorry you had a problem with the dough! It sounds like you may have had too much flour as this is definitely a sticky dough. Did you use the spoon and level method for measuring flour? Number 1 in this Baking Tips post explains it nicely. Please LMK if I can help in any other way.

      • — Jenn on February 20, 2024
      • Reply
  • This challah is divine!! My first attempt at a challah so I was a little intimidated but it wasn’t too tricky and was absolutely scrumptious.

    • — Sari Springer on February 17, 2024
    • Reply
  • Hi Jenn
    Love all of your recipes. The challah dough is very challenging. Should more dough come away from sides of bowl. Should sides be scraped down?
    This is my second try. I even use a bench scraper after flouring countertop.
    Thank you, Rose

    • — Rose Kidd on February 12, 2024
    • Reply
    • Hi Rose, so glad you like the recipes but sorry you’re having a problem with the challah dough. It is a very sticky dough – if you look at the pics, you’ll see that it kind of clings to the mixing bowl. Add a little flour (just a few tablespoons) to get the flour to a point that you can work with it. Hope you are able to tackle it!

      • — Jenn on February 13, 2024
      • Reply
      • Hi Jenn,
        This time I used KA flour and wow!!!
        The dough was beautiful. Waiting to put it in the oven, So Excited. Planning to take this to my cook book club later this month after perfecting it.
        Thanks so much, Rose

        • — Rose Kidd on February 13, 2024
        • Reply
        • Yay – so glad you had success with it – thanks for taking the time to report back!

          • — Jenn on February 14, 2024
          • Reply
      • Hi Jenn, I only have KA bread flour. Will bread flour work? Do the measurements need to change?
        Thank you,
        Cindy

        • — Cindy on March 9, 2024
        • Reply
        • Hi Cindy, I don’t recommend bread flour here — sorry!

          • — Jenn on March 11, 2024
          • Reply
  • Hi Jenn, I’m about to try this recipe but would rather replace the honey with sugar. Would that work? What amount of sugar should I add?

    • — Melissa on January 14, 2024
    • Reply
    • Hi Melissa, It’s fine to use sugar in place of the honey. You’ll need to use the same amount (6 tablespoons). Enjoy!

      • — Jenn on January 15, 2024
      • Reply
  • Yum, Yum, yum.. I started making this Challah in 2020, and it has been a hit. I just made a loaf using organic bread flour that I had on hand from the holidays, and it made the most beautiful loaf. This is not only easy but really delicious and makes the house smell amazing on a snowy winter day.

    • — Neil on January 6, 2024
    • Reply
  • I’ve made this a handful of times and I get compliments every time!!

    • — Michela Montgomery on December 29, 2023
    • Reply
  • I have made this recipe every week for more than a year , I love it. I have made round challahs for all the holidays! I live in Bangor Northern Ireland where fresh challah is a Gift u make for others . I do have to add boiling water in a pan to proof as it’s cold and damp by the ocean where I live. It changed the proof times. But my challah is usually wonderful.
    On occasion my bread is dry. Is that from over or under proofing?
    Thank you

    • — Glenda Klein on December 20, 2023
    • Reply
    • Hi Glenda, so glad you like this! If it comes out dry sometimes, it’s probably just been a bit overbaked (it wouldn’t be a result of under or over-proofing).

      • — Jenn on December 20, 2023
      • Reply
  • Directions are terrific. This is my first attempt at bread and it came out perfectly! A few notes: I combined the wet and dry by hand before starting the dough hook on low. It only took 3.5 mins to finish! I also used the two day instructions and finished up to braiding before refrigerating. Following the instructions worked really well!! FYI I also don’t own a pastry brush so I used a rolled up piece of paper towel which worked great for the egg wash!

    Question: I personally love a much sweeter challah so I’ll try 2x-3x the honey next time. Any suggestions on how to modify the rest of the dry ingredients to accommodate the extra liquid and sweetness?

    • — Sarah F on December 19, 2023
    • Reply
    • Hi Sarah, so glad you enjoyed this! I wouldn’t recommend doubling or tripling the honey as it will really throw off the wet to dry ratios. Instead, I’d suggest slathering it with a little honey butter. The one from this recipe would work nicely.

      • — Jenn on December 20, 2023
      • Reply
  • I made Jenn’s Challah bread last week for the very first time making challah. I’m not a bread baker, but my bread looks just like Jenn’s and was so tender and delicious I’ll be making it again this weekend!

    • — Liz Vorbeck on December 7, 2023
    • Reply
  • Always my go to recipe for Challah! How do I post a pic?? 🙂

    • — Chef Gigi on November 23, 2023
    • Reply
    • Glad you like it! Unfortunately, the blog isn’t set up to receive pictures but you can email them to me at jennifer@onceuponachef.com, or if you’re on Instagram, you can share it there; be sure to tag me @onceuponachef!

      • — Jenn on November 24, 2023
      • Reply
    • Jenn…… I just made your challah! I am making it for the holidays. I love the recipe. My first attempt at bread, and it turned out beautifully! Thank you for your great recipes!!!

      • — Bev on December 16, 2023
      • Reply
  • Love this challah. Made it for my family & they loved it. Light, fluffy & delicious.

    • — Máire on November 23, 2023
    • Reply
  • Hi Jen! I made your challah tonight and it was PERFECT! I followed your directions exactly. Your recipes are always my “go to”. Thank you! I wish I could post a picture here but not sure how to do it.

    • — Kathy Fialk on October 30, 2023
    • Reply
  • would this recipe work with a different braiding technique? Like braiding 2/3 of the dough for the bottom of the loaf and then placing the remaining 1/3 braided on top? How would the baking time differ?

    • — Sally on October 24, 2023
    • Reply
    • Sure, Sally, that will work. I don’t know how it will impact the baking time though, so keep a close eye on it. Enjoy!

      • — Jenn on October 25, 2023
      • Reply
  • Favorite challah recipe I’ve tried so far! I did have trouble with the dough not rising at first – might have just been too cold in my kitchen. I re-kneaded the dough a little then stuck it in a warm (but not turned on) oven with just the light on and it rose fine.

    • — Amanda on October 19, 2023
    • Reply
  • can you share how to make this recipe in a breadmaker? haven’t tried yet but excited.

    • — Rachel Fried on October 12, 2023
    • Reply
    • Hi Rachel, I’ve never used a bread machine so I can’t say confidently whether or not this would be appropriate for one. Sorry I can’t be more helpful!

      • — Jenn on October 12, 2023
      • Reply
    • Hi, did you try the bread maker? i’m curious if i can make the dough on the dough setting in my bread maker.

      • — Erin McElveen on October 31, 2023
      • Reply
  • sorry if this a duplicate question but I didn’t want to ready all 400 comments : )
    recipe calls for 1 Tablespoon instant/rapid rise yeast, the little yeast packets are 2 1/4 teaspoons….the recipe will need 2 packets, one all and the other 3/4 of a teaspoon? I’m curious why you didn’t write the recipe to accommodate the way yeast is packaged or made note of 2 packets would be required..thanks

    • — Rifka on September 24, 2023
    • Reply
    • Hi Rifka, Thanks for pointing that out. You can also buy yeast in a jar or bag, but I will add a note to the recipe to indicate to readers that they will need more than one packet.

      • — Jenn on September 25, 2023
      • Reply
  • Hi Jenn,

    I’m making this challah for the first time for Rosh. I’d like to make it a round raisin challah so my question is when do I add the raisins?
    Also, the video link to how to make round raisin challah is awesome – thank you.
    Depending on how the challah turns out I will probably never buy a store made one again. But based on all of your recipes that I’ve made through the years I know it will be great.

    • — Marilyn S on September 15, 2023
    • Reply
    • Hi Marilyn, I would add the raisins at the very end of the kneading process – just mix until they are evenly incorporated. Hope it turns out well!

      • — Jenn on September 16, 2023
      • Reply
  • I’ve made this challah five times. Each time it gets better.
    I’ve learned that you’re right – using weight for flour instead of volume is the best thing I’ve learned in baking. Thank you.
    I follow the recipe exactly. It’s the most perfect detailed bread recipe I’ve done in my ten years of baking yeast breads.
    My kitchen is chilly so I proof in the oven. Turn it on to 350 and leave on just till it starts to feel warm and then turn it off. Leave the oven light on. Put dough in and wait.
    So excited to make the challah for Rosh Hashanah family dinner for the second time! After trying many famous bakers’ recipes I’m grateful I found this last year.
    Shanah Tovah

    • — Jo Ann Lewis on September 13, 2023
    • Reply
  • Jenn – I do not have a stand mixer with a dough hook. What are the initial instructions for mixing the dough by hand? Thanks.

    • — Priya on September 12, 2023
    • Reply
    • Hi Priya, This is a pretty wet dough so it might be a bit challenging to knead by hand. I would mix the flour, yeast, and salt in a large bow. In a separate bowl, combine the lukewarm water, oil, honey, 2 of the eggs, and the egg yolk. Add to the dry ingredients and use a wooden spoon to mix until you have a shaggy dough. I would then just knead by hand in the bowl for 5 to 7 minutes.

      • — Jenn on September 14, 2023
      • Reply
  • Hi Jenn!

    Can this recipe do well with a cold rise? Doing a cold rise is easier those that don’t want to wait until after work to start this task. Love all your recipes and looking forward to trying this one!
    Shana Tova!

    • — Tracey on September 12, 2023
    • Reply
    • Sure, Tracey – that should be fine. Happy New Year!

      • — Jenn on September 12, 2023
      • Reply
  • This was our first Challah attempt. The bread came out GREAT! We put both sesame and poppy seeds on top. The crust was the perfect texture of lightly crispy, the bread itself, sweet and perfect for the butter we shmeared on it. The braiding was my first attempt but not my last. My husband and I will definitely be baking this one again!

    • — Cara and Glenn on September 10, 2023
    • Reply
    • Making this now
      In solidarity & prayer

      • — Challah on October 13, 2023
      • Reply
  • I have made your excellent Challah recipe twice. It is by far the best recipe. Others are often somewaht daunting. I am so pleased with this and will continue to make it following your recipe and explicit directions. My second one is in the freezer, as I write, awaiting the start of Rosh Hashanah. Thank you so much.

    • — Joan B. Gordon on September 10, 2023
    • Reply
  • Hey Jenn! I’ve made this recipe before and love it. Was hoping to make it for Rosh Hashanah this yerar, and was wondering if you had any recommendations about how to shape this into a round challah?

    Thanks so much!

    • — Caroline on September 8, 2023
    • Reply
    • Hi Caroline, I like the woven method shown in this video tutorial. Hope that helps!

      • — Jenn on September 10, 2023
      • Reply
  • This recipe was terrible. My dough was hard, and it was super cakey after baking. It was nothing like Challah, and the recipe called for the salt and yeast together, which kills the yeast. For a good challah, the yeast needs to bloom in the lukewarm water. Very dissapointed.

    • — Erez Hadar on August 25, 2023
    • Reply
    • This has been my weekly challah recipe for the past few years and it really is delicious and beautiful resulting in a challah that has a perfect medium crust and the specific challah style inside that you would hope for (not just bread-like). Perhaps you can give it another try using the weight measurements for an easier and more predictable experience. I follow every step in Jenn’s recipe and adjust the rise times (by sight) as the humidity and temperatures change in my home which results in a fun baking experience with consistent results (& my home smells amazing after baking). No blooming necessary with this recipe.

      • — Sara on September 9, 2023
      • Reply
      • I agree! Give it another try.
        Jenn’s recipe is perfection! Best we’ve ever had & the fam says better than the one we get from the award winning famous bakery in our area. Love that it’s not too sweet or too dry. And we love how perfectly symbolic it is for the Challadays🙏Illuminates the table! 🌟 it’s special & makes you & your family feel proud having made it together. Thank you Jenn👏🌟❤️

        • — Mary on September 10, 2023
        • Reply
    • You can bloom the yeast in the water if you don’t use the instant yeast. Use the active dry yeast instead. Either way, it turns out well.

      • — Matt on September 24, 2023
      • Reply
  • Baked this yesterday to share at an event and it got rave reviews. This was just my second attempt at Challah and I loved the detailed illustrations, especially for braiding which I am proud to say I have finally mastered. Thanks for the great recipe.

    • — Mary W. on August 23, 2023
    • Reply
  • Jenn,

    I haven’t used your recipe yet, but I would like to make two challah loaves at once. Can I just double the measurements in your recipe? If not, can you provide correct measurements for two loaves?
    Vicki

    • — Vicki on August 11, 2023
    • Reply
    • Yes, I would just double all the ingredients. Hope you enjoy!

      • — Jenn on August 14, 2023
      • Reply
  • Hi, I have made the challah twice and today will be the third time. The first time I made it with my grandsons and it turned out with a yeast taste and quite dense. The second time I made it myself and left it in the refrigerator over night and then took it out in the morning for the second rise. It turned out perfect and I Received compliments! I used King Arthur unbleached all purpose flour both times. The first time I used Rapid Rise Yeast. The Second time I used Active Dry yeast. The third time I have repeated what I did on the second go around. However I was wondering if I could leave it in the refrigerator for two or three days before baking it? Thank you for the wonderful recipe.

    • — Peggy on July 3, 2023
    • Reply
    • Hi Peggy, Glad you had better luck the second time around. I think I’m weighing in too late to help, but I’ve never refrigerated the dough for 2 to 3 days before baking so I can’t say how it will come out. If you did store it in the fridge for a few days, I’d love to hear how it turns out!

      • — Jenn on July 6, 2023
      • Reply
  • My dough was hard.i followed the recipe perfect.

    • — Constance Ellis on June 9, 2023
    • Reply
  • I accidentally added an extra 1/4 cup of flour because I misread the recipe. Despite this it still turned out amazing. So good eaten warm with butter and honey. Will definitely make again when time allows.

    • — Alisson White on May 7, 2023
    • Reply
  • Hello Jenn,
    I wanted to ask if bread flour could be substituted for the AP flour? If so, is the amount in bread flour the same as the amount of all purpose?

    • — Diana on April 10, 2023
    • Reply
    • Hi Diana, I don’t recommend bread flour for this — sorry!

      • — Jenn on April 10, 2023
      • Reply
  • THANK YOU for this!! I made this for my family’s Easter dinner and it turned out beautifully. Everyone loved it and complimented me on it. Your instructions were very clear and easy to follow. Now I’m highly considering making this for more than just the holidays!

    • — Hannah on April 9, 2023
    • Reply
  • Used a blend of AP and bread flour for this, and it turned out really nicely. Overproofed it slightly, but that’s on me. It still baked beautifully, and it had that rich egg and slight sweetness that good challah does. I’ll make this again.

    • — Matt on March 5, 2023
    • Reply
  • I’ve just started a love of making dough…. lots of pastas and bread of late. After getting discouraged by a couple of French bread fails, I watched Molly Yeh make challah one morning. Hers, and so many other recipes, seem to be scaled for two loaves, so after casting about the internet for a while, I found yours.
    So perfect! From beginning to end just a wonderful bread making experience! Clear explanations, great pictures of each step, and a final amazing bread. I suppose it’s an odd thing to say, but the whole thing was very uplifting and made me so happy. Thanks so much for your work and dedication and putting yourself out here so that we may have delicious foods! Looking forward to the brioche up next.

    • — Steve on February 22, 2023
    • Reply
    • 😊

      • — Jenn on February 22, 2023
      • Reply
  • I am so grateful to have found this recipe! This is a delicious, soft, rich bread that rivals the very best challah I’ve had at our local delicatessen. I have made it twice, and it has received rave reviews from family and friends. The instructions are clear and helpful. One thing that I changed slightly: I added a teaspoon of heavy cream to the whole egg for the glaze…resulted in very nice shine on the crust, but still tender.

    Thanks so much for sharing the recipe and your expertise!

    • — Cheryle on February 7, 2023
    • Reply
  • Hello! I am about to make this recipe and I just noticed that the gram measurement for the flour in this online recipe varies quite a bit from the recipe published in your first book (530g in the book and 560g online) and I was wondering which measurement you would recommend for this recipe? I know that 5 grams per cup isn’t that big of deal when you are only using a cup or two, but at 4.25 cup of flour, that difference really adds up. I read below that you are slowly converting your gram flour measurements to line up wit 130g per cup (which is also what I get when I spoon and sweep!) and it has me wondering if your first book’s recipes were tested using the gram measurements or the volume measurements? If it’s volume, then I can confidently move forward converting and using a 130 g per cup of flour measure for the recipes, or if I can and should use the printed 125 g measures given. Thanks for developing and sharing such wonderful recipes!! I made your beef stew recipe last night and it was a huge hit with the family, and I am making your buttermilk chicken tenders tomorrow and I can’t wait!!

    • — Denette on February 6, 2023
    • Reply
    • Hi Denette, Yes, you can confidently move forward using these measurements. For the book, I used online resources to do the converting and now that I consistently weigh my ingredients, I’ve determined that 1 cup is the equivalent of 130 grams. Glad to hear you enjoyed the beef stew and hope you enjoy the challah!

      • — Jenn on February 7, 2023
      • Reply
  • When you put the baking sheet on top of another is there a space between the two

    • — Ron on January 16, 2023
    • Reply
    • Hi Ron, no there is not a space between the two — you nest one inside/on top of the other. Hope that clarifies!

      • — Jenn on January 16, 2023
      • Reply
  • I made this challah many times and this is by far the best recipe for challah. Dough rises smoothly and stays soft all week long. Kids eat it with butter and drizzle of honey. Thank You

    • — Krystyna on January 7, 2023
    • Reply
  • My challah turned out very dense and cakey. I searched up reasons as to what may have caused this issue and read that salt kills yeast when put together. This could have very well explained why it did not rise. I wish the outcome of the texture was different because I do like the taste!

    • — Alex on January 5, 2023
    • Reply
  • I really want to try this recipe. Can this be made without a stand mixer?

    • — Andrea Nicholson on January 2, 2023
    • Reply
    • Sure, Andrea, you can make it by hand. Hope you enjoy!

      • — Jenn on January 3, 2023
      • Reply
  • It would be great to know what your actual weight is by using your spoon and knife method on the flour. I knew ahead of time it’s somewhere between sifted (4 oz per cup) and unsifted (5 oz per cup) but depending on how “aggressively” I spooned, I got between 4.5 and 4.75 oz per cup. Times 4 cups… that’s a meaningful difference in flour. Would be nice to have both mentioned in the recipe (the spoon/knife technique who aren’t regular bakers and don’t weight)…

    So far so good… I just braided so we’ll see the final (but I’ve done enough bread to know this is at least pretty good).

    • — Jen Nelson on January 2, 2023
    • Reply
    • Hi Jen, The great majority of my recipes (including this one) include conversions to metric/weight measurements. To view them, scroll down to the recipe, and immediately under the recipe title on the right side, you’ll see a little toggle. If you move it from “cup measures” to metric, you’ll see measurements that will work for you. Hope that helps and that the challah came out well!

      • — Jenn on January 2, 2023
      • Reply

Add a Comment

This site uses Akismet to reduce spam. Learn how your comment data is processed.