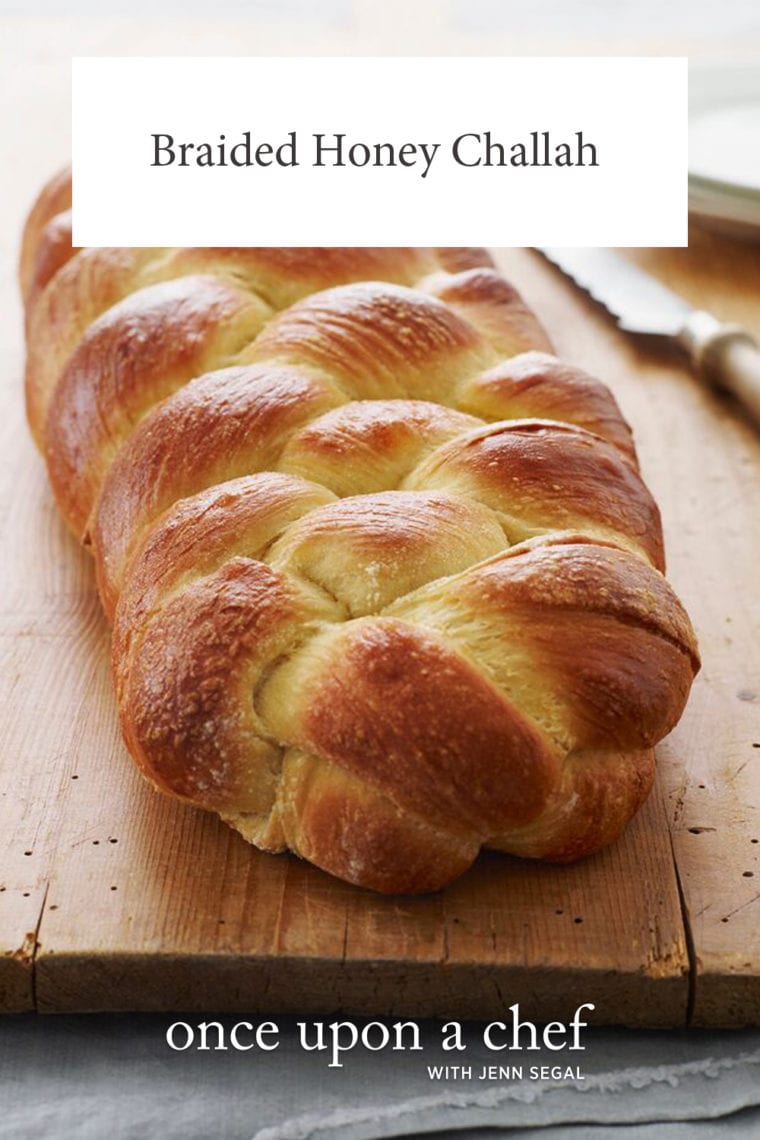
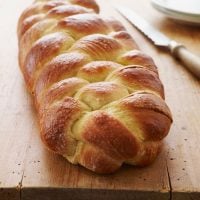
Challah

This post may contain affiliate links. Read my full disclosure policy.
Learn how to make the best homemade challah with this easy recipe and step-by-step braiding guide—perfect for Shabbat, holidays, or any occasion!
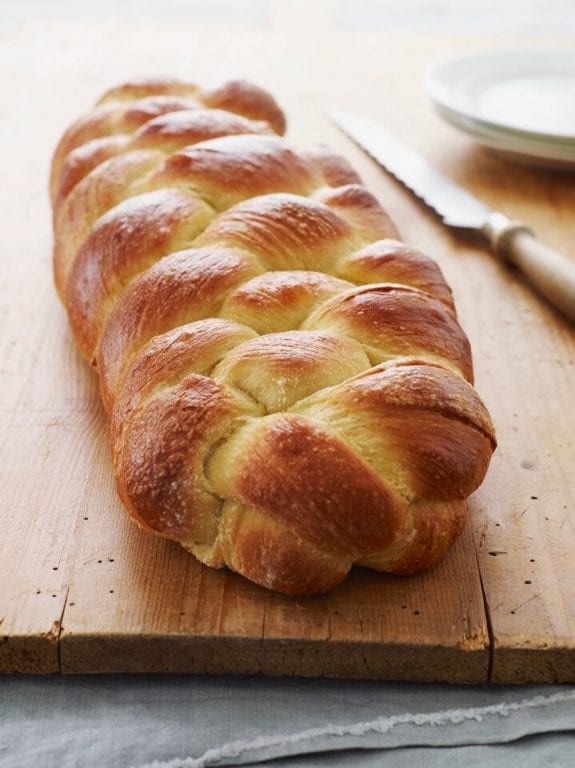
Photo by Alexandra Grablewski (Chronicle Books, 2018)
Challah is the bread of celebration in Jewish tradition, but I put it in the matzo ball soup and bagel category: it appeals to everyone. It’s a rich, slightly sweet loaf with a shiny, golden crust and pillowy-soft interior. But what makes it truly special is its distinctive braid, which symbolizes, among other things, the joining together of family and friends.
Rest assured, challah looks like far more trouble than it actually is. Think of it as a once-in-a-while baking therapy project. Kneading and braiding the dough, smelling the challah baking in the oven—it really is satisfying. And when the long braided loaf is presented at the dinner table, it is a sight to behold!
I owe much of the credit for this recipe to Nanci Hirschorn, one of my lovely readers, who has been perfecting her challah recipe for over thirty-five years. Thank you, Nanci, for all the pointers! Heads up: this recipe makes one 16-in loaf. It’s huge! If you have leftovers, use it to make challah French toast.
What You’ll Need To Make Challah
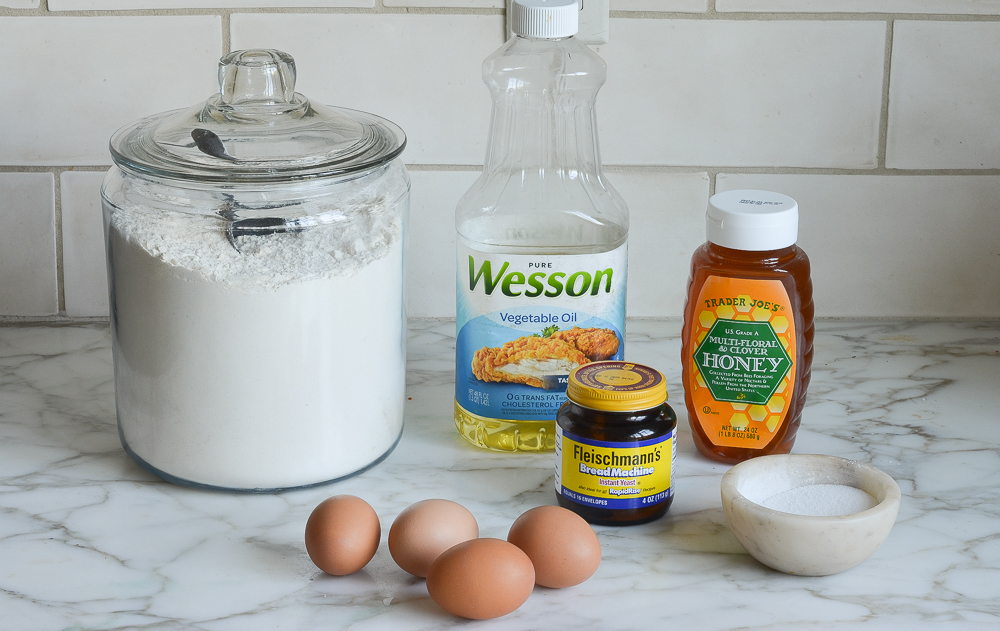
- All-purpose flour: Forms the base of the dough.
- Instant/rapid-rise yeast: Helps the dough rise, giving the bread a light, airy texture—and it works faster than regular active dry yeast. You can find it in jars or packets, but if you’re not a frequent baker, packets are the way to go. Just keep in mind this recipe calls for 1 tablespoon, which is more than a single packet provides.
- Salt: Enhances the flavor
- Lukewarm water: Hydrates the flour, activates the yeast, and helps bind the ingredients together to form the dough.
- Vegetable oil: Adds richness and moisture to the bread, contributing to its soft and tender crumb.
- Honey: Sweetens the dough and adds moisture, while also contributing to the flavor and helping with browning.
- Eggs: Provide richness, moisture, and structure to the dough, giving the challah its characteristic golden color and tender texture. Be sure your eggs are room temperature; this dough is slow to rise and cold eggs will slow it down even further.
- Jump to the printable recipe for precise measurements
Step-by-Step Instructions
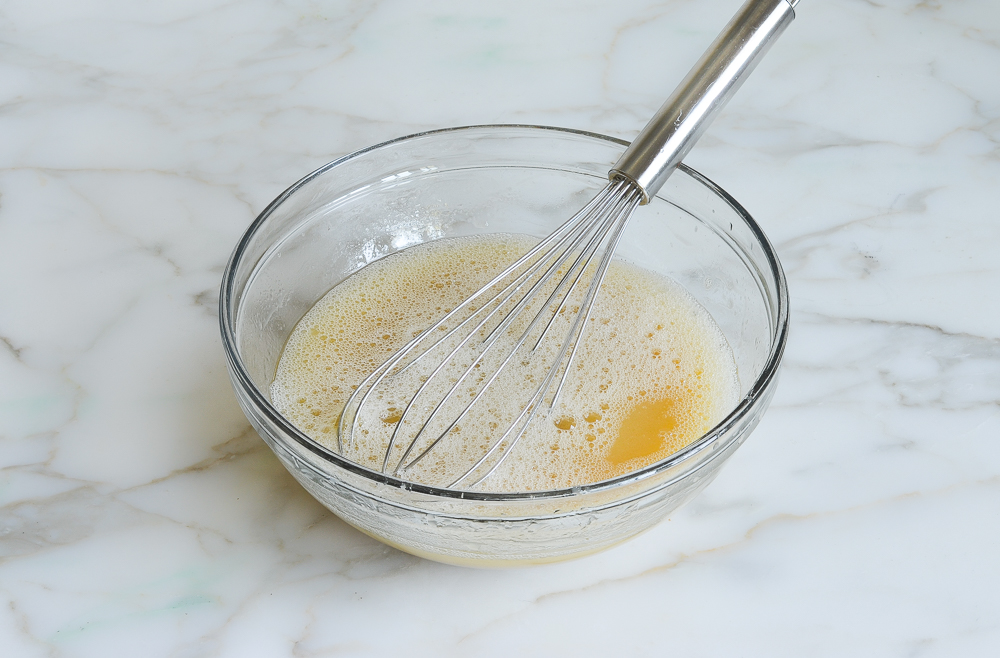
Start by whisking together the lukewarm water, oil, honey, two eggs, and the egg yolk until well combined, then set the mixture aside.
Using a stand mixer with the dough hook attachment, combine the flour, yeast, and salt. Give it a quick mix to evenly distribute the ingredients.
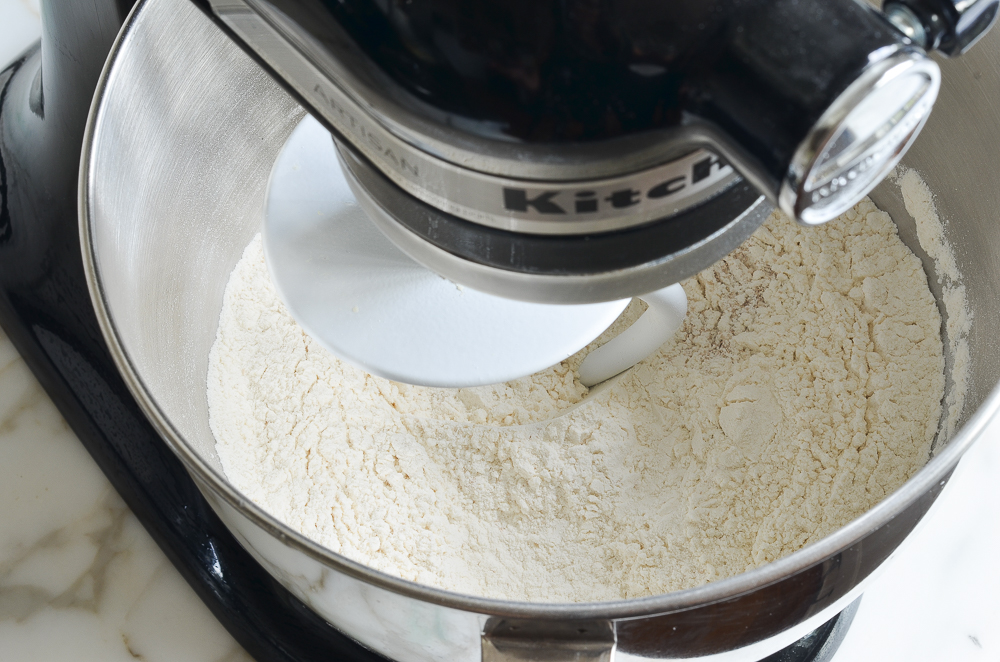
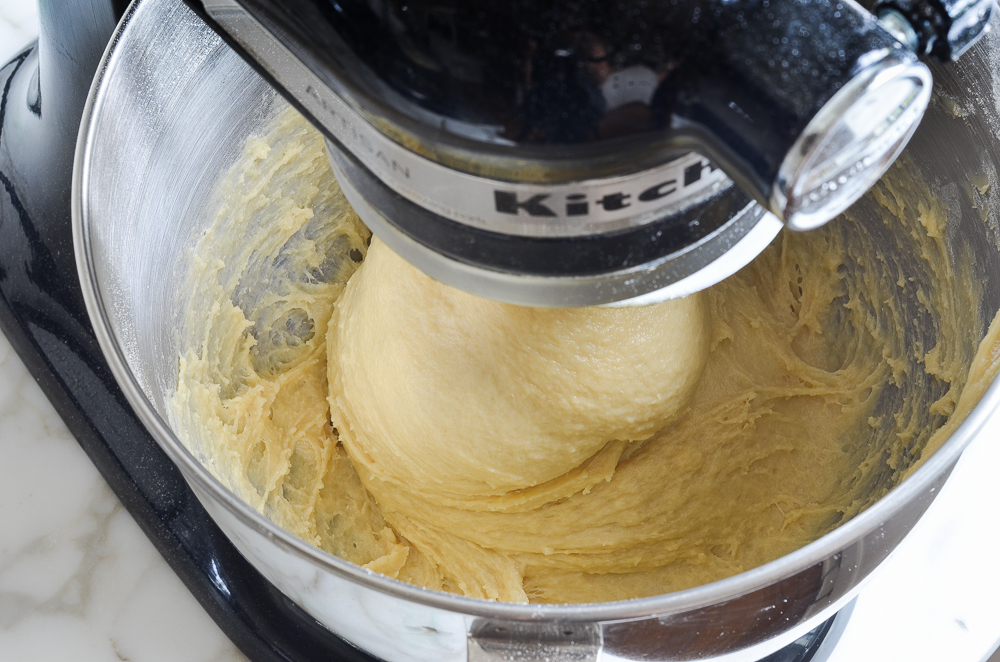
Gradually add the wet ingredients to the dry mixture in the stand mixer. Knead on medium-low speed until the dough becomes sticky and clings to the bottom of the bowl, which should take around 5 to 7 minutes. If the dough seems too wet, don’t worry—it’s meant to be that way.
Generously flour your hands before handling the dough, then transfer it to a lightly floured surface. Lightly dust the top with flour and knead until it forms a soft, smooth ball.
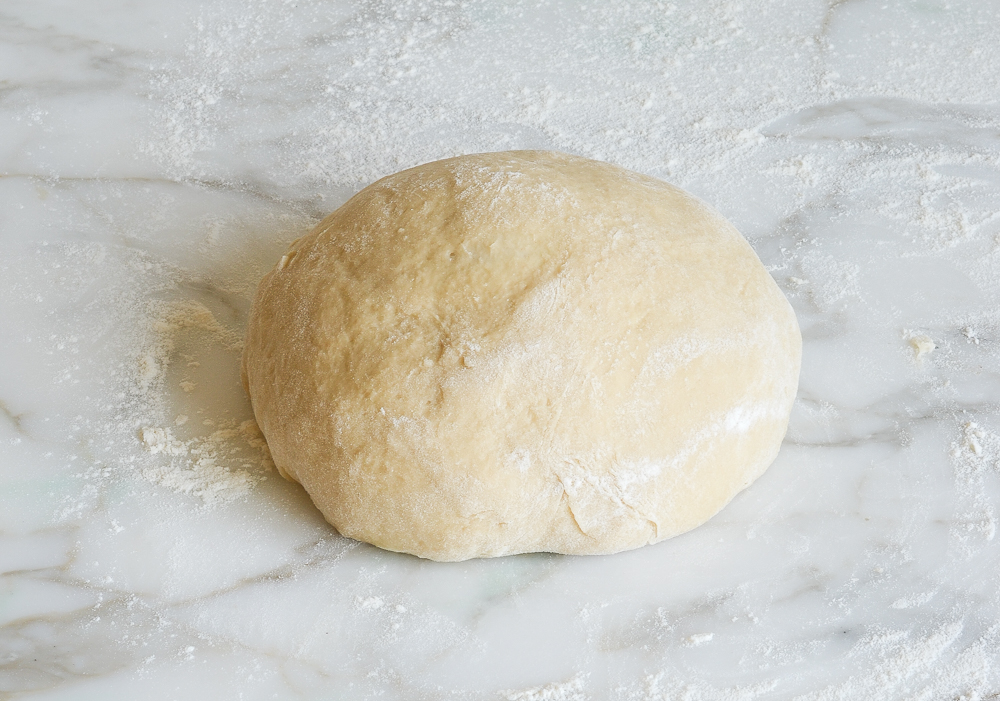
Lightly grease a large bowl with oil or nonstick spray, then place the dough inside and flip it to coat the top. Cover with plastic wrap and let it rise in a warm, draft-free spot until it doubles in size, which may take 2 to 3 hours. Keep in mind that rising times can vary based on kitchen conditions like temperature, humidity, and kneading technique.

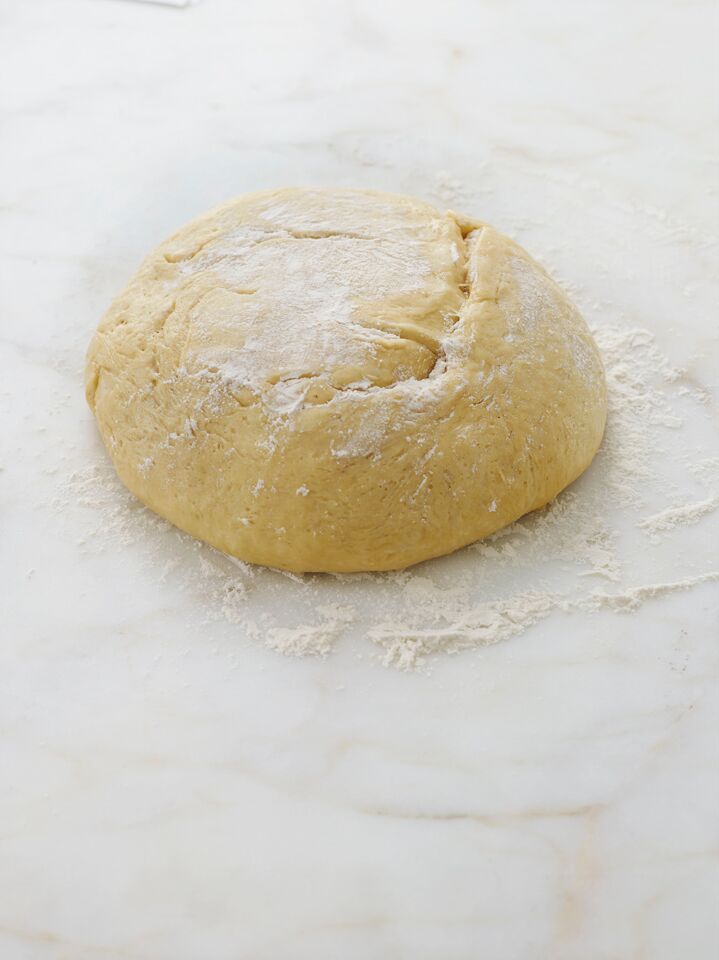
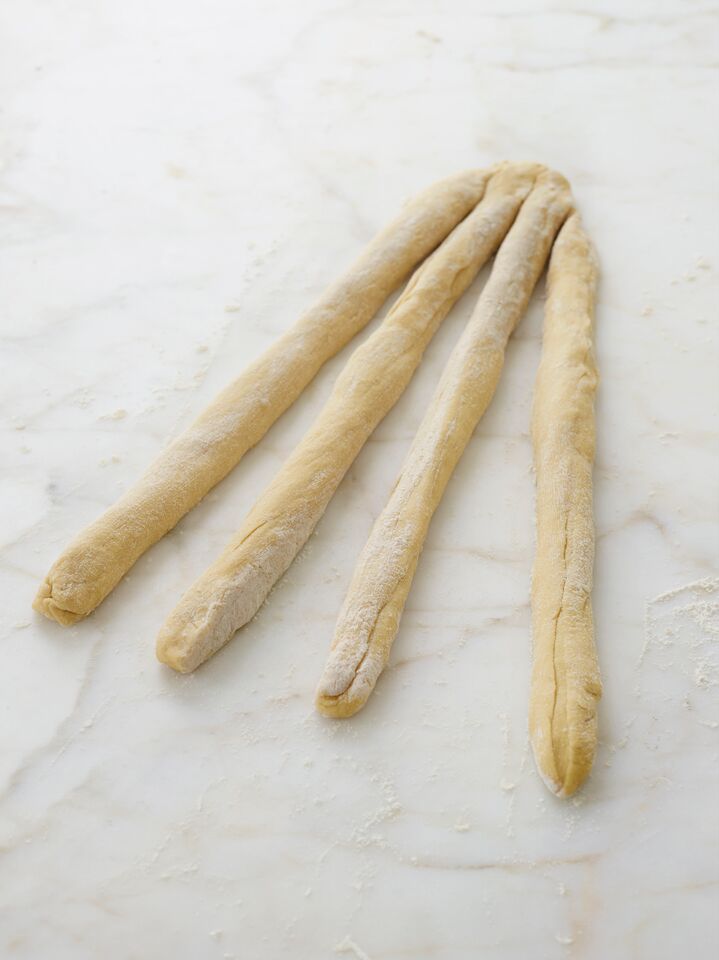
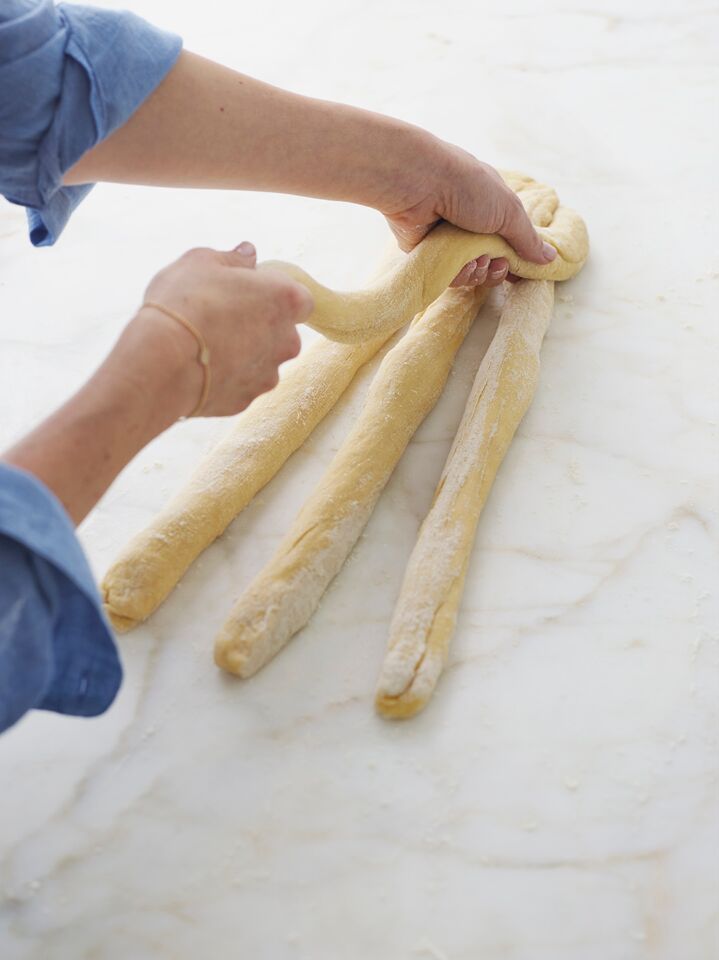
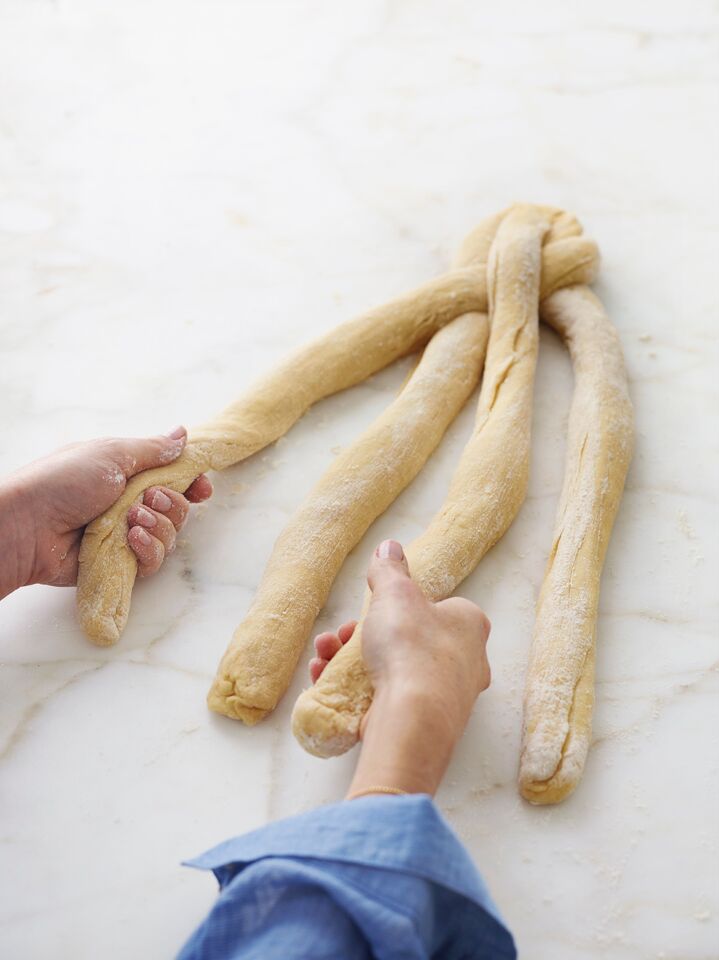
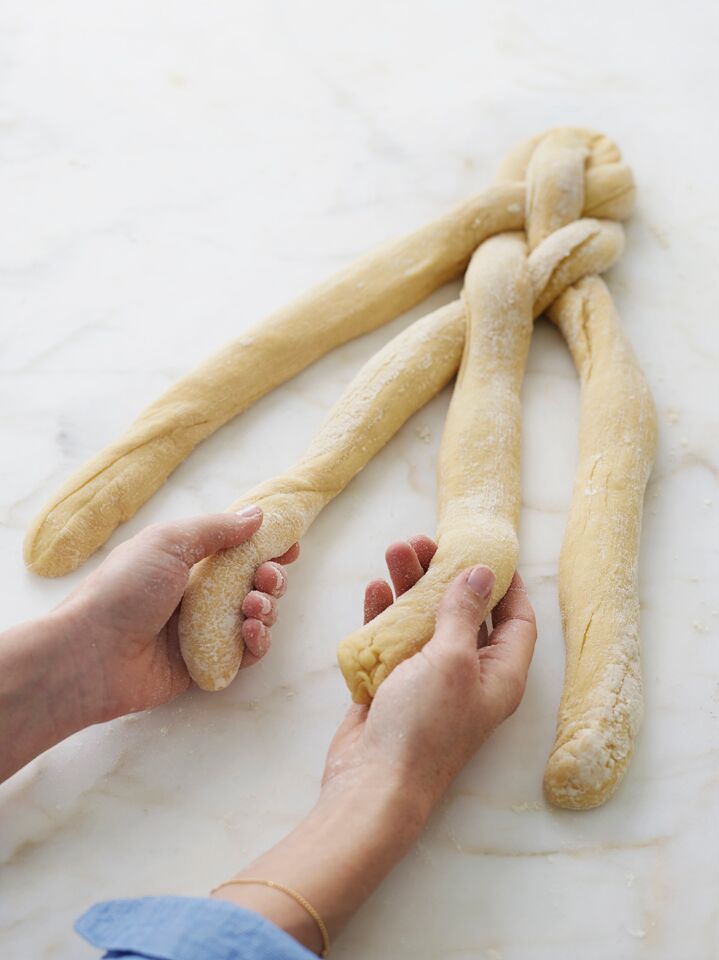
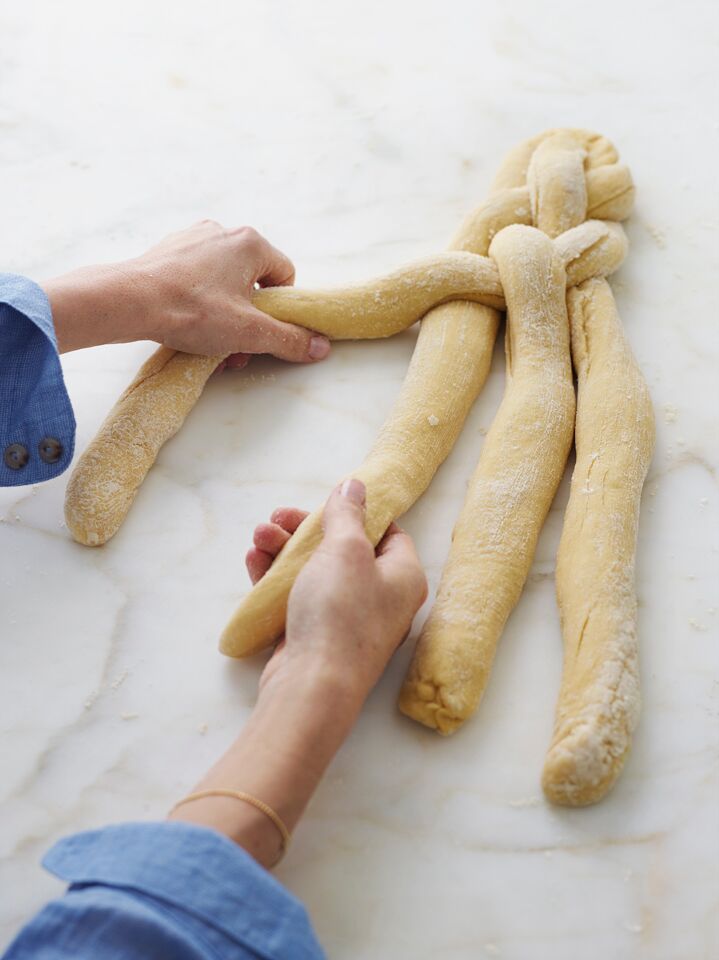
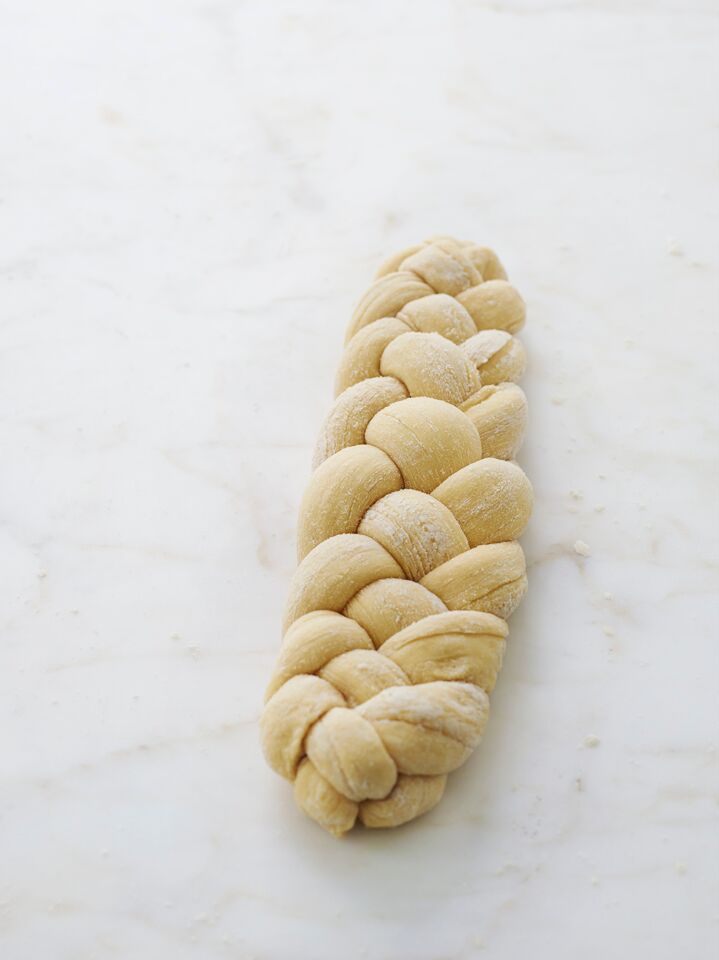
To braid the dough, first turn it onto a lightly floured surface, letting it deflate naturally. Lightly dust with flour, then divide it into four equal pieces. If you prefer precision, each piece should weigh around 9 oz (260 g). Braiding challah may seem intimidating, but a simple four-strand braid is both easy and pretty. If you’ve ever braided hair, you’ll have a head start, but even if not, it’s straightforward to learn.

Roll each piece of dough into a 20-inch rope and arrange them vertically in parallel. Pinch the top ends together and fan out the strands. If the ropes shrink, gently stretch them back to length. To start braiding, take the rightmost strand and weave it through the others using an over-under-over pattern. Keep repeating this sequence until the dough is fully braided. Tuck the ends under the loaf to give it a finished look.

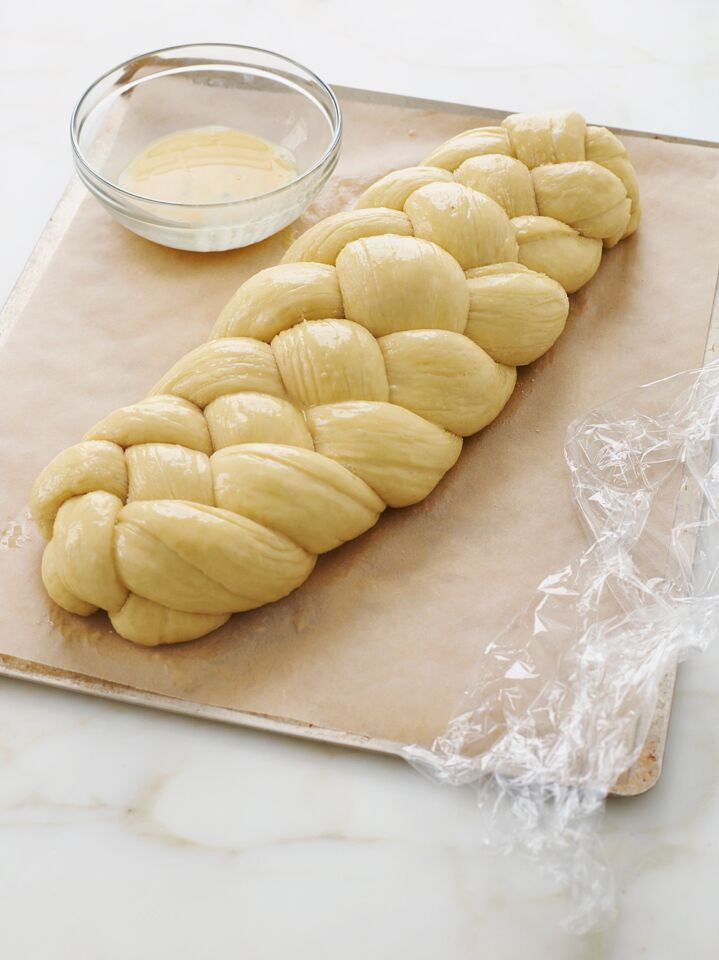
Place the braided loaf on a parchment-lined baking sheet and cover it loosely with plastic wrap. Let it rise in a warm spot until it’s about 1.5 times its size, which takes 1 to 2 hours. Toward the end of the rise, preheat your oven to 350°F with a rack in the middle. The loaf will continue to rise as it bakes. Beat the remaining egg and brush it generously over the dough. If you’d like, sprinkle poppy or sesame seeds before baking.
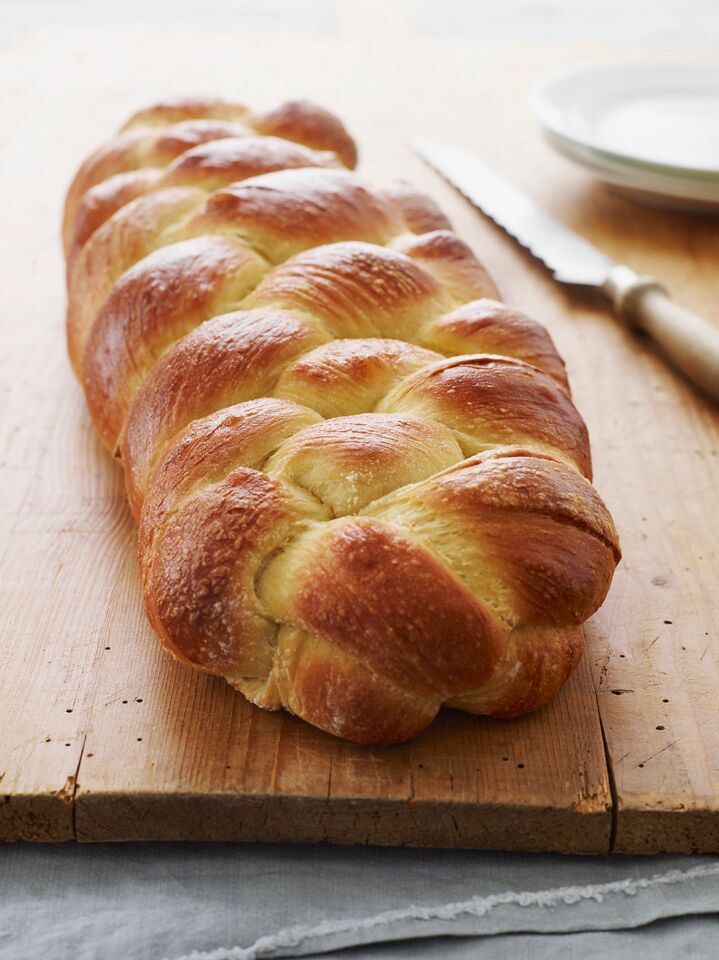
Place the baking sheet on top of another to prevent the bottom from over-browning. Bake for 30 to 35 minutes until the crust is deep golden and the internal temperature reaches 190°F to 200°F. Transfer the bread to a rack to cool. Challah is best enjoyed fresh, but leftovers can be stored in a sealed plastic bag for a few days.
You May Also Like


Homemade Challah
Ingredients
- 4¼ cups all-purpose flour, spooned into measuring cup and leveled-off, plus more for dusting
- 1 tablespoon instant/rapid-rise yeast (see note)
- 2 teaspoons salt
- ¾ cup lukewarm water
- ¼ cup + 2 tablespoons vegetable oil
- ¼ cup + 2 tablespoons honey
- 3 eggs, at room temperature
- 1 egg yolk, at room temperature
Instructions
- In a stand mixer fitted with the dough hook, combine the flour, yeast, and salt. Mix on low speed for 30 seconds to combine. In a separate bowl, combine the lukewarm water, oil, honey, 2 of the eggs, and the egg yolk. Add to the dry ingredients and knead on medium-low speed until you have a sticky dough that clings to the bottom of the bowl, 5 to 7 minutes. The dough may seem too wet but have faith—it’s supposed to be.
- Dust your hands generously with flour, then scrape the sticky, elastic dough out onto a lightly floured work surface. Dust the top of the dough lightly with flour and knead briefly into a soft, smooth ball. Lightly grease a large bowl with oil or nonstick cooking spray. Place the dough in the bowl, flip it over once so the top is lightly oiled, and then cover the bowl with plastic wrap. Allow the dough to rise in a warm, draft-free spot until it's puffy and doubled in size, 2 to 3 hours.
- Invert the dough onto a lightly floured work surface and dust with flour. It will deflate. Cut the dough into four even 9-oz (255-g) pieces, and then stretch and roll each piece into a rope about 20 inches (50 cm) long. Lay the ropes parallel to one another (vertically). Pinch them tightly together at the top, and then fan them out. If the ropes shrink a bit, just work them back into their original length.
- Begin by taking the strand farthest to the right and weave it toward the left through the other strands using this pattern: over, under, over. Take the strand furthest to the right and repeat the weaving pattern again: over, under, over. Repeat this pattern, always starting with the strand farthest to the right, until the whole loaf is braided. Tuck the ends under to give the loaf a finished look.
- Carefully transfer the braided loaf to a parchment-lined 13 x 18-inch (33 x 46-cm) baking sheet. Cover the loaf loosely with plastic wrap and let it rise in a warm, draft-free spot until about 1.5 times the size, 1 to 2 hours. Toward the end of the rising time, preheat the oven to 350°F (175°C) and set an oven rack in the middle position. (Note that the loaf will continue to rise significantly in the oven.)
- In a small bowl, beat the remaining egg and brush the beaten egg generously over the risen dough. (Note: If you like, sprinkle poppy or sesame seeds onto the challah before putting it in the oven.) Place the baking sheet atop another baking sheet; this will prevent the bottom crust from browning too much. Bake for 25 to 35 minutes, until the crust is a rich brown color and the internal temperature is between 190°F and 200°F (88°C and 93°C) on an instant-read thermometer. Remove the bread from the oven and place it on a rack to cool. Challah is best enjoyed fresh, but leftovers will keep for a few days in a sealed plastic bag.
Notes
Nutrition Information
This website is written and produced for informational purposes only. I am not a certified nutritionist and the nutritional data on this site has not been evaluated or approved by a nutritionist or the Food and Drug Administration. Nutritional information is offered as a courtesy and should not be construed as a guarantee. The data is calculated through an online nutritional calculator, Edamam.com. Although I do my best to provide accurate nutritional information, these figures should be considered estimates only. Varying factors such as product types or brands purchased, natural fluctuations in fresh produce, and the way ingredients are processed change the effective nutritional information in any given recipe. Furthermore, different online calculators provide different results depending on their own nutrition fact sources and algorithms. To obtain the most accurate nutritional information in a given recipe, you should calculate the nutritional information with the actual ingredients used in your recipe, using your preferred nutrition calculator.
My first time making challah bread and it turned out amazing! I did substitute half the flour with whole wheat flour, and the loaf came out fluffy and delicious. We ate half and used the rest for your French toast recipe. Thanks for another keeper!
Hi Jenn – if I use half whole wheat flour, do I need to change anything else? I’ve made your challah before and it’s amazing! Just ran out of white flour (oh the horror!) and trying to avoid going to the store. Thanks!
Hi Elizabeth, no need to make any adjustments if using half whole wheat flour. I do think the finished product will be a bit drier though.
Hi Jen,
Can this recipe be made into two round loafs?
Thanks.
Sure. Baking time may be slightly less so keep a close eye on them. Enjoy!
Hi Jen,
I made your Apple cake the other day and it was such a hit!!! I’m thinking of making the challah tomorrow, but I don’t have enough honey in my house! How much sugar (In grams) can I substitute for honey or can it be a 1-1 substitution?
Thanks!
Glad you liked the apple cake! Yes, I’d do a 1:1 substitution so you’ll need 75 grams of sugar. 🙂
Hi Jenn, I made this today and I would give the result six out of ten. The loaf looked exactly like the picture in your book, but it was not fluffy like a brioche, it was the consistency of a regular white loaf. I don’t think this is right is it?
It seemed to go wrong at the dough stage, the dough was very clingy and stuck to the dough hooks, leaving a lot of dry mix in the bottom of the bowl. I pulled all the dough off the hooks and kneaded it by hand, but it was still very dry and I added some more water. Your recipe says that it will be very wet, so clearly something went wrong.
I live in Canada and I know that my bread maker recommends using less flour if it is Canadian. Could this be the reason do you think? I used Robin Hood all purpose flour and I used a cup measure levelled off with a knife, so I’m confident I put in the amount of flour exactly as in the recipe.
It tastes fine but it just seems to be the wrong consistency. I think I’ll use it to make the Baked apple French toast!
Hi Peter, I do think that’s the cause — there is so much variation between different brands, even in the States. I use King Arthur for all my baking so if you can find that, I recommend it for best results. If not, I would try reducing the flour by 1/2 cup next time; you can always add more if the dough is too wet. Hope that helps!
Amazing aroma and texture. I was apprehensive about the braiding but your instructions made me realize it was quite simple. I am using most of the bread for your baked apple french toast. I definitely will be making challah again.
This was good, if a bit bland. I used active dry yeast (proofed it in the water) and it took about 2 hours for the first rise. I let it sit for 30 minutes for the second rise – shouldn’t have done it. It started growing side-wise – the braid became messy and the bread ended up very wide. My oldest son said this was great, since he likes bigger slices 🙂 However, I would have liked a tighter loaf. Still, my issue wasn’t with aesthetics. The bread tasted bland. I make a sweet bread (with walnut filling) that has some lemon and orange peel, besides some vanilla extract. I think this bread could benefit from some sort of flavor – just my thought. Thank you for sharing your wonderful recipes and ideas with your readers!
Hi Jenn,
Can you make this Gluten Free? If so, what flour do you recommend?
Thanks!
I don’t recommend it, Sandy. Sorry!
Forgot 1 egg but it still came out delish! Thank you!
My challah looked beautiful but the dough was so elastic that I felt like I was fighting with it. Can u please tell me what might have gone wrong
Hi Byrna, Did you use all-purpose flour?
Do you have an opinion on SAF instant red yeast vs gold yeast for this recipe? It seems gold is for sweet breads and that’s what this is right? Thanks Jenn!!!!!
Hi Kristina, Either will work, but I’d recommend SAF (which I think is ideal for challah and all other sweet bread dough). Hope that helps and that you enjoy the challah!
Wow, Jenn! One month later of solid use of your site and I stumble on this …I used to make challah for my family as a girl, but it’s been years! I made it this weekend the day before company came. I used an Italian 00 flour and I kneaded by hand as I don’t have a stand mixer. I did get the yeast you said and it was a rainy day, so I had to rise it almost four hours the first time down here in the Southern Hemisphere. The dough was never wet for me or sticky. Anyway, took my time, followed your recipe precisely, baked it and wow!!! It was gorgeous! You’re recipes are so full-proof that I used this one for my first time entertaining two guests who are real “foodies”! It was a success. They remarked and remarked on the bread and said I could have simply served that for dinner! I am so excited to be making challah from scratch for my family now! Thank you!