22 Quick and Easy Recipes in 30 Minutes (or less) + 5 Chef Secrets To Make You A Better Cook!

Challah

Tested & Perfected Recipes Cookbook Recipe

This post may contain affiliate links. Read my full disclosure policy.

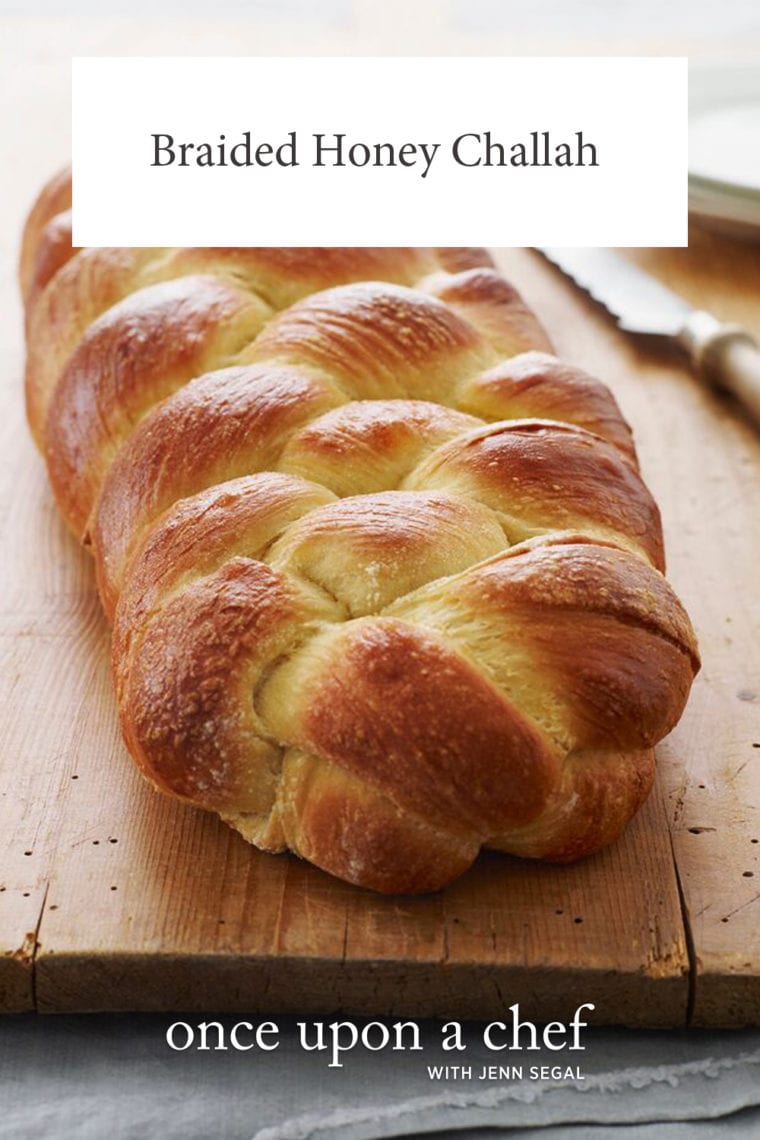
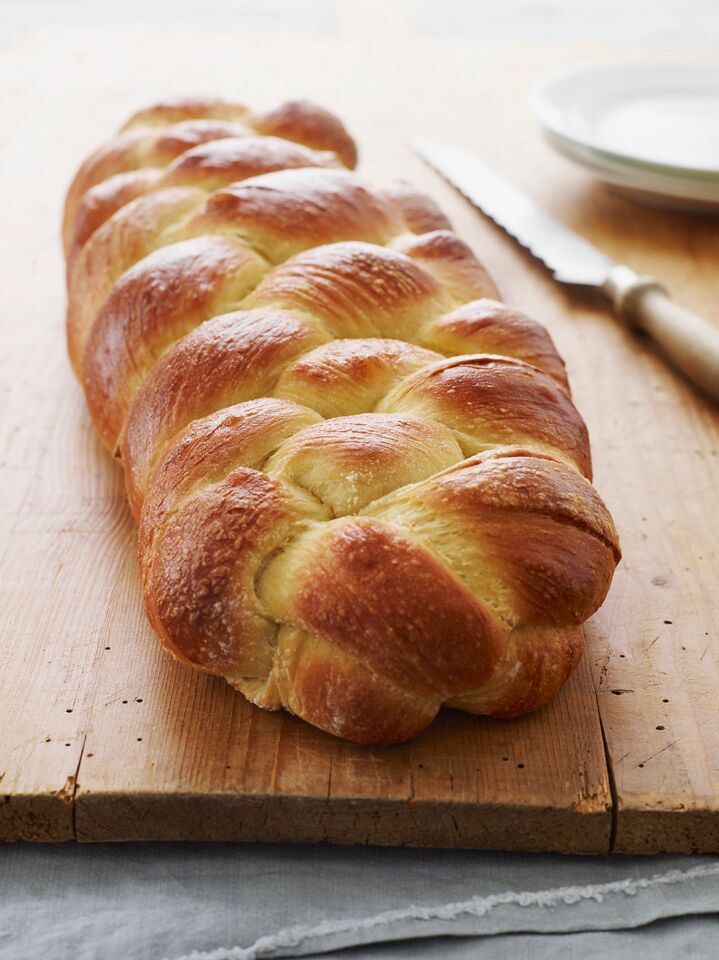
With its rich, slightly sweet flavor, shiny golden crust, and pillowy interior, challah isn’t just for the Jewish holidays — it appeals to everyone, any time!

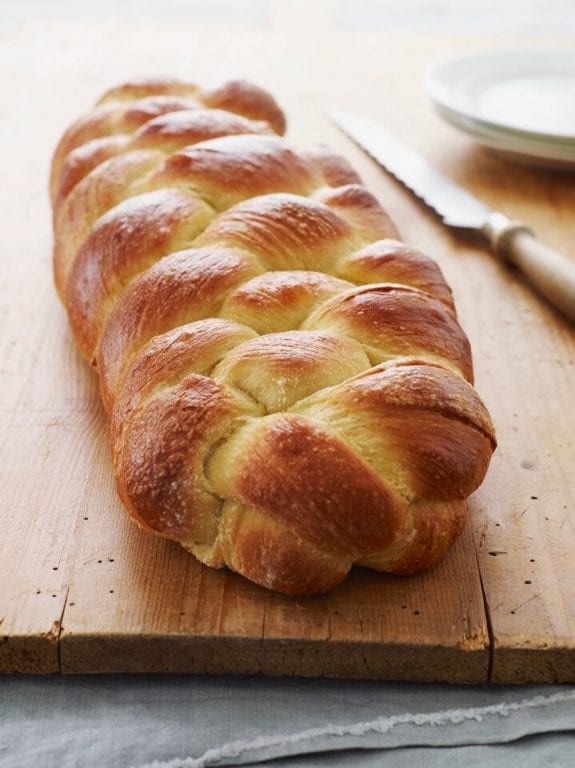
Challah on a wooden surface.

Photo by Alexandra Grablewski (Chronicle Books, 2018)

Challah is the bread of celebration in Jewish tradition, but I put it in the matzo ball soup and bagel category: it appeals to everyone. It’s a rich, slightly sweet loaf with a shiny, golden crust and pillowy-soft interior. But what makes it truly special is its distinctive braid, which symbolizes, among other things, the joining together of family and friends. Rest assured, challah looks like far more trouble than it actually is. Think of it as a once-in-a-while baking therapy project. Kneading and braiding the dough, smelling the challah baking in the oven—it really is satisfying. And when the long braided loaf is presented at the dinner table, it is a sight to behold!

I owe much of the credit for this recipe to Nanci Hirschorn, one of my lovely readers, who has been perfecting her challah recipe for over thirty-five years. Thank you, Nanci, for all the pointers! Heads up: this recipe makes one 16-in loaf. It’s huge! If you have leftovers, use it to make French toast.

Challah is part of my yeast bread collection, which includes other enriched bread recipes, like brioche and babka – rich-tasting breads with a higher proportion of eggs, sugar, butter, and milk – as well as classics like no-knead artisan bread, focaccia, dinner rolls, and naan.

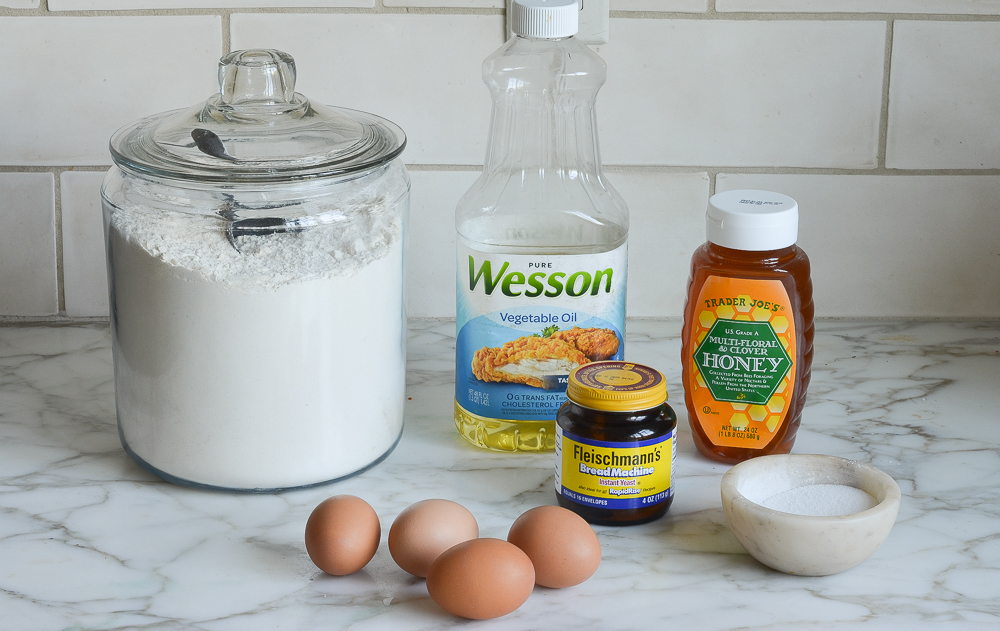
What you’ll need to make Challah

Challah ingredients including yeast, eggs, and honey.

The recipe calls for instant or rapid-rise yeast, which rises faster than regular active dry yeast. Once opened, yeast will keep in the refrigerator for three to six months. Yeast is sold in jars (as pictured) or individual packets. If you don’t do a lot of bread baking, it’s best to buy the packets; just note that the quantity required for this recipe (1 tablespoon) is more than one packet.

Be sure your eggs are room temperature; this dough is slow to rise and cold eggs will slow it down even further.

How To Make Challah

Step 1: Make The Dough

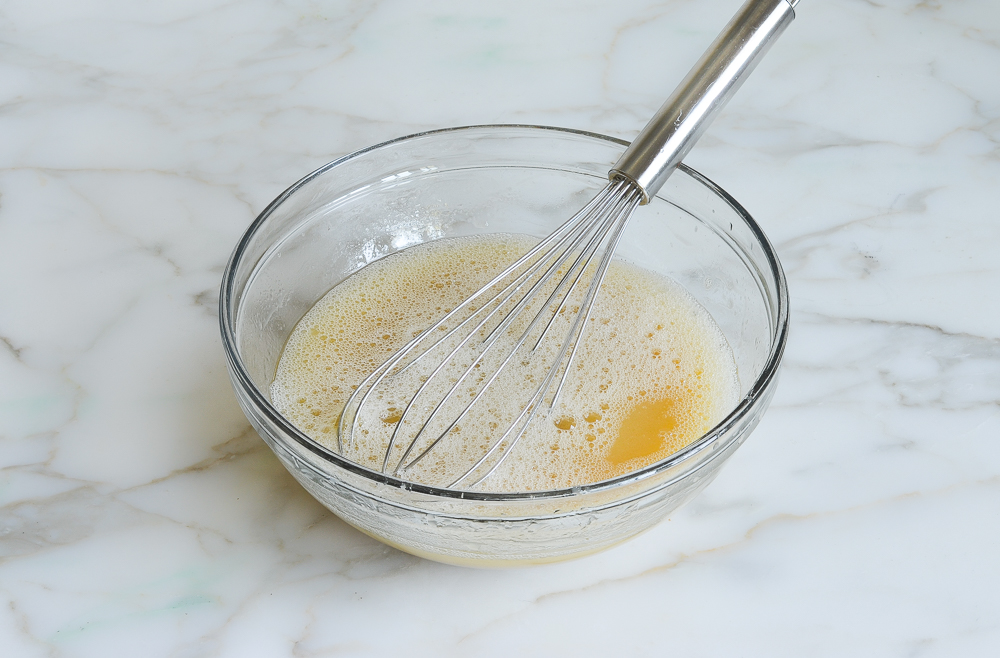
Eggs, water, oil, and honey in a mixing bowl.

Begin by combining the lukewarm water, oil, honey, 2 of the eggs, and the egg yolk; whisk well and set aside.

whisked wet ingredients

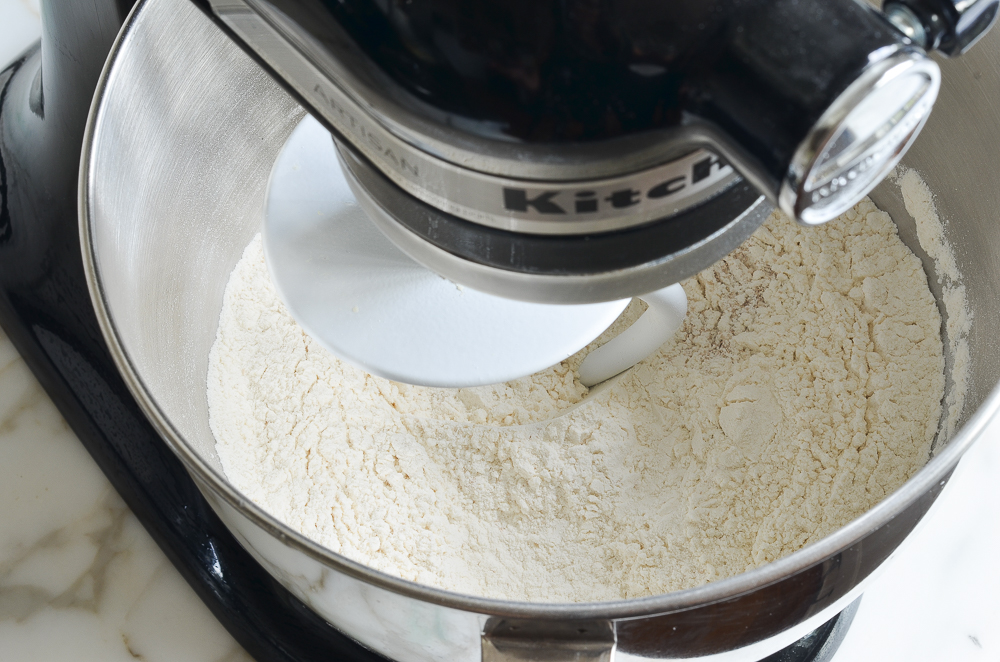
In a stand mixer fitted with the dough hook, combine the flour, yeast, and salt.

flour, salt, and yeast in mixer

Mix to combine.

whisked flour, salt, and yeast

Add the liquid ingredients to the dry ingredients.

adding liquid ingredients to dry ingredients in mixer

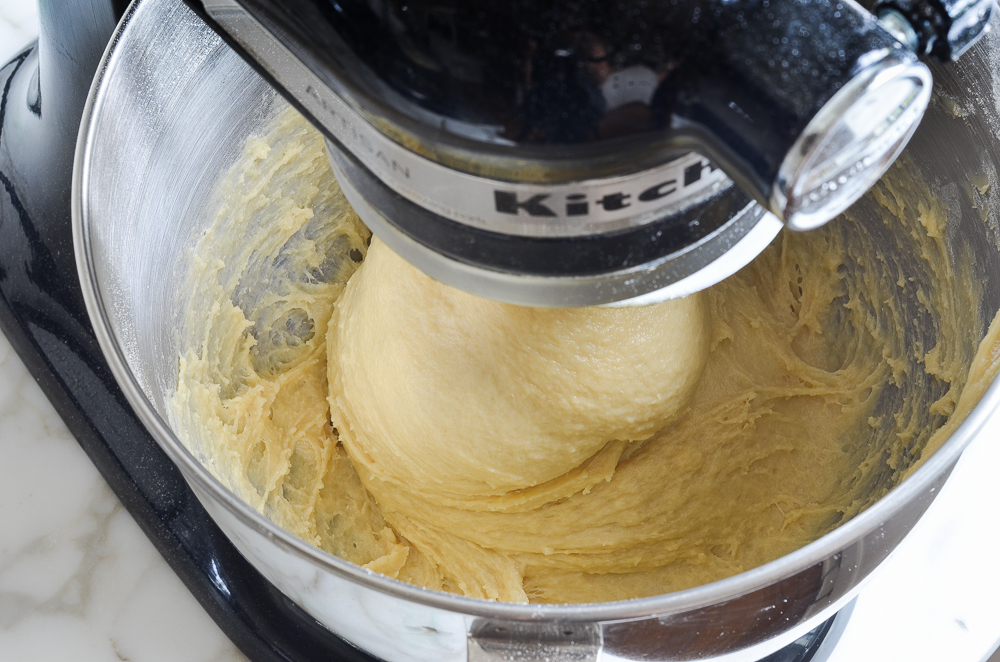
Knead on medium-low speed until you have a sticky dough that clings to the bottom of the bowl, 5 to 7 minutes. The dough may seem too wet but have faith—it’s supposed to be.

kneaded sticky challah dough

Dust your hands generously with flour, then scrape the sticky, elastic dough out onto a lightly floured work surface. Dust the top of the dough lightly with flour.

challah dough on floured countertop

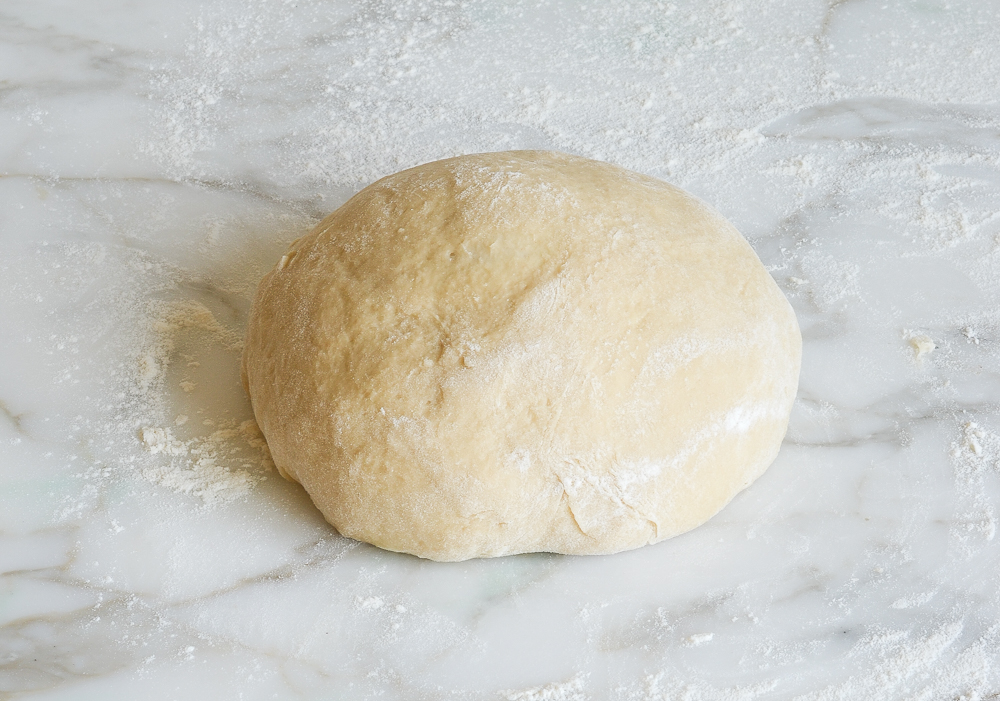
Knead into a soft, smooth ball.

challah dough kneaded into a ball

Step 2: Let it Rise

Lightly grease a large bowl with oil or nonstick cooking spray. Place the dough in the bowl, flip it over once so the top is lightly oiled, and then cover the bowl with plastic wrap.

dough in bowl ready to rise

Allow the dough to rise in a warm, draft-free spot until it’s puffy and doubled in size, 2 to 3 hours. Keep in mind that when baking yeast breads, rising times are only a guide. The temperature in your kitchen, the humidity level outdoors, and how you knead the dough will all affect the rising time.

challah dough after first rise

Step 3: Braid the Dough

If you have a little girl in your life, or were ever a summer camp counselor, you have an advantage with braiding challah. But even if not, I assure you it’s easy to do. There are dozens of methods, but I think this 4-strand braid is the easiest and the prettiest.

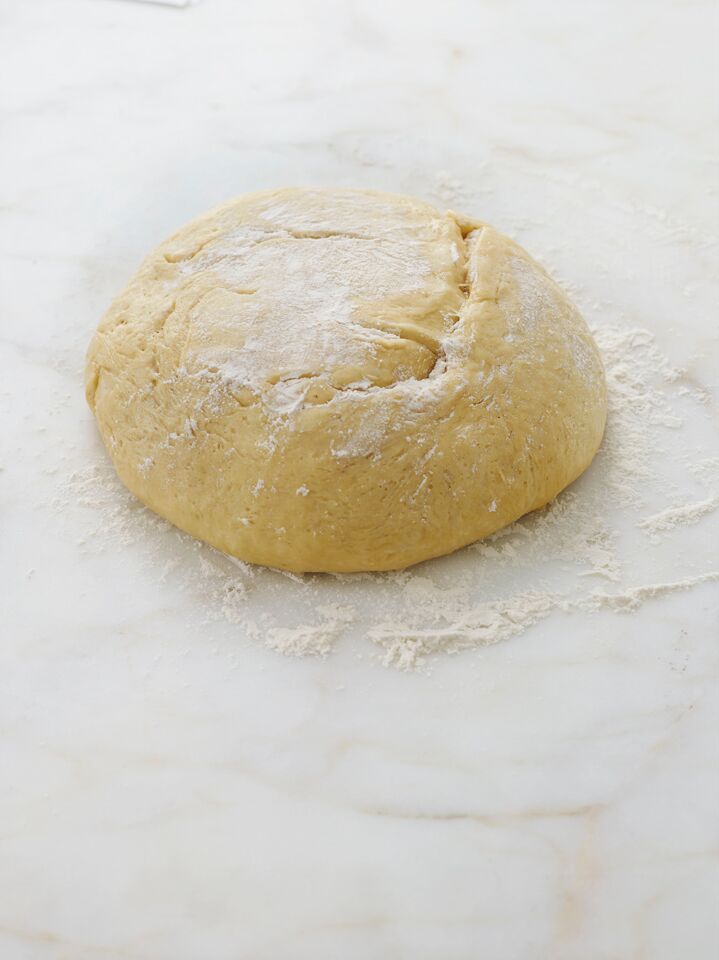
To begin, invert the risen dough onto a lightly floured work surface and dust with flour. It will deflate.

Ball of challah dough.

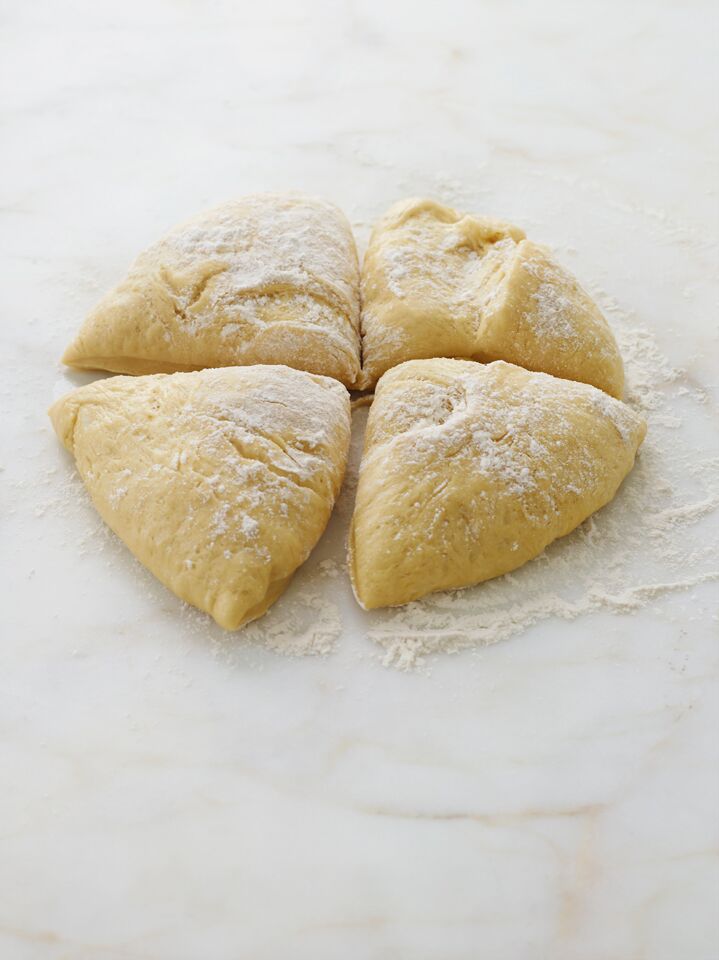
Cut the dough into four even pieces. (If you want to be exact, each piece should weigh approximately 9 oz or 260 g.)

cut challah dough

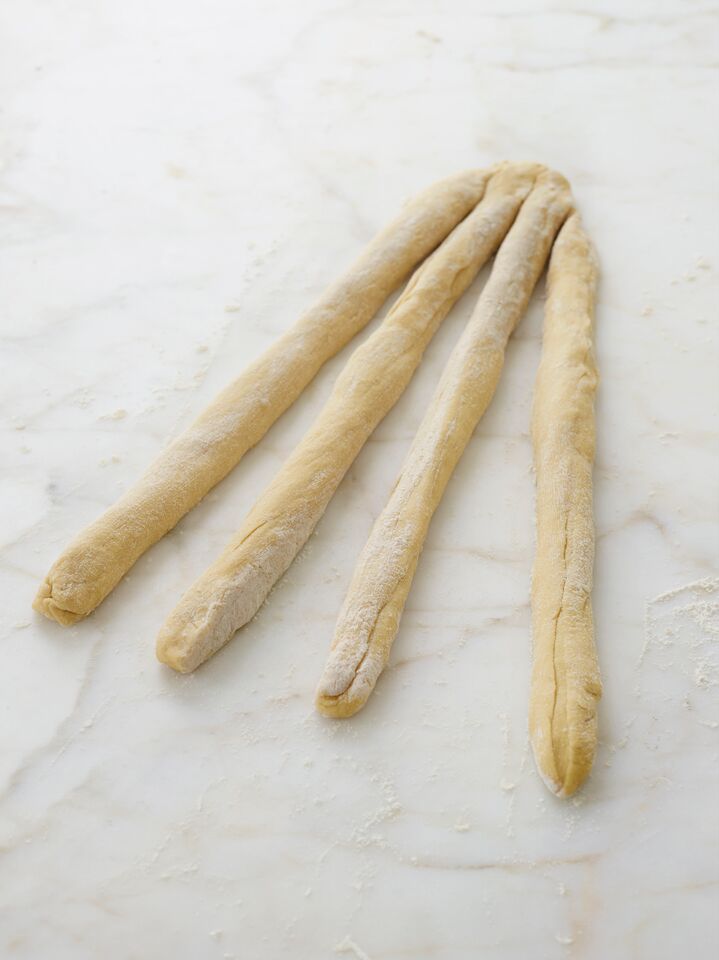
Stretch and roll each piece into a rope about 20-inches long. Lay the ropes parallel to one another (vertically). Pinch them tightly together at the top, and then fan them out. If the ropes shrink a bit, just work them back into their original length.

four strands of challah dough

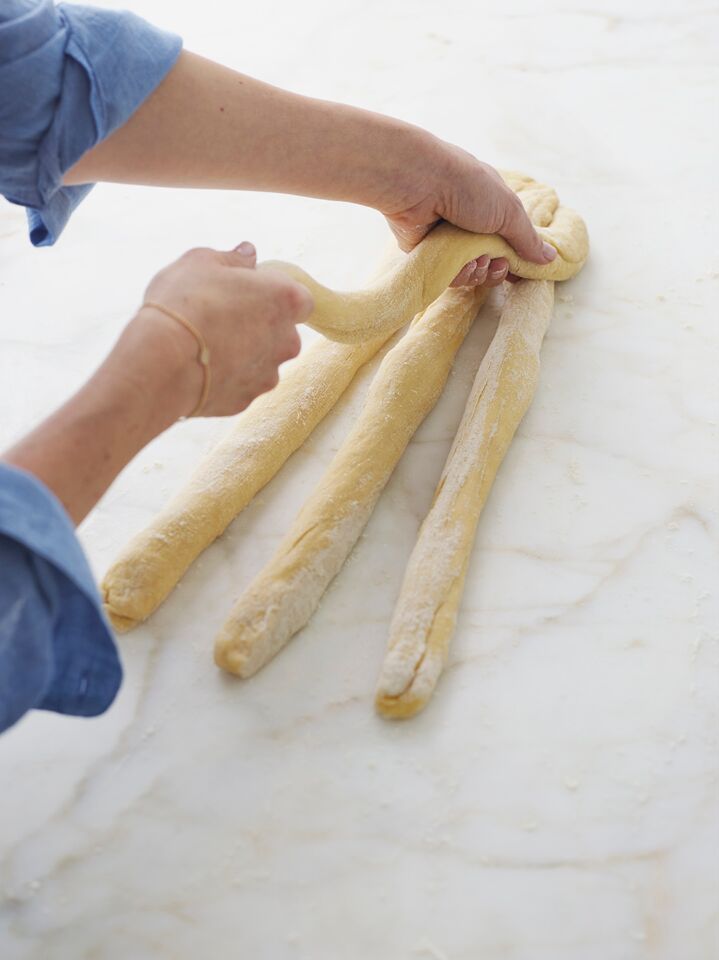
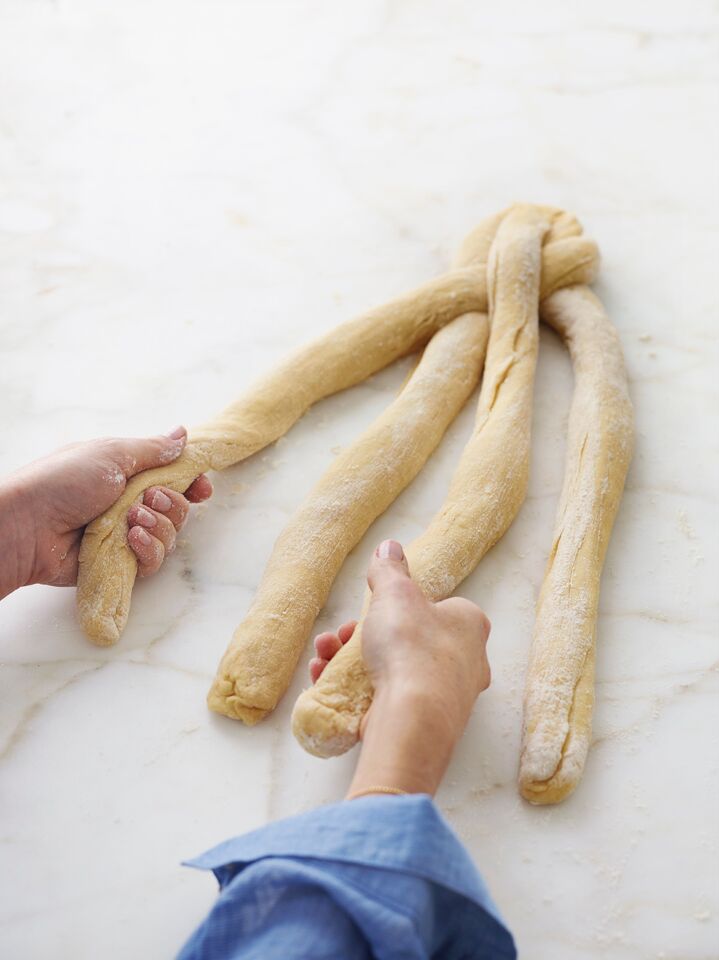
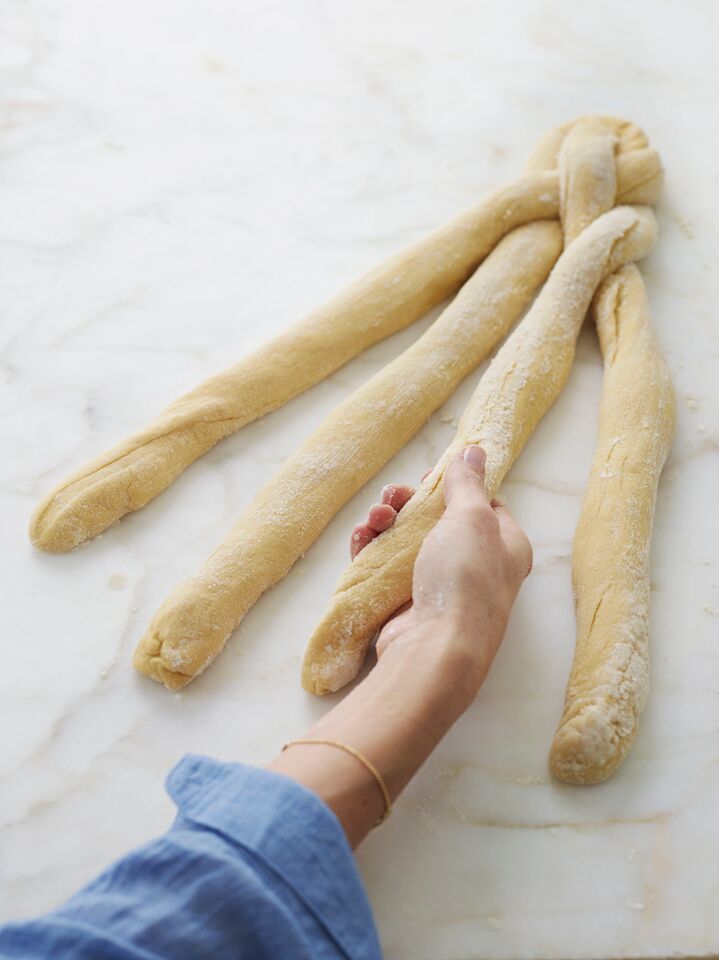
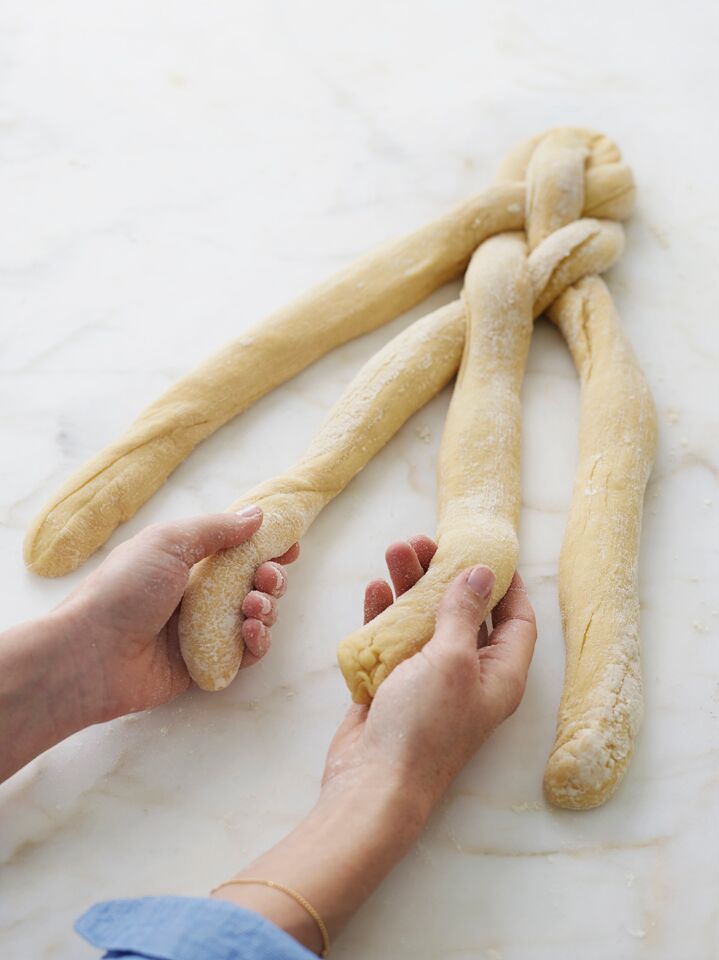
Begin by taking the strand farthest to the right and weave it toward the left through the other strands using this pattern: over, under, over.

starting challah braidstarting challah braidTake the strand furthest to the right and repeat the weaving pattern again: over, under, over. Person grabbing the third of four strands of challah dough.

Person grabbing the two middle strands of challah dough out of four.

Person grabbing the first and second strands of challah dough out of four.

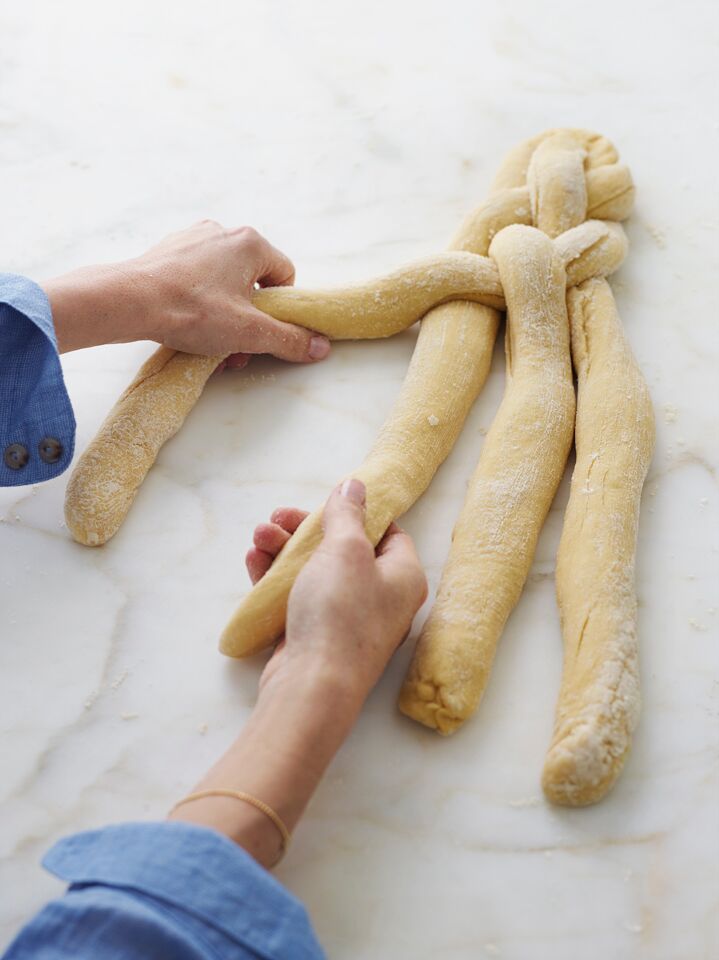
Repeat this pattern, always starting with the strand farthest to the right, until the whole loaf is braided.

Person grabbing the third out of four strands of challah dough.

Person grabbing the two middle strands of challah dough out of four.

Person grabbing the first two strands of challah dough out of four.

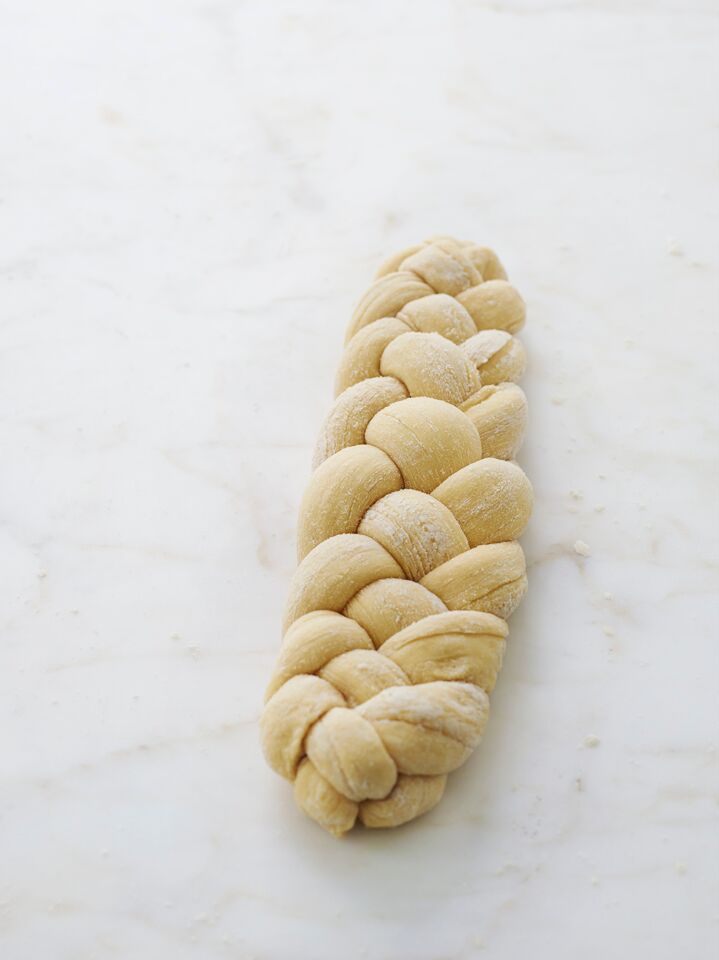
Tuck the ends under the loaf to give it a finished look.
Braided challah dough.

Step 4: Let the Braided Dough Rise

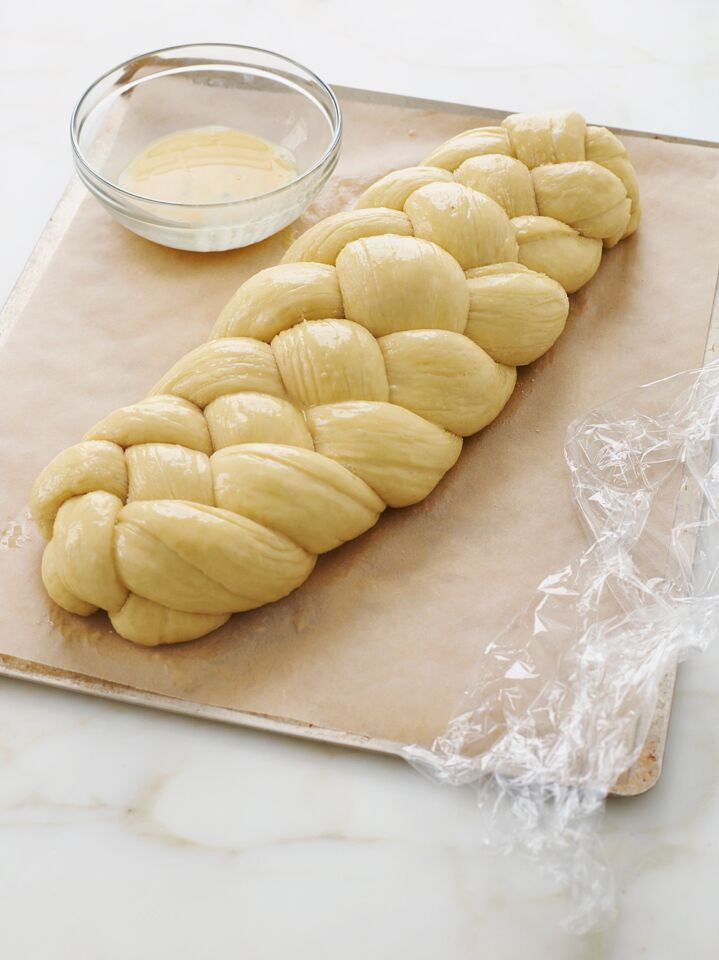
Carefully transfer the braided loaf to a parchment-lined 13 x 18-inch baking sheet. Cover the loaf loosely with plastic wrap and let it rise in a warm, draft-free spot until about 1.5 times the size, 1 to 2 hours. Toward the end of the rising time, preheat the oven to 350°F and set an oven rack in the middle position. (Note that the loaf will continue to rise a bit in the oven.) In a small bowl, beat the remaining egg and brush the beaten egg generously over the risen dough. (Note: If you like, sprinkle poppy or sesame seeds onto the challah before putting it in the oven.)

Braided challah dough on a lined baking sheet.

Step 5: Bake

Place the baking sheet atop another baking sheet; this will prevent the bottom crust from browning too much. Bake for 30 to 35 minutes, until the crust is a rich brown color and the internal temperature is between 190°F and 200°F on an instant-read thermometer. Remove the bread from the oven and place it on a rack to cool. Challah is best enjoyed fresh, but leftovers will keep for a few days in a sealed plastic bag.

Challah on a wooden surface.

Photo by Alexandra Grablewski (Chronicle Books, 2018)

You May Also Like


Challah

With its rich, slightly sweet flavor, shiny golden crust, and pillowy interior, challah isn’t just for the Jewish holidays — it appeals to everyone, any time!

Servings: One 16-inch [40 cm] loaf

Ingredients

  • 4¼ cups all-purpose flour, spooned into measuring cup and leveled-off, plus more for dusting
  • 1 tablespoon instant/rapid-rise yeast (see note)
  • 2 teaspoons salt
  • ¾ cup lukewarm water
  • ¼ cup + 2 tablespoons vegetable oil
  • ¼ cup + 2 tablespoons honey
  • 3 eggs, at room temperature
  • 1 egg yolk, at room temperature

Instructions

  1. In a stand mixer fitted with the dough hook, combine the flour, yeast, and salt. Mix on low speed for 30 seconds to combine. In a separate bowl, combine the lukewarm water, oil, honey, 2 of the eggs, and the egg yolk. Add to the dry ingredients and knead on medium-low speed until you have a sticky dough that clings to the bottom of the bowl, 5 to 7 minutes. The dough may seem too wet but have faith—it’s supposed to be.
  2. Dust your hands generously with flour, then scrape the sticky, elastic dough out onto a lightly floured work surface. Dust the top of the dough lightly with flour and knead briefly into a soft, smooth ball. Lightly grease a large bowl with oil or nonstick cooking spray. Place the dough in the bowl, flip it over once so the top is lightly oiled, and then cover the bowl with plastic wrap. Allow the dough to rise in a warm, draft-free spot until it's puffy and doubled in size, 2 to 3 hours.
  3. Invert the dough onto a lightly floured work surface and dust with flour. It will deflate. Cut the dough into four even 9-oz pieces, and then stretch and roll each piece into a rope about 20-inches long. Lay the ropes parallel to one another (vertically). Pinch them tightly together at the top, and then fan them out. If the ropes shrink a bit, just work them back into their original length.
  4. Begin by taking the strand farthest to the right and weave it toward the left through the other strands using this pattern: over, under, over. Take the strand furthest to the right and repeat the weaving pattern again: over, under, over. Repeat this pattern, always starting with the strand farthest to the right, until the whole loaf is braided. Tuck the ends under to give the loaf a finished look.
  5. Carefully transfer the braided loaf to a parchment-lined 13 x 18-inch baking sheet. Cover the loaf loosely with plastic wrap and let it rise in a warm, draft-free spot until about 1.5 times the size, 1 to 2 hours. Toward the end of the rising time, preheat the oven to 350°F and set an oven rack in the middle position. (Note that the loaf will continue to rise significantly in the oven.)
  6. In a small bowl, beat the remaining egg and brush the beaten egg generously over the risen dough. (Note: If you like, sprinkle poppy or sesame seeds onto the challah before putting it in the oven.) Place the baking sheet atop another baking sheet; this will prevent the bottom crust from browning too much. Bake for 25 to 35 minutes, until the crust is a rich brown color and the internal temperature is between 190°F and 200°F on an instant-read thermometer. Remove the bread from the oven and place it on a rack to cool. Challah is best enjoyed fresh, but leftovers will keep for a few days in a sealed plastic bag.
  7. Note: If you're using yeast that comes in the packets, the quantity required for this recipe (1 tablespoon) is more than one packet.
  8. Note: Active dry yeast may be used instead of instant/rapid-rise yeast, however, the dough will take longer to rise.
  9. Note: When baking yeast breads, rising times are only a guide; the temperature in your kitchen, the humidity level outdoors, and how you knead the dough will all affect the rising time.
  10. Make-Ahead Instructions: Prepare the loaf up to the point where it's braided and on the pan. Cover it with greased plastic wrap, and place it in the refrigerator overnight. The next day, remove the braided dough from the refrigerator and set it on the countertop (keep it covered). Let it come to room temperature and rise for about 1 hour before baking as directed.
  11. Freezer-Friendly Instructions: Challah can be baked, cooled, tightly wrapped, and frozen for up to 3 months. Allow it to thaw at room temperature for at least 3 hours before serving.

Nutrition Information

Powered by Edamam

  • Per serving (16 servings)
  • Serving size: 1 slice
  • Calories: 206
  • Fat: 7 g
  • Saturated fat: 1 g
  • Carbohydrates: 32 g
  • Sugar: 7 g
  • Fiber: 1 g
  • Protein: 5 g
  • Sodium: 126 mg
  • Cholesterol: 35 mg

This website is written and produced for informational purposes only. I am not a certified nutritionist and the nutritional data on this site has not been evaluated or approved by a nutritionist or the Food and Drug Administration. Nutritional information is offered as a courtesy and should not be construed as a guarantee. The data is calculated through an online nutritional calculator, Edamam.com. Although I do my best to provide accurate nutritional information, these figures should be considered estimates only. Varying factors such as product types or brands purchased, natural fluctuations in fresh produce, and the way ingredients are processed change the effective nutritional information in any given recipe. Furthermore, different online calculators provide different results depending on their own nutrition fact sources and algorithms. To obtain the most accurate nutritional information in a given recipe, you should calculate the nutritional information with the actual ingredients used in your recipe, using your preferred nutrition calculator.

See more recipes:

Comments

  • I tried making your challah on Thursday and something went wrong! It wasn’t sticky in the bowl and then didn’t rise well. Any thoughts on what I did wrong? Thanks! Hannah

    • — Hannah D on December 24, 2022
    • Reply
    • Hi Hannah, I’m sorry you had a problem with this! If it wasn’t sticky, I’m wondering if it had a bit too much flour. Did you use the spoon and level method to measure the flour? Even a few extra ounces can make a big difference. This article/video explains it nicely. And you mentioned it didn’t rise much. Was your yeast old or expired?

      • — Jenn on December 25, 2022
      • Reply
      • I must have done the flour wrong! The yeast wasn’t old/expired, but I used active, not rapid. I gave it three hours, but maybe that was not enough. I’ll try again this week and buy the right ingredients! Thank you!

        • — Hannah on December 27, 2022
        • Reply
        • I hope you have better luck this time!

          • — Jenn on December 28, 2022
          • Reply
  • My son just won his 10th grade English class baking contest with this recipe. He did everything except turn on the stand mixer. Pretty awesome. His classmates said it tasted amazing with and without the jam he brought, which is a testament to its flavor. He saved a slice for me which I thought was especially sweet.

    • — Sai on December 24, 2022
    • Reply
    • 💕

      • — Jenn on December 24, 2022
      • Reply
  • Hi Jenn –
    My husband and I made your challah today – our first time making break without a bread maker! It tasted great, but it lost all definition of the braids on the second proof – it spread out instead of up and by the time it finished baking, it looked pretty much like a smooth loaf. Where did we go wrong? We were using active dry yeast as we didn’t have instant, but let it proof on the long side of your recommendations.
    Thanks!

    • — CINDY B on December 12, 2022
    • Reply
    • Hi Cindy, sorry to hear the braids lost their definition. What brand of flour did you use?

      • — Jenn on December 14, 2022
      • Reply
  • I’ve made your challah recipe twice now… turned out great! The kitchen smelled delicious as it baked. Thank you!😋

    • — Gloria on November 22, 2022
    • Reply
  • Thank you for this wonderful recipe! Have been making it for a few years and it’s a winner! I weigh my flour and use the King Arthur Flour chart where 1 cup of flour weighs 120 grams so have been using 510 grams for this recipe and today I clicked on grams and see that you use 560 for 4 ¼ cups. Is it a typo or is there a variation on what flour weighs? I added a little more flour today but didn’t go up to the full 560 grams. It’s still rising.
    And I love that you have instructions to mix, rise and braid in advance. A game changer for me.
    Thanks again.

    • — Bea on November 3, 2022
    • Reply
    • Hi Bea, so glad you like this! The 560 g is not a typo. For a long time I relied on King Arthur’s weight as that’s the flour I always use. Recently, when I was baking something that needed to be very exact, I consistently got 130 g for 1 cup of flour so I’m slowly but surely changing that on the recipes. Hope that yours comes out well with the additional flour!

      • — Jenn on November 4, 2022
      • Reply
  • This recipe is delicious!! I’m confused though about the number of eggs. The recipe calls for 3 eggs. You put 2 of the 3 plus an egg yolk into the dough, which would leave only the white remaining. Should the loaf be brushed with the leftover egg white, or another entire egg? I’ve done it both ways. Thank you for a most amazing recipe and for always being kind, even when people aren’t kind to you. This bread slices perfectly for sandwiches and of course makes delicious French toast. ❤️

    • — Lori on October 8, 2022
    • Reply
    • Glad you like it! The reason the recipe calls for three eggs and one egg yolk is because when you’re making the dough, you’ll need two eggs and one egg yolk. Later on, when you’re brushing the dough with egg you’ll need to use one full egg. Hope that clarifies!

      • — Jenn on October 10, 2022
      • Reply
  • Jen- do you think I can use melted butter for the oil? I don’t use vegetable oil. I only have olive oil, and I do t think that would work.
    Thanks!

    • — Kelly on October 7, 2022
    • Reply
    • Sure, I think you could get away with melted butter. I’d love to hear how it turns out!

      • — Jenn on October 7, 2022
      • Reply
  • I made this recipe with a 4-strand round challah for Rosh Hashanah. Best I’ve ever baked, and the dough was easy to work with.

    • — Ellen L on September 30, 2022
    • Reply
  • In the past few months, I have started making bread. I will be honest enough to say, I was initially intimated by this bread due to the length of rising times and the braiding process. But I made this bread. Let me say, it was easy and it is delicious. I watched many videos on the braiding process and your method was the easiest and best understood. Many thanks!

    • — Ginger Hilyer on September 26, 2022
    • Reply
  • This recipe was so easy to follow and yielded fantastic results! It was my first time making challah although I’ve been baking bread/bread-adjacent things for the past couple years. I had to look up a separate tutorial for the braiding part because my brain is broken and video was the only way I could get the steps down, haha — but otherwise everything couldn’t have been easier to follow, unlike many others online which seem a bit convoluted. We snacked on a slice or two last night and enjoyed it in french toast form this morning. Looking forward to trying more of your recipes, Jenn!

    • — Rachel on September 25, 2022
    • Reply
  • Really could not have been more straightforward, and I’ve never made challah before. I actually only had bread flour on hand, Robin Hood ‘best for bread’ homestyle white, and the texture of the bread is perfect. Definitely needed at least 2.5 hours to proof, and my kitchen is pretty warm to begin with so YMMV. I followed the overnight instructions so that I was able to pull it out of the fridge and do the second rise first thing Saturday morning. Delightful, sweet but not too sweet, very pull-apart-able. This recipe is a keeper.

    • — Leah on September 24, 2022
    • Reply
  • I’ve never made challah before but this recipe makes me want to make it all the time. It was so good and actually looked like the picture when it came out of the oven. Unfortunately half of it was gone within 5 minutes but at least I got a picture! One question I did have is could this also be made in a steam oven?

    • — Dianna on September 20, 2022
    • Reply
    • So glad you liked it! I’m not familiar with a steam oven, so, unfortunately, I don’t know whether or not it would work. Sorry I can’t be more helpful!

      • — Jenn on September 20, 2022
      • Reply
  • This recipe is amazing! Took some time because I didn’t have rapid rise yeast, but so worth it! Best challah I’ve ever made!

    • — Maria Beilis on September 17, 2022
    • Reply
  • Bread was my nemesis until your recipe. Thank you.

    I do have a question, would I have to adjust the baking time if I split the dough into two smaller loaves? My gut says yes.

    • — LK Anderson on September 14, 2022
    • Reply
    • So glad you found a recipe that works for you! For 2 smaller loaves, the baking time should also be about the same if not just a tiny bit shorter. Just keep a close eye on them. Enjoy

      • — Jenn on September 15, 2022
      • Reply
  • My apologies, plan to make this for the first time , ” 2 of the eggs and the egg yolk” meaning 2 whole eggs plus one egg yolk ???? did not quite get that, Thanks

    • — Patrick on September 12, 2022
    • Reply
    • Hi Patrick — you’ll need 3 full eggs and one egg yolk. Hope that clarifies and that you enjoy the challah! 🙂

      • — Jenn on September 12, 2022
      • Reply
  • I’ve made this twice and the dough was extremely dry. I measured correctly and used KA flour. Is it ok to add some additional water or should I decrease the flour

    • — Bryna on September 8, 2022
    • Reply
    • Sure Bryna, you can increase the water, bit by bit until it becomes more manageable. This dough is typically pretty sticky — are you using the spoon and level method to measure the flour? Even a few extra ounces can make a big difference. This article/video explains it nicely.

      • — Jenn on September 9, 2022
      • Reply
      • I had the same issue but added a few splashes of water until the dough was sticky as described, turned out beautiful!

        • — Challah Lover on September 28, 2022
        • Reply
  • Haven’t tried the recipe but like that it’s sugar free (my daughter cannot eat sugar) and that most reviews are so positive. I have a few questions:

    If you want to make the challah with raisins, how much do you add, and when do you add them? Do measurements of other ingredients change?

    If I want to make a round challah, how do I do it?

    • — Linda Garmisa on August 20, 2022
    • Reply
    • Hi Linda, If you’d like to add raisins, I’d start with about 1/2 cup and if you like the results, you can increase the amount the next time you make it (and the amount of other ingredients would remain the same). I’d add them right at the end of when you’re kneading the dough in the mixer. For round challah, this video tutorial may help. Keep in mind that the bake time may be a bit different but I’m not certain by how much, so I’d pay attention to the visual cues and the temp on your instant-read thermometer. Please LMK how it turns out!

      • — Jenn on August 22, 2022
      • Reply
  • I’ve tried multiple Challah recipes to find one that ‘checked all of the boxes’- ease of recipe, bake and flavor. This one was the best so far!

    • — elaine merritt on August 9, 2022
    • Reply
  • Just made this today and the bread turned out very well…soft and very tasty. The best Challah i ever made. I divided the dough into 2 portions so i could separately braid the dough with my kid. Ended up with 2 little cute challahs. It’s easy and fun to make it. Thank you!

    • — Fon Kotchban on July 17, 2022
    • Reply
  • Not nice. It did not rise and tasted like the ocean.

    *Probably because I’m an inexperienced cook. 😜😭😘

    • — Etan on June 3, 2022
    • Reply
  • Fantastic, best recipe I have ever used. Turned out beautifully and with the perfect texture! This will forever be my go to recipe. Thank you!

    • — Marilyn on May 26, 2022
    • Reply
  • This bread is AMAZING. It’s slightly sweet, soft on the inside, delicious, and beautiful!!!

    • — Sunny on May 14, 2022
    • Reply
  • Made this on a whim when my other recipe wouldn’t halve well. The challah turned out beautifully…golden and delicious. Can’t wait to make it again!!

    • — Steph on May 12, 2022
    • Reply
  • I just finished braiding the bread. It was pretty easy. I had a hard time keeping the dough sections from drying out though. I plan on making French toast in the am. Thank you for another fine recipe. You are my go to for the majority of my recipes. Thank you so much Jen!

    • — Virginia Lehner on April 29, 2022
    • Reply
  • Wow, so delicious and beautiful 😍🥰 thanks for your easy-to-follow- instructions 🙂 it came out perfect even though I used bread flour since that’s what we had on hand, hope to try it with all purpose though! Perhaps it may come out bigger? Why do you not suggest bread flour? Just wondering, new baker here 🙂 praise the Lord ❤️

    • — Maurissa on April 20, 2022
    • Reply
    • Hi Maurissa, Using all-purpose flour would not make the bread bigger. It would just have a slightly different texture. I don’t use bread flour for this because I am aiming for a less chewy, lighter texture. Glad though that you used what you had on hand and that it came out nicely!

      • — Jenn on April 22, 2022
      • Reply
  • Just a comment on measurements… King Arthur Flour notes that 1 cup equals 120 grams. Using their weight, 560 grams would be equal to 4 2/3 cups flour for this recipe, not the 4 1/4 cup listed.

    • Hi Julie, I know that King Arthur notes on their bag that a cup is the equivalent of 120 g. I’ve always found (and have weighed it many times) that it comes out to 130 g. Because I’ve developed the recipe based on this, I’d stick to the measurements I have there. Hope that clarifies!

      • Came out perfect and oh so yummy! It was the first time making challah bread and your pictures on the post really helped. Thank you so much for wonderful recipes.

        • — Cas on September 23, 2022
        • Reply
  • Made this challah today for Shabbat dinner. It came out perfect. I always used sugar before and everyone loved it with honey. It was fluffy and just the perfect color too.
    Thank you for this great recipe.

  • How would the recipe change if I used fresh yeast from the bakers? How many grams would I need to substitute for dry?

    • Hi Katherine, I haven’t worked with fresh yeast. I read that 2 1/4 teaspoons dry active, instant, or rapid-rise yeast granules (usually one 1/4-ounce packet) = 2/3 ounce fresh yeast. You can read more about it here. It will work, but timing be a bit different. Please LMK how it turns out if you try it!

  • I made this for the second time today. It turned out great both times and has been a hit with my family. I did use active dry yeast so I let it activate in the water along with a tablespoon of honey prior to combining it with the other wet ingredients. Thanks for the great recipe!

  • I just wanna praise you for your talent! My entire family loves your Challah bread! They get so excited for Shabbat knowing they are getting the best bread they have ever had! Thank you generously for this God send of a recipe! Blessings to you and your lovely hands!

  • This recipe has been a hit with family and friends. It is the perfect bread for open-faced sandwiches and pairs well with avocado and tomato. However the first attempt was fairly dense. On the second attempt I let the yeast bloom on its own with the water. I would highly recommend activating your dry yeast in water, if you use the same Fleishmann’s brand pictured above. I know the author mentioned instant yeast does not need to bloom pre-mix but in my experience it has made for a much fluffier and palatable bread.

  • Can you make this bread in loaf pans and not braided?

    • Hi Dani, I haven’t tried it, but I think you could bake this in 2 loaf pans without braiding it. I suspect it should take about 30 minutes but keep a close eye on them! Please report back and let me know how they turn out!

  • Hi there! I have a couple questions. I tried your recipe, loved the flavor. But I didn’t get as good a rise as I would have liked, and the challah could have been a little lighter. I think that maybe I needed a bit more flour – it was a little stickier than most doughs I have made. First question – do you have weights for the flour? I converted to weight by multiplying by 125 grams. Is this the right weight? Or are your cups more or less packed than average? Second question – I’m using active dry yeast that is definitely alive. Maybe I should try adding to the wet ingredients instead of the dry? Or proof it in the water with a bit of the honey first? Thank you!

    • Hi David, sorry that you didn’t get quite the rise or texture that you were looking for. I don’t think it’s necessary to add the yeast to the wet ingredients or proof it in the water with honey. How long did you let the dough rise? Also, on the day that you made it, might your kitchen have been a bit cool?

      And the dough is definitely a bit sticky so it doesn’t sound like you went wrong there. I do have measurements in grams – To view them, scroll down to the recipe, and immediately under the recipe title on the right side, you’ll see a little toggle. If you move it from “cup measures” to metric, you’ll see measurements. Please LMK if I can help in any other way!

      • Thank you, Jenn! I didn’t see the weight toggle, and I used a bit less flour than you recommend. Yes, my kitchen was (and always is) a bit cool. That might have been the problem with a slow rise. Will try again with the oven on and the right weight and see how it goes. Thanks!

  • Thank you for your recipe and braiding instructions. I followed your directions carefully even turned on the oven to make sure the dough sitting on top of the range was warm enough. I waited over 3 hours for the dough to double, it did not. I decided to go ahead and braid the bread. Your instructions were Very easy, I then waited almost 2 more hours prior to baking. The final product looked beautiful, tasted perfect, but the bread was very dense or heavy as it did not rise enough. Should I have proofed the yeast first with warm water and a little of the honey? Or used more yeast? I’m truly not sure how to make a great challah. Any suggestions would be greatly appreciated, thank you, Penny Hays

    • Hi Penny, Enriched doughs like challah can take a while to rise, but over 3 hours does seem long! Instant yeast does not need to be activated with warm water first, so I don’t think that’s the issue. Is it possible your yeast is expired or on its way out? If you want to test it, add a few teaspoons of the yeast to a half cup of warm water along with a teaspoon of sugar, and give it a stir. Let it sit for about 10 minutes. If it foams up vigorously, the yeast is alive; if not (or if the foam is “wimpy”), it’s expired.

  • Thank you for a fantastic challah recipe. I recently bought a challah for $12 that was so dry and disappointing that I was committed to finding a recipe for one I’d love and I’ve now made yours twice. The first time I forgot the salt but it still came out tasty. This time I added the salt but one less egg and am looking forward to tasting the difference!

    Letting the dough rise clearly makes a huge difference as well so my advice to other bakers is …patience!

  • I don’t really leave review on a lot of recipes but I had to with this one. This is my new go to Challah recipe EVERY. SINGLE. TIME. Look no further, this will be a soft, delicious, amazing pull apart challah that will get a satisfaction sound every-time someone breaks a piece and eats it. Amazing recipe. Thanks for sharing.

  • Great recipe but it was a little bit too sweet for me. Definitely will make this again but with less honey. Thank you!

  • Followed the recipe exactly and it came out perfect, wish I could post the picture. House smells wonderful can’t wait to try it. Thanks Jenn, happy holidays!!

  • I am a very experienced bread maker, always make my own bread always have,
    There is not enough flour in the recipe to give the results as photograph. The amount in the recipe gives a pancake consistency – no way could it be kneaded. I had to over double the flour, reduce the honey to 4 tbs add more year – a packet is 7 gm.
    I followed the photographs but only roughly the recipe which would be confusing for anyone inexperienced.

    • I just made this, and would completely agree with everything you’ve said. Not near enough flour!

    • I had the opposite happen to me. I am not super experienced with baking. I grew up making bread with my grandma. Idk what I did wrong but mine was dry. Had to add some more water. Gonna try again. Mine was just dense and thick. Had to bake longer than 30 minutes, think it was in for 45 and still had some questionable areas of maybe it’s cooked but maybe it’s not. I think many things went wrong.

      • — Theora on December 3, 2022
      • Reply
  • Luv all of your recipes. Getting ready to retire and will have more time to cook and bake. If u take requests please consider developing a recipe for pretzel challah. Charlotte

    • — Charlotte Goldin
    • Reply
  • Hi Jenn,
    Any tips for making this gluten free? Typically, I just substitute gluten free flour for the regular, but checking in advance if you think there’s anything more specific than that I should do.
    Thank you and I love your recipes!
    Patricia

    • Hi Patricia, So glad you like the recipes! Unfortunately, I don’t think this one will work very well with gluten-free flour. While it may work, I’m doubtful, and it’s a lot of time to put in for a lot of unpredictability. Sorry!

  • I dont have a stand mixer or bread machine, all I have is a hand mixer. Can I make the challah completely by hand?

    • Hi Tiana, It’s fine to make it by hand. Hope you enjoy!

  • I followed this recipe almost exactly. The only thing I changed was I made two smaller loaves made the same way with the four braids. The texture was great but I just don’t think it is the sweetness I am looking for. I was first introduced to challah when I was 16 at my first job at a Jewish bagel place. I got to take home all the leftovers I could eat, it was great.

  • I hadn’t made a challah in decades, but it was just like getting back on that bicycle. Followed the recipe exactly, though we live at 3,500′ elevation and my yeast wasn’t the freshest. First rise was only 1hr 45min and the second rise was only 45 minutes. Watch the dough, not the clock ! Crust was beautiful, sliced easily and left overs the next morning toasted to perfection with crispy crust with pillow soft inside. Used regular all-purpose flour, used the dough hook in my mixer, hand kneaded for a few minutes ( just cause I like to do that).

  • Hi
    I made this recipe for tonight’s rosh hashanah dinner. I’ve tried at least a dozen different recipes over the last eight years or so, and this was the best challah I ever made.
    I did make some changes. I used three whole eggs and one egg yolk in the dough. Used milk and melted butter in place of water and oil. The dough was too wet and sticky, so I added flour a tablespoon or two at a time till the consistency felt right. I Kneaded in the stand mixer for about 7 minutes, till the dough pulled away from the bowl and made a ball on the dough hook.
    I cut the dough into three equal pieces (used a scale) and made three ropes long enough to make a circle on my large pizza stone. I braided the ropes, attached the two ends, and placed the circle on a piece of parchment paper on the stone. I oiled plastic wrap and laid it on top, then slid the stone into the frig for overnight.
    Next morning I took the stone out of the frig and left it on the counter to come to room temp and finish the second rise. Preheated oven to 350, put challah in to bake. 30 minutes, 190 degrees internal temp.
    Mixed approx 3 tablespoons honey with one tablespoon boiling water. Brushed it over the challah.
    This challah was tender and complex, slightly sweet, absolutely the best I’ve ever eaten! Loved

  • Hi I plan on trying this recipe tomorrow. Can I use avocado oil instead of vegetable oil?

    • Sure, that should be fine. Enjoy!

  • Can you tell me how I could make 2 round loaves from this recipe? Thank you.

    • Hi, that’s possible. You may want to watch a video on how to create a braided round challah. This one looks doable and gives a few options. Bake time for the 2 challahs should be about the same as indicated in the recipe if not a bit shorter. Hope that helps!

  • Hi Jenn
    I love this recipe and make it weekly

    In preparation for the holidays I’d like to make the challah in advance. Can this recipe be frozen before it is baked? Or should I just bake as normal and then freeze?

    • Hi Lesley, While I think you could freeze the dough, I typically make and bake the challah and then freeze it. Please LMK how it turns out if you try it. Happy holidays!

  • Jennifer, Can I halve this recipe?

    • Sure — the bake time may be a bit shorter so keep a close eye on it. Hope you enjoy!

      • Hi Jen,

        I’ve made this recipe several times now and it’s always delicious, but the definition of my braids is never as good as yours! Can you suggest a technique to help me achieve better definition in the final loaf?

        • Hi Megan, Glad you like this! Do you braid the bread fairly tightly? That will help to give you more definition.

  • Delicious!!!!!!
    Can I make it into 2 smaller loaves?
    Proof times and bake times?
    Thank you in advance

    • Hi Debbie, So glad to hear you enjoyed it! Yes, you can divide the dough into two smaller loaves. The proof time would be the same and the baking time should also be about the same if not just a tiny bit shorter. Just keep a close eye on them. Hope that helps! 😊

Add a Comment

This site uses Akismet to reduce spam. Learn how your comment data is processed.