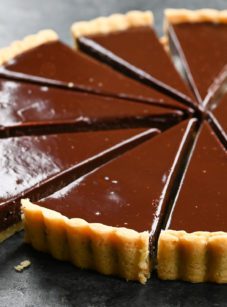
Chocolate Cream Pie


This post may contain affiliate links. Read my full disclosure policy.
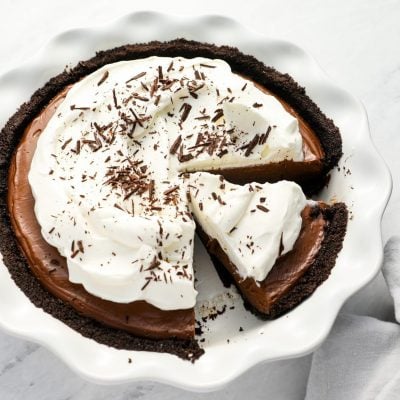
With an Oreo crust and creamy chocolate filling, this chocolate cream pie recipe is tried and true—a longtime family favorite.

There aren’t many recipes in my family that are more of a tradition than this chocolate cream pie. My son, Zach—who’s now 22—has asked for it on his birthday every year since he was little, and at this point, we don’t even bother with cake—this pie is the main event. You can spot it in more family photos than I can count! With its Oreo cookie crust, silky chocolate pudding filling, and cloud of whipped cream on top, it’s the kind of dessert everyone looks forward to. Just be sure to plan ahead; the filling needs at least 8 hours in the fridge to set before serving.
“This was far and away the best chocolate pie that I’ve ever tasted (much less made).”
What You’ll Need To Make Chocolate Cream Pie

- Oreo cookies – Crushed to form the crust, they provide a rich, chocolatey base.
- Butter – Binds the crust and adds richness to both the crust and the filling.
- Sugar – Sweetens the filling and the whipped cream topping.
- Cornstarch – Thickens the filling and gives it a silky, pudding-like texture.
- Egg yolks & Whole Milk – The creamy, rich base of the chocolate filling.
- Bittersweet & unsweetened chocolate – For deep, complex chocolate flavor. Use good-quality chocolate (like Ghirardelli) for best results.
- Vanilla extract – Rounds out and enhances the chocolate flavor.
- Heavy whipping cream – Whips into a light, fluffy topping. Be sure it’s very cold for best volume.
- Jump to the printable recipe for precise measurements
Step-By-Step Instructions
Step1: Make the crust. In a food processor, pulse the Oreos and melted butter until the mixture is finely ground and evenly moistened. Press the crumbs into a deep 9-inch pie pan—start with the sides so you get a nice, even edge (about ¼ inch thick), then press the rest into the bottom. Bake at 350°F for 5 to 6 minutes, just until the crust is slightly crisp. Let it cool completely before adding the filling.


Step 2: Make the chocolate filling. In a medium saucepan, whisk together the sugar, cornstarch, and salt. In a separate bowl or large measuring cup, whisk the egg yolks and milk, then slowly pour it into the saucepan while whisking. Cook over medium-high heat, whisking often (and scraping the bottom and sides), until it starts to bubble and thicken, 6 to 8 minutes. Reduce the heat to a simmer and cook 1 minute more. Off the heat, whisk in the chopped chocolate, butter, and vanilla until smooth.


Step 3: Fill and chill. Pour the filling into the cooled crust and smooth the top. Press plastic wrap directly onto the surface to prevent a skin from forming, then refrigerate for at least 8 hours or overnight.

Step 4: Finish the pie. Using an electric mixer, whip the cream on medium-low until it starts to thicken and the beaters leave tracks. Add the sugar and continue whipping until soft, silky peaks form. Spread the whipped cream over the chilled filling, leaving a bit of the chocolate showing around the edges. Sprinkle with grated chocolate and refrigerate until ready to serve. You can make the pie (without the whipped cream) up to a day ahead. Just wait until a few hours before serving to whip and top. Store covered in the fridge.

Video Tutorial
You May Also Like


Chocolate Cream Pie
Ingredients
For the Crust
- 24 Oreo cookies
- 5 tablespoons unsalted butter, melted
For the Filling
- ⅔ cup sugar
- ¼ cup cornstarch
- ½ teaspoon salt
- 4 large egg yolks
- 3 cups whole milk
- 5 ounces bittersweet chocolate, best quality such as Ghirardelli
- 2 ounces unsweetened chocolate, best quality such as Ghirardelli
- 2 tablespoons unsalted butter
- 1 teaspoon vanilla extract
For the Topping
- 1 cup chilled heavy whipping cream
- 1 tablespoon sugar
- 1 ounce bittersweet chocolate, grated or shaved
Instructions
For the Crust
- Preheat the oven to 350°F (175°C) and set an oven rack in the middle position.
- In the bowl of a food processor fitted with a steel blade, blend the Oreos and butter until the mixture is finely chopped and evenly moistened. Firmly press the crumbs into a deep-dish 9-in (23-cm) pie pan, starting by lining the sides to create a crust about ¼-in (6-mm) thick, then press the remaining mixture onto the bottom to form the base. Use the bottom of a measuring cup or glass not only to flatten and even out the surface of the base but also to press against the sides, ensuring they are compact and uniform. To refine the top edge of your crust, position the side of your thumb or the edge of a measuring cup inside the crust's side wall, and with the index finger of your other hand, gently press down on the top edge. Gradually rotate the pie pan, maintaining this motion, to ensure a consistently neat and smooth edge around the entire perimeter. Bake the crust for 5 to 6 minutes, or until slightly crisp, then allow it to cool completely before filling.
For the Filling
- Combine the sugar, cornstarch, and salt in a heavy medium saucepan. Whisk gently until combined.
- In a bowl or large measuring cup, whisk together the egg yolks and milk. Add the milk mixture to the saucepan in a slow and steady stream, whisking until the mixture is smooth. Cook over medium-high heat, whisking frequently, until the mixture starts to bubble and thicken, 6 to 8 minutes. Immediately turn the heat down to a simmer and cook -- whisking constantly, especially around the edges -- for one minute more, until thick. (The constant stirring and low heat prevent the eggs from scrambling. Be sure to scrape the whisk against the bottom and edges of the pan where the mixture is more likely to overheat.) Off the heat, immediately add the chopped chocolate, butter, and vanilla extract; whisk until the chocolate is completely melted and the mixture is evenly combined.
- Pour the filling into the crust and smooth the top. Press a piece of saran wrap directly over the surface of the filling to prevent a film from forming; chill in the refrigerator for at least 8 hours or overnight.
For the Topping
- Up to 3 hours before serving, place the heavy cream in a mixing bowl. Using an electric mixer, whip on medium-low speed until the whisk or beaters begin to leave tracks in the cream. Add the sugar and whip until the cream holds medium, silky peaks. Go slowly towards the end; if it gets grainy or curdled, you’ve gone too far. Spread the whipped cream over the filling, leaving some of the chocolate filling showing around the edges. Sprinkle with the grated chocolate and refrigerate until ready to serve.
Notes
Nutrition Information
This website is written and produced for informational purposes only. I am not a certified nutritionist and the nutritional data on this site has not been evaluated or approved by a nutritionist or the Food and Drug Administration. Nutritional information is offered as a courtesy and should not be construed as a guarantee. The data is calculated through an online nutritional calculator, Edamam.com. Although I do my best to provide accurate nutritional information, these figures should be considered estimates only. Varying factors such as product types or brands purchased, natural fluctuations in fresh produce, and the way ingredients are processed change the effective nutritional information in any given recipe. Furthermore, different online calculators provide different results depending on their own nutrition fact sources and algorithms. To obtain the most accurate nutritional information in a given recipe, you should calculate the nutritional information with the actual ingredients used in your recipe, using your preferred nutrition calculator.
Hi Jenn –
I’ve made both the chocolate cream pie and the key lime pie and they’re both absolutely amazing!
I noticed that the whipped topping for the key lime pie calls for confectioner’s sugar and the one for the chocolate pie calls for regular sugar. Just curious – if there’s a reason behind it? Again, they’re both absolutely delicious; just wondering. Thanks a bunch!
Hi Karen, So glad you like both pies! No, there’s no scientific reason for the different kinds of sugar — either one will work in either recipe.
How much sugar is needed? The the quantity box Is marked with an X “cup”
Hi Theresa, I’m sorry — I will have my developer fix it! You’ll need 1/3 cup of sugar for the crust and 2/3 cup of sugar for the filling. Hope you enjoy!
Can I freeze the pie without the topping?
Hi Celeste, I wouldn’t recommend it — sorry!
Hello, I’ve made this recipe MANY times – always with gf Oreos for the crust (minus the additional sugar) and it turns out amazing. My question is, how far ahead of time do you think you can make this? I’d like to make it today (Friday) to be eaten Sunday. Thanks!
Hi Bailey, So glad you like it! The pie keeps nicely, so 2 days ahead will be fine.
I made this for a pie tutorial night and it was a hit. It tastes so much better than other chocolate cream pies……in Idaho you can find the chocolate wafers at Fred Meyers and Albertsons.
Hi Jenn I forgot to ask is there a reason you make the crust with softened not melted butter?
Thanks
Hi Chris, you can go either way here; either softened or melted butter will work.
My glass Pyrex pie dish is 9.5 inches. Do you think I need to increase the crust amount? I feel the filling will be enough but not sure.
Hi Chris, I think you should be fine with the recipe as-is. Enjoy!
Hi Jenn!
I just made this and I couldn’t get it to thicken at all on the stove top-it was really runny when I put it in the fridge just now. Wondering if I whisked too much? I didn’t forget the corn starch but I did use a slightly thinner whole milk from our local creamery.
Hi Cathy, I don’t think whisking would cause the problem. Did it bubble up? You do need whole milk for it to thicken properly, but I’m surprised that it didn’t thicken at all, even with the lighter milk. Did you make any adjustments to the recipe?
Hi Jenn
I have made this delicious pie a couple years ago with the wafers. Unfortunately, this time my store only had the oreo thins. Is there any adjustments to the crust ingredients when using the oreo’s and also, do i remove the oreo filling?
Thank you
Hi Nicole, No worries – it will be delicious with Oreo thins. It’s not necessary to remove the filling; I would just reduce the sugar to 1/4 cup.
Perfect and so easy!
Well Jenna: I tried this at my grand daughter request. So I figure give it a whirl after the two great successes ( NY Cheesecake & strawberry short cake) how can I go wrong. Everybody grand daughter included thought it was great. Thanks My next challenge is the chocolate mousse
I made this for Christmas Eve dessert 2021. It was just heaven. It was so incredibly smooth and rich.
I used Scharffen Berger unsweetened chocolate and Godiva bittersweet chocolate chips. Served with more whipped cream than the recipe suggests and delicious fresh raspberries. Swoon worthy!