Peanut Butter Pie


This post may contain affiliate links. Read my full disclosure policy.
This creamy peanut butter pie has that classic chocolate–peanut butter combo everyone loves—and comes together with just a few ingredients.

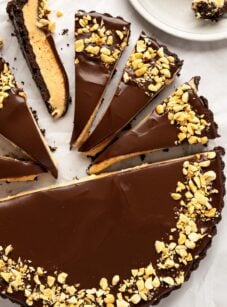
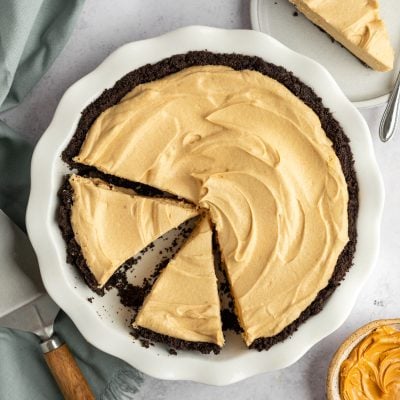
Calling all chocolate and peanut butter lovers! This peanut butter pie is an absolute dream. With a cool and creamy peanut butter filling, a rich chocolate layer, and a crunchy Oreo cookie crust, it’s the perfect crowd-pleasing dessert for warm weather. Best of all, it’s easy to make with simple ingredients you probably already have—or can pick up in a quick grocery stop. And since it needs to chill before serving, it’s a great make-ahead option, too.
The pie needs at least 3 hours to set up in the fridge, so plan accordingly—or better yet, make it a day ahead and cross it off your list!
“Fabulous!!!! A teenage guest said it was the best thing he had ever eaten in his life.”
What You’ll Need To Make Peanut Butter Pie

- Oreo Cookies: Provide a chocolatey base for the pie crust.
- Butter: Binds the crushed cookies together, creating a firm, buttery crust.
- Heavy Cream: Combines with the chocolate to form a rich chocolate layer. Additional heavy cream is whipped and folded into the filling, adding lightness and creaminess.
- Semi-Sweet Chocolate: Melts with the cream into a rich and decadent chocolatey layer, adding depth of flavor to the pie.
- Cream Cheese: Adds richness and tanginess to the filling, and contributes to its creamy texture.
- Creamy Peanut Butter: For best results, use a smooth commercial peanut butter (I like Skippy). This gives the pie that classic creamy texture and helps it set properly. Natural or chunky peanut butter will affect the consistency of the filling and result in a less smooth pie.
- Vanilla: Adds a hint of warmth and depth to the filling.
- Confectioners’ Sugar: Sweetens and thickens the filling.
- Jump to the printable recipe for precise measurements
Step-By-Step Instructions
Step 1: Make the crust. Preheat the oven to 350°F and set an oven rack in the middle position. In the bowl of a food processor fitted with a steel blade, add the Oreos.

Add the melted butter and blend until the mixture is finely chopped and evenly moistened.

Firmly press the crumbs into a deep-dish 9-inch pie pan, starting by lining the sides to create a crust about ¼-inch thick, then press the remaining mixture onto the bottom to form the base.

Bake the crust for 5 to 6 minutes, or until slightly crisp, then allow it to cool completely before filling.

Step 2: Make the chocolate layer. In a small microwave-safe bowl, combine the cream and chocolate (or chocolate chips). Heat on high power for 30 seconds and stir until melted (microwave for another 10 seconds or so if needed).

Pour into the cooled crust and carefully spread evenly over the bottom using a spoon or offset spatula, taking care not to disturb the crust. Let cool until the chocolate has set — it doesn’t need to be completely firm, but you should be able to lightly touch it without sticking to your finger. For quicker setting, place it in the freezer for about 15 minutes.

Step 3: Make the peanut butter filling. In the bowl of a stand mixer fitted with the whisk or beaters, whip the heavy cream until stiff peaks form. Transfer the whipped cream to a separate bowl.

Without cleaning the mixer bowl or whisk/beaters, add the cream cheese, peanut butter, salt, and vanilla.

Beat on medium-high speed until fluffy, about 2 minutes, making sure to scrape down the sides of the bowl as needed.

Gradually add in the confectioners’ sugar while mixing on low speed, then increase the speed to medium and continue beating until the mixture is smooth, about 2 minutes, scraping the bowl as necessary.

Introduce one-third of the whipped cream into this mixture.

Beat until just combined; this helps lighten the mixture for easier folding. Then gently fold in the remaining whipped cream with a rubber spatula until the texture is consistent and resembles peanut butter mousse.

Step 4: Assemble the pie. Pour the filling into the cooled crust, using the back of a spoon to create decorative swirls on the surface.

Step 5: Chill and serve. Place the pie in the refrigerator for at least 3 hours or overnight to allow it time to set. Serve the pie cold from the fridge and enjoy!

More Peanut BUtter Desserts You May Like


Peanut Butter Pie
Ingredients
For the Crust
- 24 Oreo cookies
- 5 tablespoons unsalted butter, melted
For the Chocolate Layer
- ¼ cup heavy cream
- ⅓ cup semi-sweet chocolate chips (or 2 oz/57 g chopped semi-sweet chocolate)
For the Peanut Butter Filling
- 2 cups heavy cream
- 8 oz cream cheese
- 1 cup creamy peanut butter (see note)
- ½ teaspoon salt
- 2 teaspoons vanilla
- 1½ cups confectioners’ sugar
Instructions
For the Crust
- Preheat the oven to 350°F (175°C) and set an oven rack in the middle position. In the bowl of a food processor fitted with a steel blade, blend the Oreos and butter until the mixture is finely chopped and evenly moistened. Firmly press the crumbs into a 9-in (23-cm) deep-dish pie pan, starting by lining the sides to create a crust about ¼-in (6-mm) thick, then press the remaining mixture onto the bottom to form the base. Use the bottom of a measuring cup or glass not only to flatten and even out the surface of the base but also to press against the sides, ensuring they are compact and uniform. To refine the top edge of your crust, position the side of your thumb or the edge of a measuring cup inside the crust's side wall, and with the index finger of your other hand, gently press down on the top edge. Gradually rotate the pie pan, maintaining this motion, to ensure a consistently neat and smooth edge around the entire perimeter. Bake the crust for 5 to 6 minutes, or until slightly crisp, then allow it to cool completely before filling.
For the Chocolate Layer
- In a small microwave-safe bowl, combine the cream and chocolate chips. Heat on high power for 30 seconds and stir until melted (microwave for another 10 seconds or so if needed). Pour into the cooled crust and carefully spread evenly over the bottom using a spoon or offset spatula, taking care not to disturb the crust. Let cool until the chocolate has set — it doesn’t need to be completely firm, but you should be able to lightly touch it without sticking to your finger. For quicker setting, place it in the freezer for about 15 minutes.
For the Peanut Butter Filling
- In the bowl of a stand mixer fitted with the whisk or beaters, whip the heavy cream until stiff peaks form. Transfer the whipped cream to a separate bowl. Without cleaning the mixer bowl or whisk/beaters, add the cream cheese, peanut butter, salt, and vanilla. Beat on medium-high speed until fluffy, about 2 minutes, making sure to scrape down the sides of the bowl as needed. Gradually add in the confectioners’ sugar while mixing on low speed, then increase the speed to medium and continue beating until the mixture is smooth, about 2 minutes, scraping the bowl as necessary. Introduce one-third of the whipped cream into this mixture and beat until just combined; this helps lighten the mixture for easier folding. Gently fold in the remaining whipped cream with a rubber spatula until the texture is consistent and resembles peanut butter mousse.
- Pour the filling into the cooled crust, using the back of a spoon to create decorative swirls on the surface. Chill in the refrigerator for at least 3 hours or overnight. Serve cold.
Notes
- For best results, use a smooth and creamy commercial peanut butter, like Skippy. (I do not recommend all-natural, organic, or chunky peanut butter.)
- Make-Ahead Instructions: The pie can be made up to 1 day ahead of time.
Nutrition Information
This website is written and produced for informational purposes only. I am not a certified nutritionist and the nutritional data on this site has not been evaluated or approved by a nutritionist or the Food and Drug Administration. Nutritional information is offered as a courtesy and should not be construed as a guarantee. The data is calculated through an online nutritional calculator, Edamam.com. Although I do my best to provide accurate nutritional information, these figures should be considered estimates only. Varying factors such as product types or brands purchased, natural fluctuations in fresh produce, and the way ingredients are processed change the effective nutritional information in any given recipe. Furthermore, different online calculators provide different results depending on their own nutrition fact sources and algorithms. To obtain the most accurate nutritional information in a given recipe, you should calculate the nutritional information with the actual ingredients used in your recipe, using your preferred nutrition calculator.
All of your recipes are great, but this one really hit it out of the park! It may seem labor intensive at first, but once you get going, it is easy! I brought this to a game day and everyone loved it! Thanks again!
TRY THIS!!!!! So good! Another great recipe, Jen! Absolutely fabulous, everyone loved it. A big hit as your recipes usually are!
Would it be ok to freeze leftovers of this pie? I’m not sure if the peanut butter filling will freeze and defrost well so wanted to check. Thank you!
Hi Sam, I don’t think this pie is a great candidate for freezing–sorry!
I made this and it was incredible! However I had a TON of filling, it rose high above the crust line. I’m wondering if my pie pan was too shallow. I thought it was considered deep dish. A used a 9 inch, 36 oz. pan. Do I need a larger size? Thanks!
Hi Ali, it sounds like you have a standard pie pan. All of the filling will fit nicely in a deep dish. Glad it was great though!
This pie was amazing! But I’m disappointed, the crust stuck to the bottom of the metal pie pan…should I have greased it first?
Hi Sarah, I’m sorry you had a problem with the crust sticking! Next time, I’d pull it out of the oven a touch earlier. And, while you shouldn’t have to, you can lightly oil or butter the pie plate before putting the crust in; just keep in mind that you’ll need to press the crust in a little more gingerly as the sides will be slick. Hope that helps!