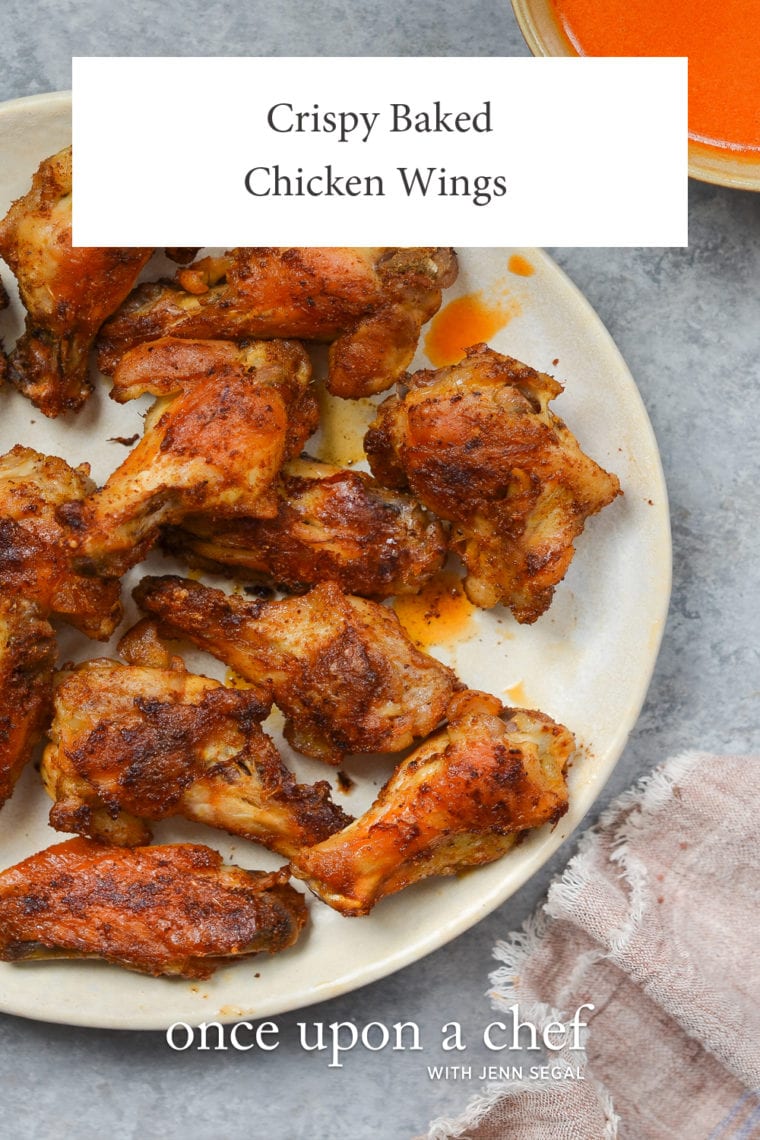
Crispy Baked Chicken Wings

This post may contain affiliate links. Read my full disclosure policy.
Skip the fryer and discover the secret to super crispy baked chicken wings! With a simple parboil trick, these wings will become your new go-to for game day or casual gatherings.
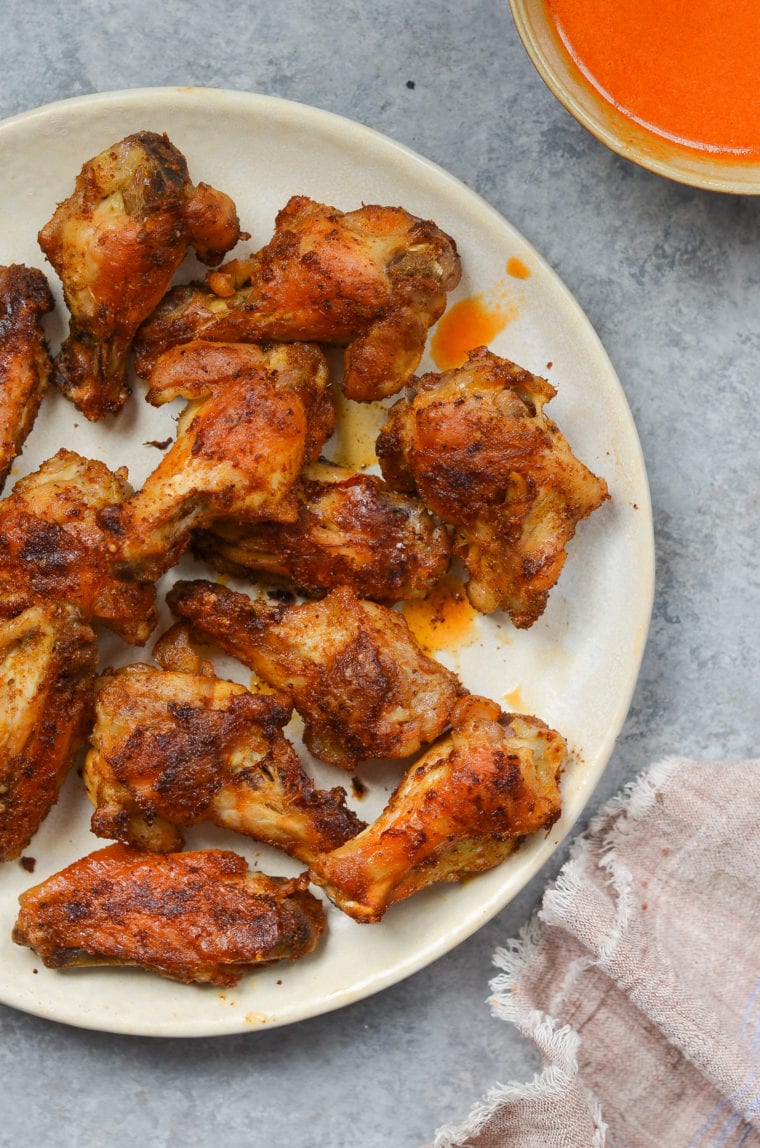
I love crispy chicken wings but not always the thought of deep-frying. Grilled chicken wings are a great option in the summertime, but what about rest of the year? Baked chicken wings are a popular alternative, but if you’ve tried other recipes, you know they rarely turn out crispy as promised. I have a solution for that! Instead of relying on baking powder, which many recipes use with mediocre results, I parboil the wings before roasting. This step melts away excess fat, ensuring the wings crisp up beautifully in the oven—no frying needed.
To amp up the flavor, I coat the wings in a bold spice rub before baking. They’re good on their own, but if you’re in the mood for classic Buffalo wings, I’ve got you covered with an easy Buffalo sauce. And, of course, no wings are complete without a side of blue cheese dressing or ranch dressing.
“Super crispy…My husband, who is a wing nut, loved these. This is the only way I will be making my wings from now on.”
What You’ll Need To Make Baked Chicken Wings

- Chicken Wings: Feel free to choose between drummettes, wingettes (flats), or a combination of both, often referred to as “party wings” in stores.
- Vegetable Oil: Helps to crisp the skin in the oven and allows the spices to adhere to the wings evenly.
- Spices (Chili Powder, Cumin, Smoked Paprika): Lend a rich, smoky, and slightly spicy flavor.
- Butter: Combines with the hot sauce to create a rich, flavorful coating that adds depth and mellows the heat.
- Frank’s Red Hot Original Cayenne Pepper Sauce: Gives the wings their classic hot and tangy flavor, essential for achieving that signature buffalo wing taste.
- Jump to the printable recipe for precise measurements
Step-by-Step Instructions
Bring a big pot of water (about 4 quarts) to a rolling boil, then toss in a tablespoon of salt. Add the chicken wings, let the water come back to a boil, and cook them for 7 minutes.
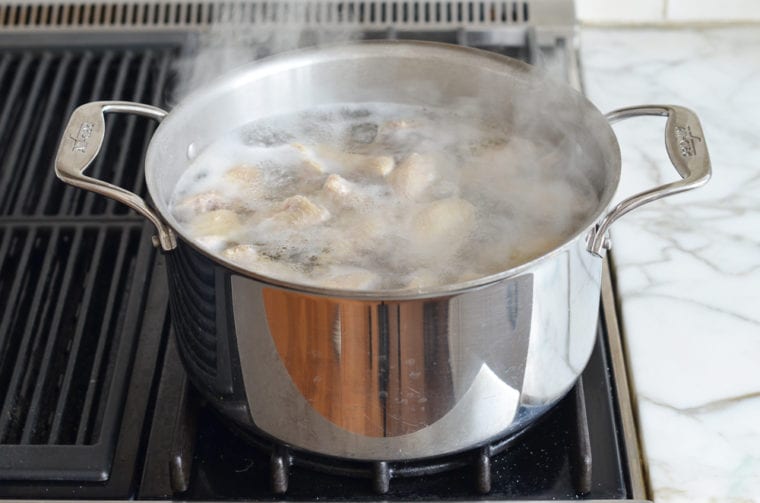
Drain the wings well in a colander—keep in mind that they’re only partially cooked at this stage.
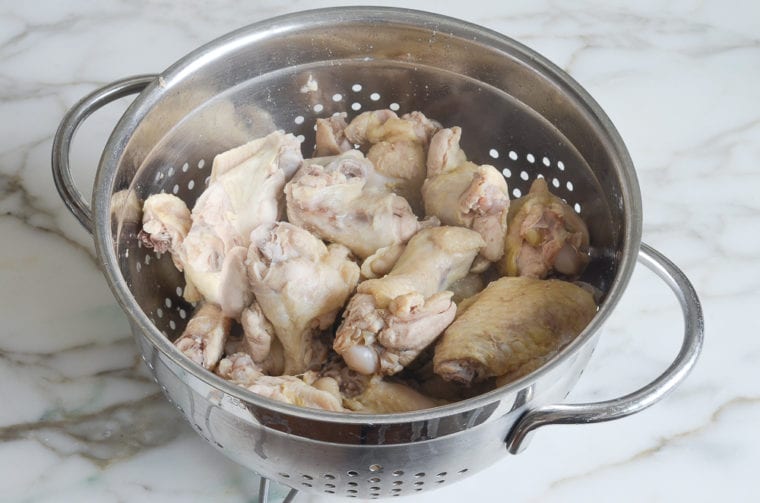
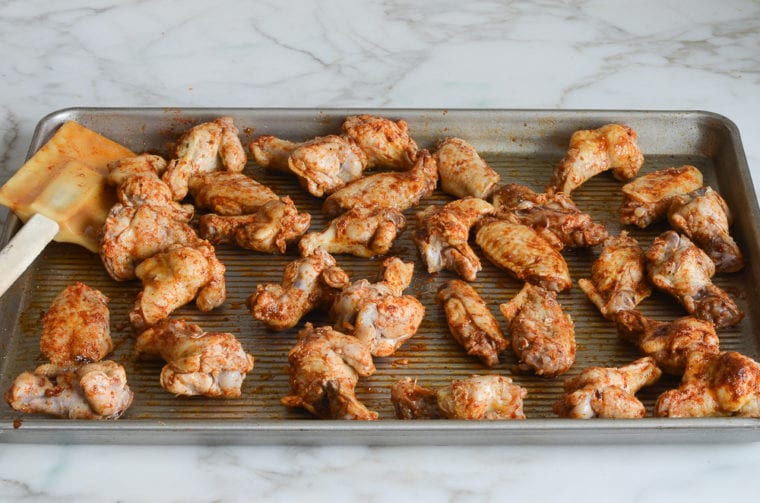
Spread the wings out on a 13 x 18-inch baking sheet. Grab a wad of paper towels and blot them as dry as possible—this helps them crisp up in the oven. Drizzle with oil, then sprinkle on 1 teaspoon salt, chili powder, cumin, and smoked paprika. Use a rubber spatula to toss everything together until the wings are evenly coated.
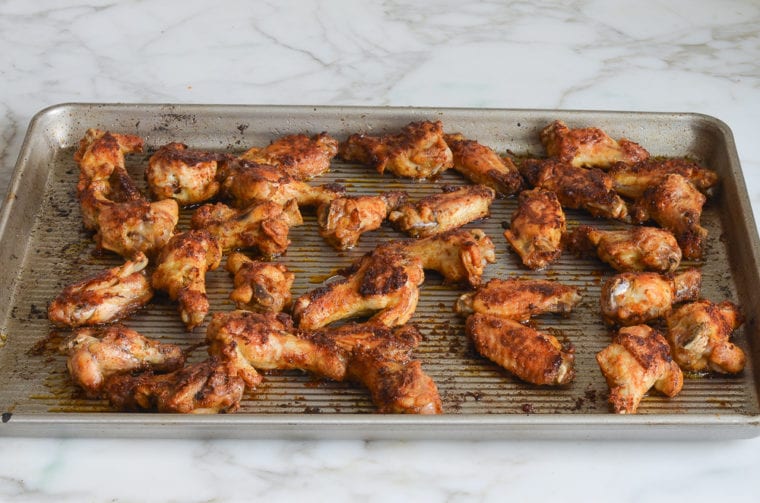
Bake for 15 minutes, then take the pan out of the oven and flip the wings over with tongs. Pop them back in and bake for another 10 minutes, or until they’re crispy all over.
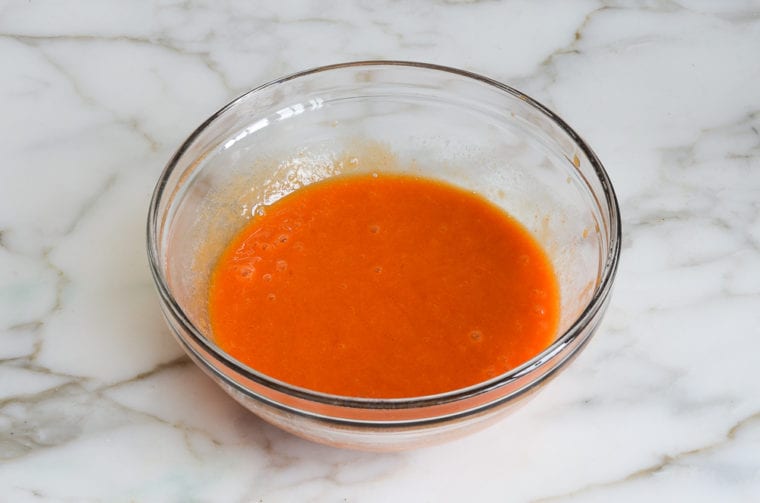
To make the Buffalo sauce, whisk together the butter and hot sauce in a small bowl until smooth. If it starts to solidify as it cools, just warm it up in the microwave or on the stovetop to bring it back to a pourable consistency.
Transfer the baked wings to a serving platter and serve with Buffalo sauce, if you like. And if you’re planning ahead—baked wings reheat nicely! Once they’re fully cooled, store them in the fridge for up to 3 days. When you’re ready to dig in, just pop them back in the oven until they’re hot and crispy again.

Video Tutorial
You May Also Like


Crispy Baked Chicken Wings

Ingredients
For the Chicken Wings
- Salt
- 3 pounds chicken wings, split into drummettes and wings (tips discarded)
- 3 tablespoons vegetable oil
- 1 teaspoon chili powder
- 1 teaspoon ground cumin
- 1 teaspoon smoked paprika
For the Buffalo Sauce (optional)
- 6 tablespoons unsalted butter, melted
- 6 tablespoons Frank's Red Hot Original Cayenne Pepper Sauce (or similar brand)
Instructions
For the Chicken Wings
- Preheat the oven to 450°F (235°C) and set an oven rack in the middle position.
- In a large pot, bring 4 qts (4L) of water and 1 tablespoon of salt to a rapid boil. Add the chicken wings, return to a boil, and boil them for 7 minutes. Drain the wings thoroughly in a colander.
- Place the wings on a 13 x 18-in (33 x 46-cm) baking sheet. Using a wad of paper towels, blot the wings as dry as possible (wipe off any moisture from the baking sheet, too). Drizzle the oil over the wings and sprinkle with 1 teaspoon salt, the chili powder, cumin, and smoked paprika. Toss with a rubber spatula until the wings are evenly coated. Bake for 15 minutes, then remove the pan from the oven and, using tongs, flip the wings over. Return to the oven and bake for about 10 minutes more, or until the wings are crispy all over. Transfer the wings to a serving platter and serve with the Buffalo sauce on the side, if desired.
For the Buffalo Sauce
- In a small bowl, whisk together the butter and hot sauce. The sauce will solidify as it cools; reheat if necessary.
Notes


Nutrition Information
This website is written and produced for informational purposes only. I am not a certified nutritionist and the nutritional data on this site has not been evaluated or approved by a nutritionist or the Food and Drug Administration. Nutritional information is offered as a courtesy and should not be construed as a guarantee. The data is calculated through an online nutritional calculator, Edamam.com. Although I do my best to provide accurate nutritional information, these figures should be considered estimates only. Varying factors such as product types or brands purchased, natural fluctuations in fresh produce, and the way ingredients are processed change the effective nutritional information in any given recipe. Furthermore, different online calculators provide different results depending on their own nutrition fact sources and algorithms. To obtain the most accurate nutritional information in a given recipe, you should calculate the nutritional information with the actual ingredients used in your recipe, using your preferred nutrition calculator.
Gluten-Free Adaptable Note
To the best of my knowledge, all of the ingredients used in this recipe are gluten-free or widely available in gluten-free versions. There is hidden gluten in many foods; if you're following a gluten-free diet or cooking for someone with gluten allergies, always read the labels of your ingredients to verify that they are gluten-free.
My husband loves to BBQ wings – sometimes it works, sometimes…well… I’m intrigued by par-boiling the wings – then having my husband do his BBQ thing. I think they would create a lovely crispy skin which is what I am looking for. Would appreciate your thoughts…
Hi Karen, I haven’t done it with this recipe, but yes, your husband can grill these. You could also give this recipe a try. I hope you enjoy whatever you make!
Just cooked these exactly as instructions yet the chicken totally stuck to the pan and we lost most of the skin. Not sure what I did wrong.
Laura, I’m sorry you had a problem with the wings sticking! Did you use the full amount of oil to toss the wings with the spices? And is your baking sheet very old? Perhaps it’s started to lose its nonstick quality?
What oil? I don’t see any oil listed?
Hi Judy, You’ll need 3 tablespoons vegetable oil (it’s the ingredient under the chicken wings). Hope you enjoy them!
Something you might want to consider… I line my pan with parchment paper. Works every time! I suppose you could also use non stick foil.
Can you freeze the wings after baking? If so, how would I reheat them from frozen? Would I thaw first?
Love all your recipes
So glad you like the recipes! I’ve never frozen these after baking, but I suppose you could. I’d reheat them in a 350-degree oven for about 15 minutes or until heated through.
Honestly, these are the best, crispiest chicken wings ever. I can’t believe that parboiling, and then baking would produce this result, and I have baked chicken wings for years using different, time consuming recipes. Thank you so much for sharing this! I’m from upstate NY, and we eat a ton of wings…so happy to have this recipe.
Do you think I could boil the day before and refrigerate? The next day I would put in the oven, understanding they’d need more time.
From a food safety standpoint, I wouldn’t recommend parboiling them without baking them right after – sorry!
I love all of your recipes but this one isn’t a keeper for me. The wings weren’t crispy (probably could have baked longer) but the big problem was that the skin stuck to the baking sheet even though there was plenty of oil. I had to scrape them up with a thin metal spatula and lost most of the skin in the process. Very disappointing. I think the deep fryer would just be faster & easier.
Thanks for all of your other fantastic recipes, they are favorites around my house.
Don’t give up!!! I can’t count the number of times I’ve made these wings. In fact, I have some in the oven as I type this… Here’s a couple of suggestions: First, line the pan with parchment paper or non-stick foil. Second, I always bake longer than what the recipe indicates but your oven might dictate otherwise. 15 minutes the first side (as recipe suggests). Turn over for another 15 minutes and possibly a couple more. (Make sure you check once or twice once you reach the recipe recommendation.) However, I also cook at a higher temperature – maybe 365. (I don’t experience dryness.) Oh, I also pre-mix the oil and spices together, place boiled wings in a large bowl and drizzle over the wings. Fold ’til all the wings are coated. Hope this helps!
I followed this recipe to a tee, and my wings were swimming in oil when I took them out of the oven. The flavor was good, so I may try making them again and spraying them briefly with oil rather than drizzling.
I can’t believe you can have healthy chicken wings! They turned out awesome. I do recommend not baking more than the recipe states. I thought I could crisp them up more by baking an extra five minutes but that just made them a little drier.
These were excellent. I doubled the recipe for my family and all but 5 wings were eaten.
I have never made wings before. I am not a wing person, but these were delicious. I made them for the Super Bowl. My son and husband devoured them. Thank you for sharing the fool proof technique.