Chess Pie


This post may contain affiliate links. Read my full disclosure policy.
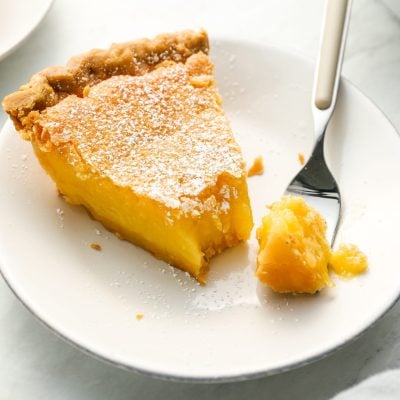
If you love simple, old-fashioned desserts, this Southern chess pie is hard to beat, thanks to its sweet-tart custard and lightly crackled top.

Let’s talk about a beloved Southern classic: chess pie. It’s famous for its custard filling—a luscious blend of eggs, sugar, butter, cornmeal, and a hint of vinegar or lemon—baked into a buttery and flaky crust. The story behind the name holds a little mystery. Some say “chess” refers to an old English word for cheese (a nod to its creamy texture), while others believe it’s a playful twist on “just pie” pronounced with a Southern drawl.
Among the various flavors of chess pie to choose from—like buttermilk, chocolate, and coconut—lemon is my favorite. It boasts a tart-sweet flavor reminiscent of lemon bars and lemon ice. And here’s a bonus: while some pies beg for a homemade crust, chess pie shines even with a store-bought one, making it ideal for those times you need a quick and easy dessert. Though it’s not the showiest dessert at the table, what it lacks in flair, it more than makes up for in taste.
“Delicious, easy, and perfectly lemony!”
What You’ll Need To Make Chess Pie

To make a homemade chess pie, you’ll first need a homemade pie crust or a store-bought pie shell. If using store-bought, a frozen pie crust in an aluminum pan works best, as it’s pre-molded to hold its shape and resist shrinking during baking. In contrast, rolled refrigerated crusts that you fit into your own pie dish will shrink if stretched or pressed too tightly.
For the filling, you’ll need large eggs, granulated sugar, lemon zest and lemon juice, vanilla extract, cornmeal, all-purpose flour, salt, and butter.
Finally, you’ll need confectioners’ sugar for dusting over the baked pie.
Step-by-Step Instructions
Step 1: Prep the crust for blind baking. Line the unbaked crust with crumpled parchment paper. Fill it with dried beans, rice, or pie weights to keep the dough flat and prevent puffing.
Pro Tip: Crumpling the parchment paper into a ball and then unfolding it helps it sit more readily against the curves of the crust and won’t spring back while you’re trying to add your weights.

Step 2: Parbake the crust. Bake at 375°F for 10 minutes, then remove the parchment and weights. Bake for an additional 5 minutes to brown the bottom, then reduce the oven temperature to 325°F.

Step 3: Make the filling. In a large bowl, whisk the eggs until smooth. Whisk in the sugar, lemon zest and juice, vanilla, cornmeal, flour, and salt, then stir in the melted butter.

Step 4: Fill the crust. Pour the lemon mixture into the parbaked pie shell.
Pro Tip: If you’d like, you can place the pie pan on a baking sheet before pouring in the filling. This makes it much easier to slide the pie into the oven without sloshing the liquid over the sides of the crust.

Step 5: Bake the pie. Bake at 325°F until the surface is golden and the filling is just set, about 50 to 55 minutes.
Pro Tip: It’s normal for the center of the pie to jiggle slightly at this point; it will finish firming up perfectly as it cools.

Step 6: Cool and serve. Cool the pie completely on a wire rack for about 4 hours before serving. The pie can be refrigerated for up to 2 days or frozen for up to 3 months. Bring to room temperature before serving.
Pro Tip: If you’re using a store-bought crust in an aluminum pan and want a more elegant look, pre-slice the pie and move the pieces to a decorative platter.

Chess Pie Video Tutorial
More Southern-Style Pies You’ll Love


Lemon Chess Pie
Ingredients
- 1 (9-in) store-bought pie shell, thawed but cold (see note), or homemade pie crust
- 5 large eggs
- 1¾ cups granulated sugar
- Zest of 1 lemon (a heaping teaspoon, packed)
- 3 tablespoons lemon juice, from 1 to 2 lemons
- 1½ teaspoons vanilla extract
- 2 tablespoons cornmeal
- 1 tablespoon all-purpose flour
- ½ teaspoon salt
- ½ cup (1 stick) unsalted butter, melted and cooled slightly
- Confectioners' sugar, for serving (optional)
Instructions
- Preheat the oven to 375°F (190°C) and set an oven rack in the middle position.
- Blind bake the crust: Line the unbaked crust with parchment paper (if you crumple it up and then flatten it a bit, it will sit better inside the crust). Fill it with dried beans, rice, or pie weights to keep the dough flat and prevent puffing. Bake for 10 minutes, then carefully remove the parchment and weights. Continue baking for an additional 5 minutes to dry and lightly brown the bottom. Reduce the oven temperature to 325°F (165°C).
- Meanwhile, make the filling: Whisk the eggs in a large bowl until smooth. Whisk in the granulated sugar, lemon zest and juice, vanilla, cornmeal, flour, and salt until well combined. Whisk in the butter until the mixture is uniform.
- Whisk the filling briefly to recombine and pour into the parbaked pie shell. Bake until just set and the surface is golden (the center may jiggle just slightly when shaken), 50 to 55 minutes. Cool completely on wire rack, about 4 hours. Dust with confectioners' sugar, if desired, and serve.
Notes
- When opting for store-bought pie crust, it's best to use the frozen ones that come in aluminum pans. These crusts are molded into the pans, setting their shape and preventing shrinkage during baking. Conversely, rolled refrigerator crusts, which you fit into a pie dish yourself, can shrink if stretched or compressed. If you're concerned about the aluminum pan's appearance, pre-slice the pie and transfer the slices to a decorative pan or platter for a more elegant presentation.
- Make-Ahead/Freezing Instructions: The pie can be made up to 2 days ahead of time. Once baked and completely cooled, cover the pie tightly with aluminum foil or plastic wrap and refrigerate. Bring the pie to room temperature before serving to ensure the best texture and flavor. To freeze, after the pie has fully cooled, wrap it securely in plastic wrap, followed by a layer of aluminum foil to prevent freezer burn. Place the wrapped pie in a freezer-safe bag or container and store it in the freezer for up to 3 months. When you're ready to enjoy the pie, thaw it overnight in the refrigerator and then let it come to room temperature before serving.
Nutrition Information
This website is written and produced for informational purposes only. I am not a certified nutritionist and the nutritional data on this site has not been evaluated or approved by a nutritionist or the Food and Drug Administration. Nutritional information is offered as a courtesy and should not be construed as a guarantee. The data is calculated through an online nutritional calculator, Edamam.com. Although I do my best to provide accurate nutritional information, these figures should be considered estimates only. Varying factors such as product types or brands purchased, natural fluctuations in fresh produce, and the way ingredients are processed change the effective nutritional information in any given recipe. Furthermore, different online calculators provide different results depending on their own nutrition fact sources and algorithms. To obtain the most accurate nutritional information in a given recipe, you should calculate the nutritional information with the actual ingredients used in your recipe, using your preferred nutrition calculator.
This was a snap to put together. I needed a GF dessert so used a GF purchased crust and swapped one-half tablespoon of cornstarch for the tablespoon of flour. Reminded me of lemon bars.