Focaccia Bread Recipe

This post may contain affiliate links. Read my full disclosure policy.
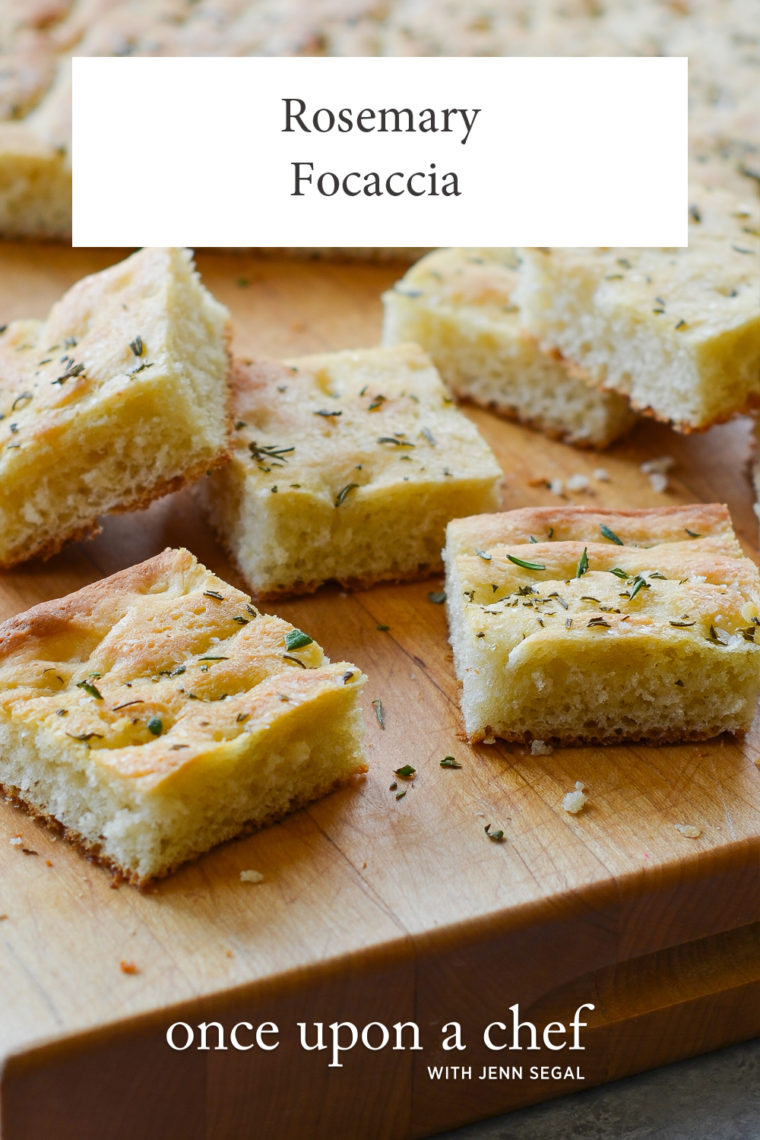
Learn to make focaccia, the simple Italian flatbread with its signature dimpled surface and rich olive oil flavor—it’s easier than you think!
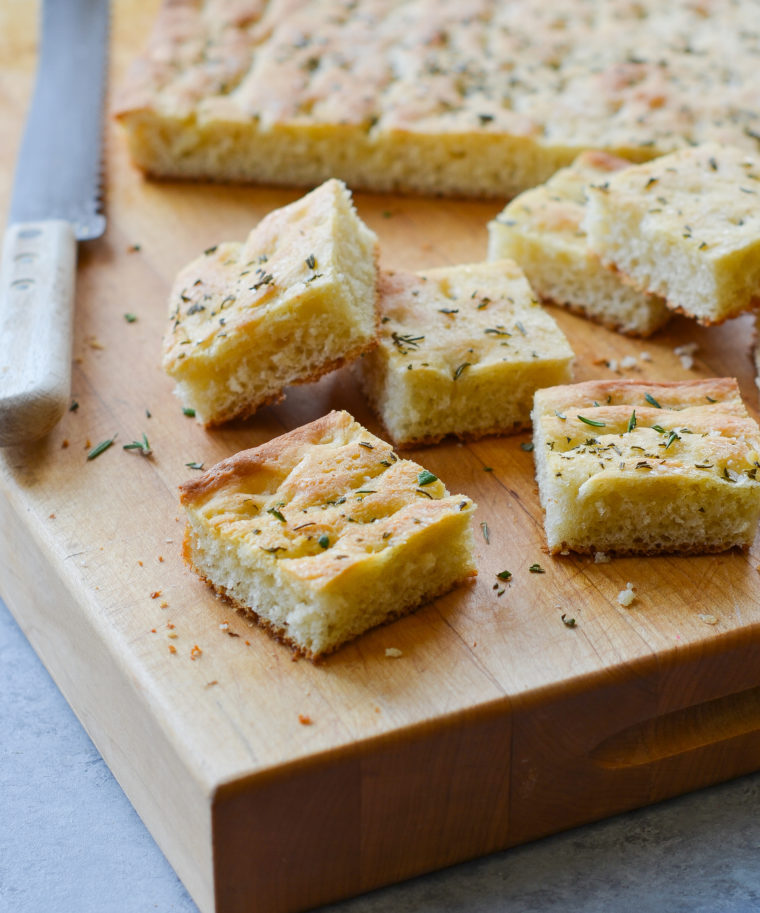
Perfect for feeding a crowd, focaccia is a rich and flavorful Italian flat bread baked in a sheet pan. It’s made with a yeast dough that rises twice: once after it is mixed and then again after it is shaped. To give the bread its signature dimpled appearance, you use your fingers to form little indentations all over the dough. These “dimples” hold tiny pools of olive oil that soak into the bread as it bakes. The recipe calls for about one cup of oil, which I know seems like a lot, but that’s what makes focaccia so good!
Adapted from Anne Burrell, this simple focaccia recipe is topped with coarse salt and fresh rosemary, but other toppings can be added, such as thinly sliced tomatoes, cherry tomatoes, olives, caramelized onions or Parmesan cheese. Enjoy the bread warm out of the oven with pasta fagioli, zuppa Toscana, bolognese, or Italian wedding soup. Leftovers make wonderful sandwiches.
“Thanks for another hit Jenn! I made this for Christmas Eve and it paired perfectly with your classic lasagna.”
What You’ll Need To Make Focaccia
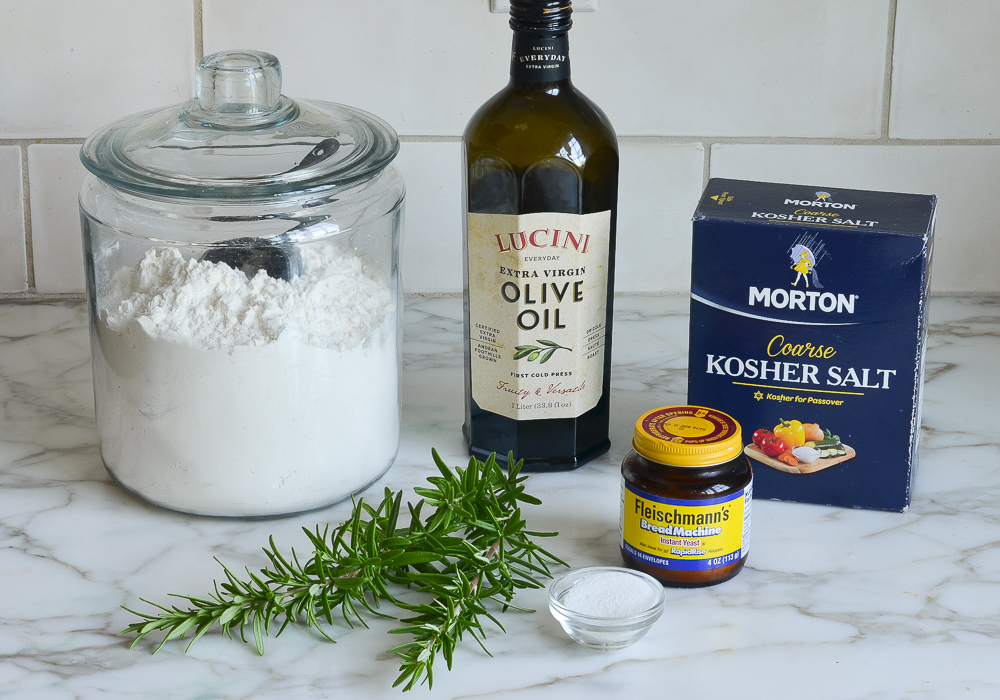
- All-purpose flour: The base of the dough. Be sure to use the spoon and level method (spoon the flour into your measuring cup and level it off with a knife) for accuracy and best results.
- Sugar: Feeds the yeast to help the dough rise.
- Yeast: Makes the bread rise. I use instant or rapid-rise yeast (sometimes labeled “bread machine yeast”) for focaccia and other yeast breads because it rises much faster than active dry yeast. You can find it in jars or packets, and once opened, it keeps in the fridge for 3 to 6 months. If you don’t bake homemade breads often, I recommend buying the individual packets to ensure freshness.
- Kosher salt: Adds flavor to both the dough and the top of the focaccia.
- Warm water: Activates the yeast and brings the dough together.
- Extra-Virgin Olive oil: Provides richness and flavor while also creating a crispy bottom. Note that it is added in stages, so be sure to read the recipe carefully before starting so that you don’t accidentally add it all at once.
- Fresh rosemary: Adds an earthy, fragrant flavor. Feel free to experiment with other herbs like thyme or oregano for a different twist.
- Jump to the printable recipe for precise measurements
Step-By-Step Instructions
Step 1: Combine the dry and wet ingredients. Combine the flour, salt, sugar, and yeast in the bowl of a stand mixer fitted with the dough hook. Add the liquid ingredients.
Pro Tip: Use a kitchen scale to weigh your flour if you have one. Focaccia dough is all about the hydration level, and even a little extra flour from a packed measuring cup can turn a light, airy bread into a dense one.
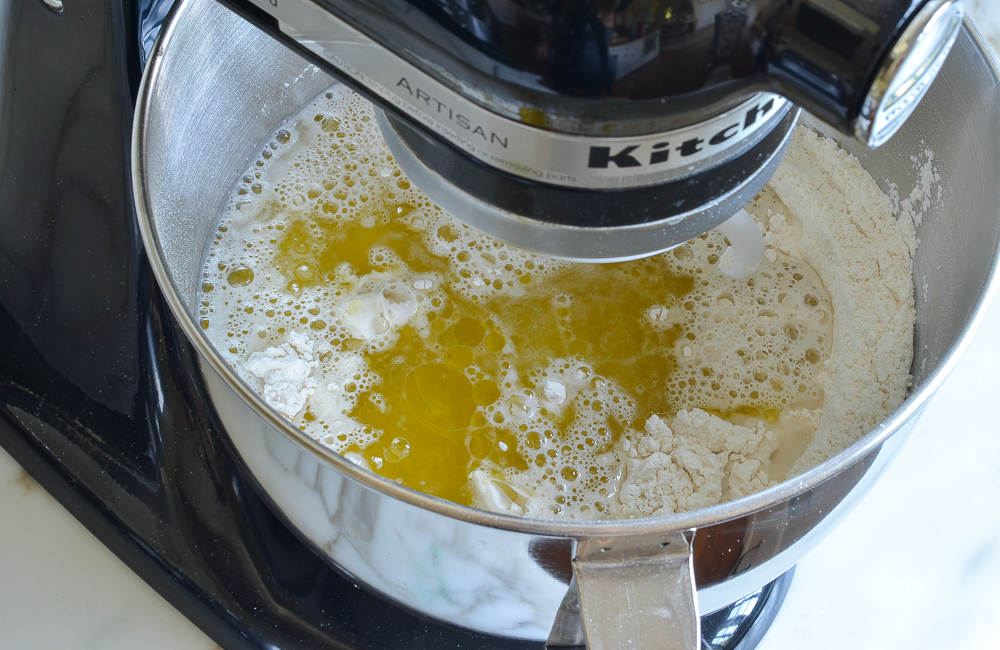
Step 2: Mix until sticky. Mix on low speed until the focaccia dough comes together into a sticky mass.
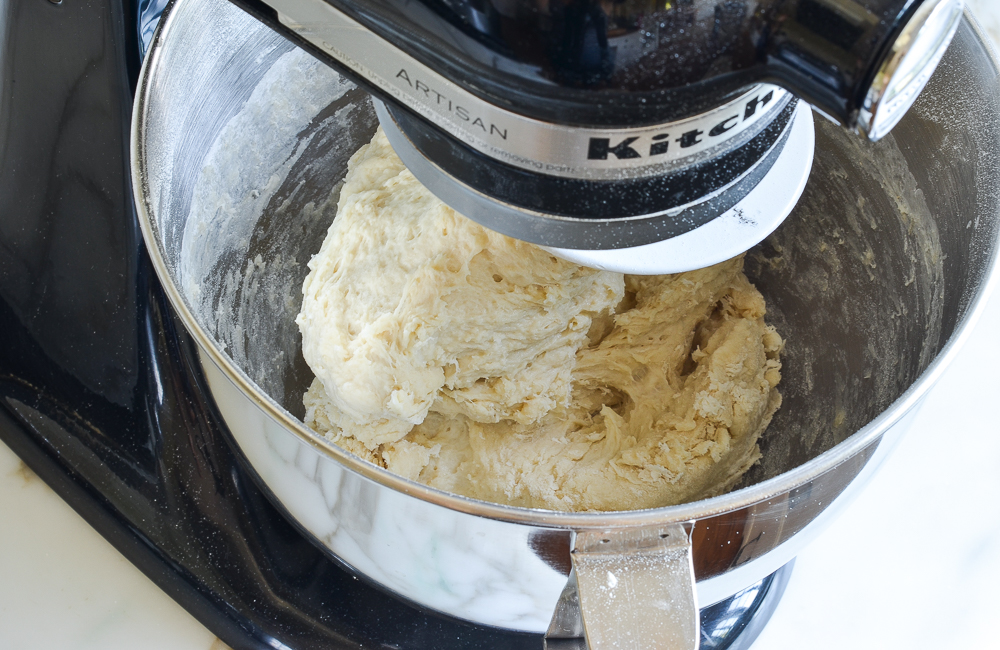
Step 3: Knead the dough. Increase the speed to medium and knead for 5 to 6 minutes. The dough should be soft and slightly sticky at the bottom; if it seems too wet, add a sprinkle of flour.
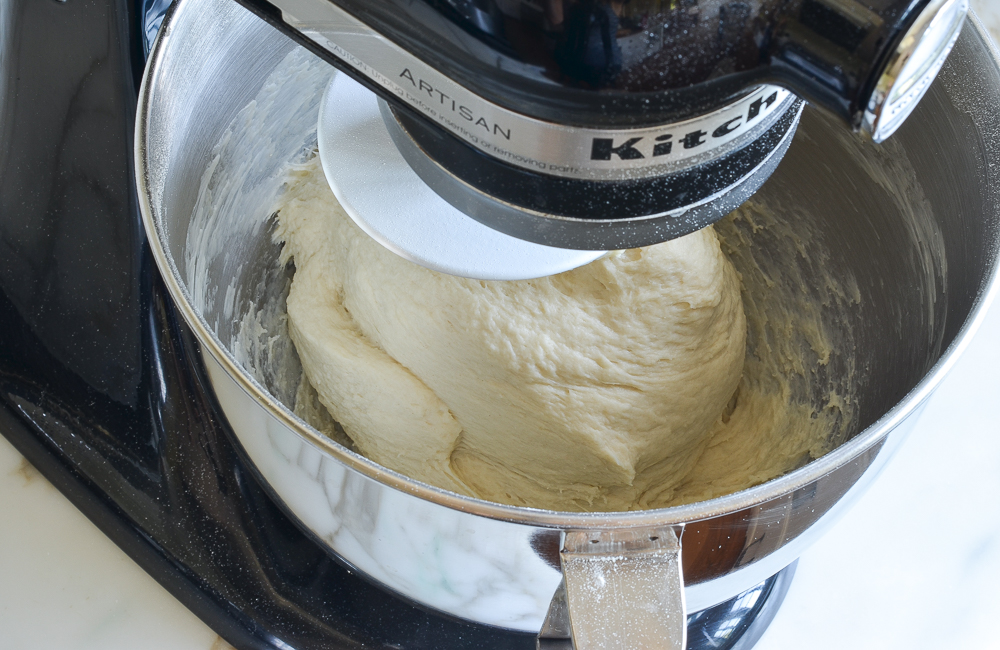
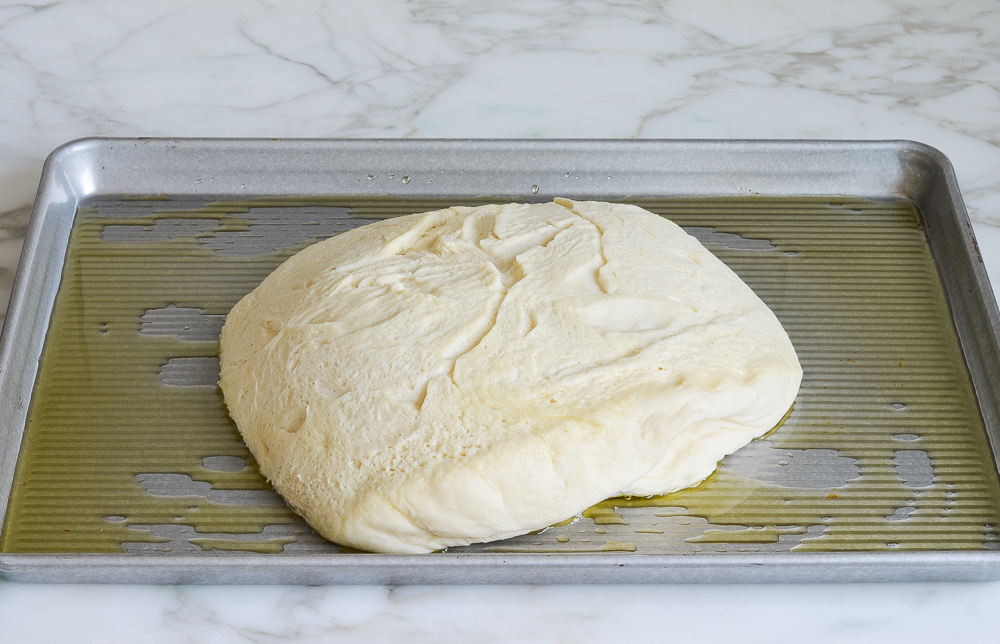
Step 4: Hand knead and prep for rise. Transfer the dough to a lightly floured surface and knead by hand until it forms a smooth ball. Place it in a large greased bowl, flipping once to coat with oil.
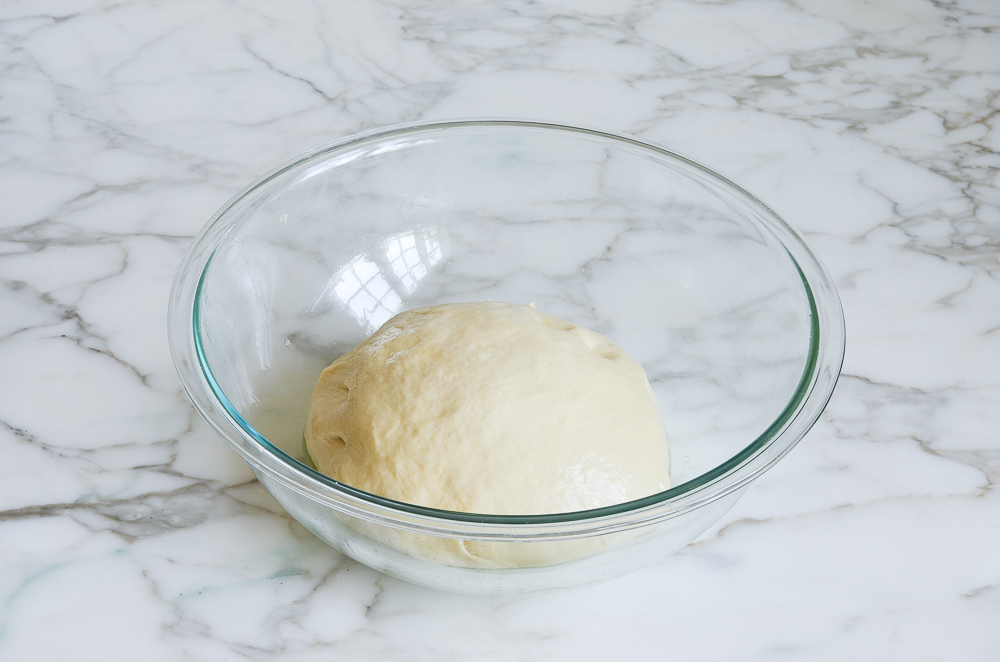
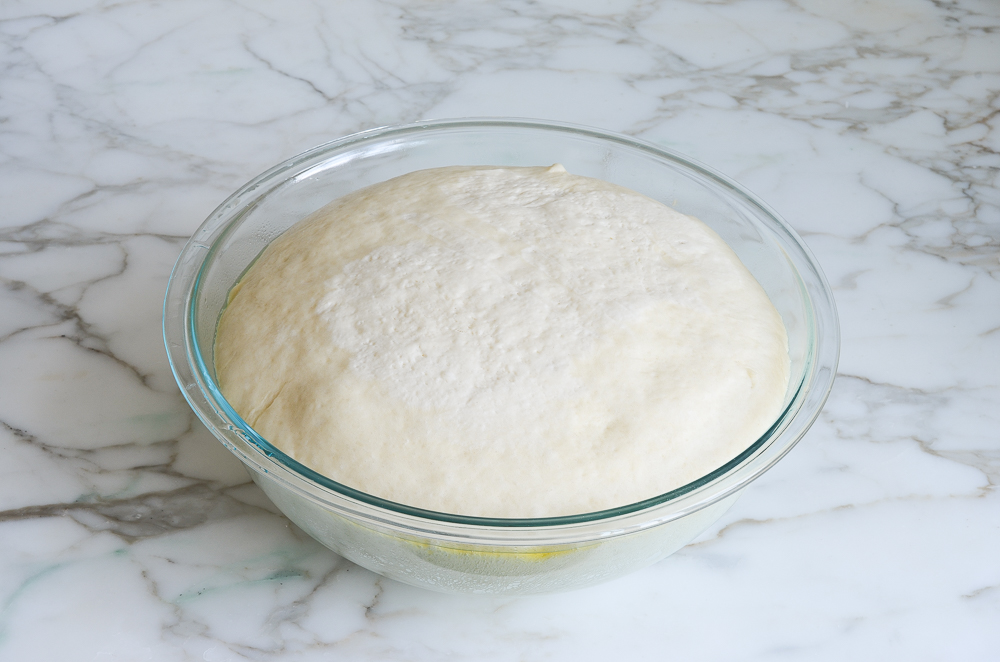
Step 5: First rise. Let the dough rise in a warm, draft-free spot until doubled in size, which typically takes 1 to 2 hours.
Pro Tip: Rising times can vary based on your kitchen’s temperature and humidity. On a cold day, your dough might need the full two hours, while a warm, humid kitchen can cut that time significantly.
Step 6: Oil the pan and dough. Pour ¼ cup of olive oil onto a rimmed baking sheet and place the dough on top. Flip the dough over so both sides are coated with oil. (Yes, it’s a lot but that’s what gives focaccia its deliciously crispy bottom!)
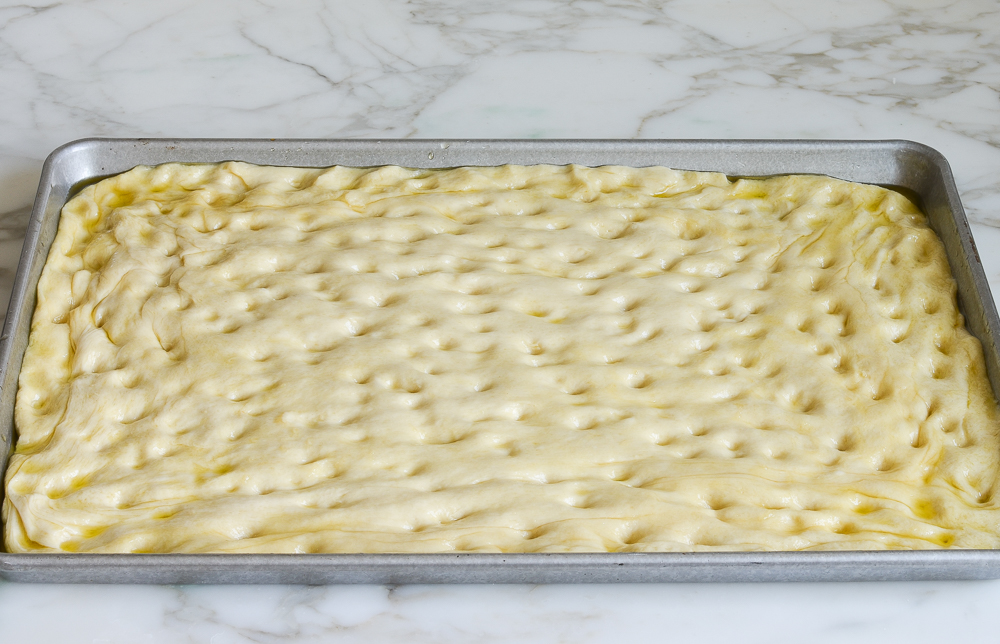
Step 7: Stretch and dimple. Use your hands to spread the dough out to the corners of the pan. Then use your fingertips to make dimples all over the surface of the dough.
Pro Tip: If the dough keeps shrinking back while you try to stretch it to the corners, let it rest for five minutes to relax the gluten, then try again.
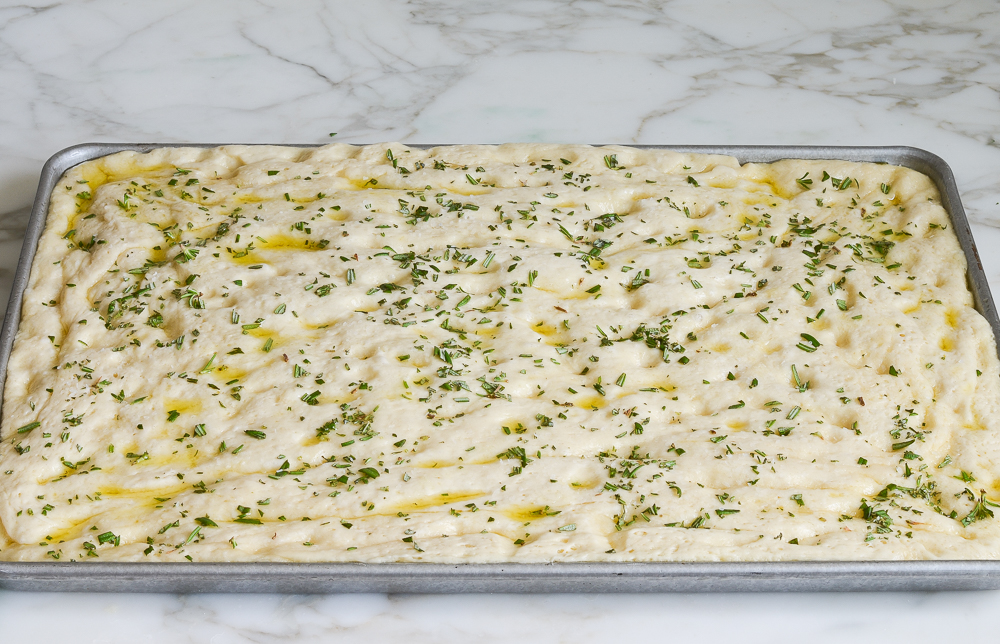
Step 8: Second rise and toppings. Cover with plastic wrap and let rise in a warm spot until puffed and doubled, about 1 hour. Drizzle with more olive oil to fill the dimples, then sprinkle with kosher salt and fresh rosemary.
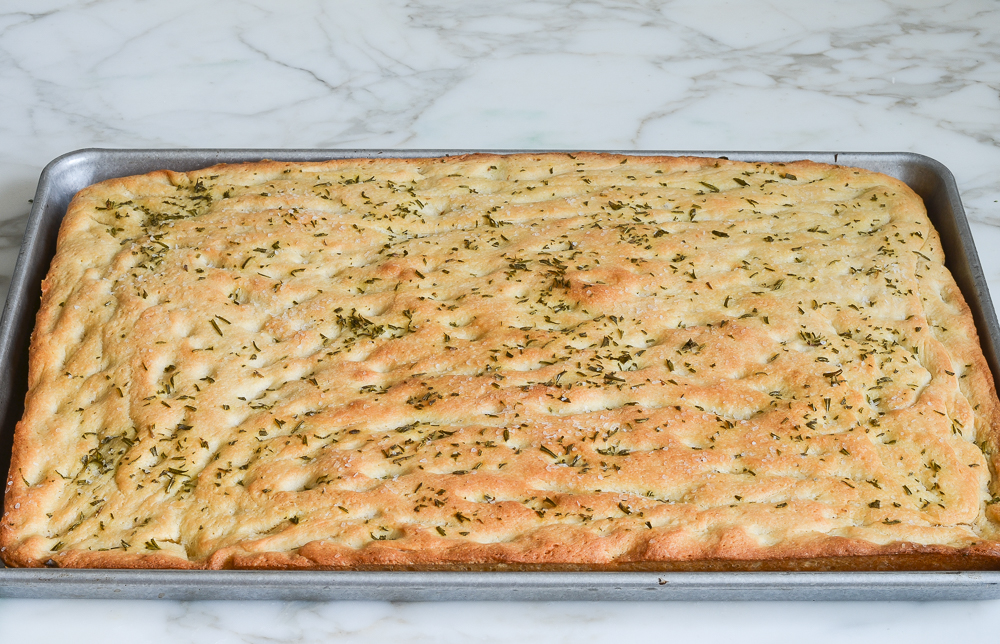
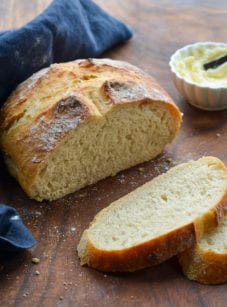
Step 9: Bake, cool, and serve. Bake the bread for about 20 minutes, until it is nicely golden brown. Cool in the pan for 15 minutes before transferring to a cutting board to slice. Serve with an optional drizzle of olive oil. The bread is best if eaten within 1 day, or can be frozen for longer storage.
More Homemade Bread Recipes You’ll Love
Focaccia

Ingredients
- 5 cups all-purpose flour, spooned into measuring cup and leveled-off, plus more for kneading
- 1 tablespoon sugar
- 1 packet (2¼ teaspoons) instant/rapid-rise yeast (see note)
- 1 tablespoon + ¾ teaspoon kosher salt, divided
- 1¾ cups warm water
- ¾ cup extra virgin olive oil, divided, plus more for oiling the bowl and drizzling on top
- 1 tablespoon chopped fresh rosemary, from several sprigs
Instructions
- In the bowl of a mixer fitted with a dough hook, combine the flour, sugar, yeast, and 1 tablespoon of the salt. Mix on low speed to combine. Add the water and ½ cup (120 ml) of the olive oil; mix on low speed until the dough comes together, then turn the speed up to medium-low and continue to knead for 5 to 6 minutes, until the dough becomes soft and slightly tacky. It should stick to the bottom of the bowl a bit. If the dough seems too wet, sprinkle with a few tablespoons of flour, and turn the mixer back on to knead it briefly to combine.
- Transfer the dough to a clean, lightly floured surface (it helps to flour your hands, too). Knead by hand briefly until the dough comes together into a smooth ball.
- Coat the inside of a large bowl with about 1 teaspoon of olive oil. Place the dough in the bowl, flipping once so that both the top and bottom are lightly slicked with oil. Cover the bowl with plastic wrap and put it in a warm, draft-free spot until the dough has doubled in size, 1 to 2 hours. (The warmer the spot, the faster it will rise.)
- Coat a 13 x 18-in (33 x 46-cm) rimmed baking sheet with ¼ cup (60 ml) of olive oil. (It will seem like a lot, but that's what makes the bottom crispy.) Plop the dough onto the prepared pan and begin pressing it out with your hands to fit the size of the pan. Turn the dough over once to coat both sides with olive oil. Continue to stretch the dough to fit the pan. Once the dough is stretched, spread your fingers out and make impressions almost all the way through the dough (don't poke holes, just press down to the bottom of the pan). Cover the pan with plastic wrap and place in a warm, draft-free spot until the dough has puffed up and doubled in size, about 1 hour.
- While the dough is rising a second time, preheat the oven to 425°F (220°C). Set an oven rack in the middle position.
- Sprinkle the top of the focaccia dough with the remaining ¾ teaspoon kosher salt and rosemary, then lightly drizzle about 1 tablespoon of olive oil on top so it pools in the indentations. Bake until golden brown, about 20 minutes. Remove the focaccia from the oven and let it cool in the pan on a wire rack for about 15 minutes. Transfer the focaccia to a cutting board and slice into squares. Drizzle a touch more oil on top before serving, if desired.
Notes
- Active dry yeast can be used as an alternative to instant/rapid-rise yeast; however, the dough will take longer to rise. To give active dry yeast a boost, add it to the warm water in the recipe, let it sit until frothy (about 10 minutes), and then proceed with the recipe.
- Make-Ahead/Freezing Instructions: Focaccia is best eaten freshly baked, but it can be made 1 day ahead of time, if necessary. For best results, wrap the focaccia in aluminum foil and place in a sealed plastic bag at room temperature. Reheat, wrapped in foil, in a 350°F (175°C) oven until just warmed through, about 10 minutes. The focaccia can also be made ahead and frozen. To freeze, cut it into portions, wrap in plastic wrap, and then foil and freeze for up to 3 months. To reheat the focaccia, remove the plastic wrap and re-wrap it in the foil. Heat it in a 350°F (175°C) oven for 10 minutes or until heated through
Nutrition Information
This website is written and produced for informational purposes only. I am not a certified nutritionist and the nutritional data on this site has not been evaluated or approved by a nutritionist or the Food and Drug Administration. Nutritional information is offered as a courtesy and should not be construed as a guarantee. The data is calculated through an online nutritional calculator, Edamam.com. Although I do my best to provide accurate nutritional information, these figures should be considered estimates only. Varying factors such as product types or brands purchased, natural fluctuations in fresh produce, and the way ingredients are processed change the effective nutritional information in any given recipe. Furthermore, different online calculators provide different results depending on their own nutrition fact sources and algorithms. To obtain the most accurate nutritional information in a given recipe, you should calculate the nutritional information with the actual ingredients used in your recipe, using your preferred nutrition calculator.
Just made your rosemary Focaccia bread.
Delicious! Thank you for your great easy to understand directions. It came out perfectly.
This was a breeze to make and absolutely delicious! I’ve been wanting to try making focaccia for a long time but was always put off by the number of steps – finally decided to give it a shot and this recipe was perfection! Love the step by step instructions with pictures. All I had to do was follow along. I had intended to serve the bread with dinner, but it didn’t last that long. The rosemary and salt, combined with the oily crunch, are irresistible. I’ll be making this recipe again and again.
Made this today and it is delicious! I did not have fresh rosemary, however, so took a tip from another recipe to make an herb oil. I warmed some olive oil and added dried rosemary, then let it cool. Brushed/poured that on top before I baked. Worked great…tastes amazing!
So incredibly good! It really is a huge bread – but hubby and I managed to polish this bad boy off in 3 days flat :). We even used it for hamburger buns! And last night I used it for pizza dough. I split it in half for two crusts and loaded it with pizza toppings. Let me tell you, this will be my new pizza dough recipe!! Turned out so well! I have never been 100% happy with pizza dough I’ve made in the past, but with this one I was 1000% happy :).
Hi Jenn, Your recipe for focaccia was easy to follow but my first results were disappointing – probably my fault. The taste was excellent but the texture was tough and dry. I kneaded for 6 minutes with my big mixer – should I cut the time or knead by hand? I think it was dry because I didn’t drizzle much oil on the top. I’m sure willing to try again because your recipes always give 5 star results. PS – If I knead by hand, what should the dough look like?
Hi Pat, Sorry the texture wasn’t quite right for you. It could’ve been a couple things; did you decrease the oil in the dough itself? Did you use the scoop and level method when measuring the flour? (It could be a bit tough if there was too much flour.) I don’t think it had anything to do with how long you kneaded it because the timing sounds right in that regard.
I just made the focaccia bread. It tastes great. No changes in the recipe needed; just perfect as it is. I have lived in Italy for six years, so I know how it’s supposed to taste, and this is the real deal!!!
I’ve made this over and over and it is delicious! I cut way back on the top salt though, just a sprinkling does it for me.
Another great offering from Jenn.
I don’t have a mixer like yours. Can I still make this maybe mixing by hand.
Thank you
Betty
Hi Betty, You can make this without a mixer and just knead by hand the old fashioned way. Hope you enjoy!
Hi, I want to make the sausage lasagne, the big Italian salad and this bread for an Italian night dinner. My question is timing!
I never get things ready all at once.
What would you suggest I start with and continue with so all is ready to eat .
Both the lasagne and bread take time!
Can any be done ahead and not ruin the taste? Thanks
Hi Deborah, the focaccia keeps nicely, so you could easily bake it in the morning and warm it up just before serving. You can also prepare the salad dressing up to two days ahead. Because the lasagna bakes for 20 minutes and then needs to sit for 15 – 20, it’s a perfect time to prep the ingredients for the salad. Hope that helps and everyone enjoys
Love the pictures. Can’t wait to make this!