Buttermilk Fried Chicken Tenders

This post may contain affiliate links. Read my full disclosure policy.
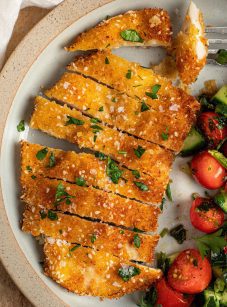
Crispy on the outside, juicy on the inside, and seasoned just right—these homemade chicken tenders are a total crowd-pleaser.
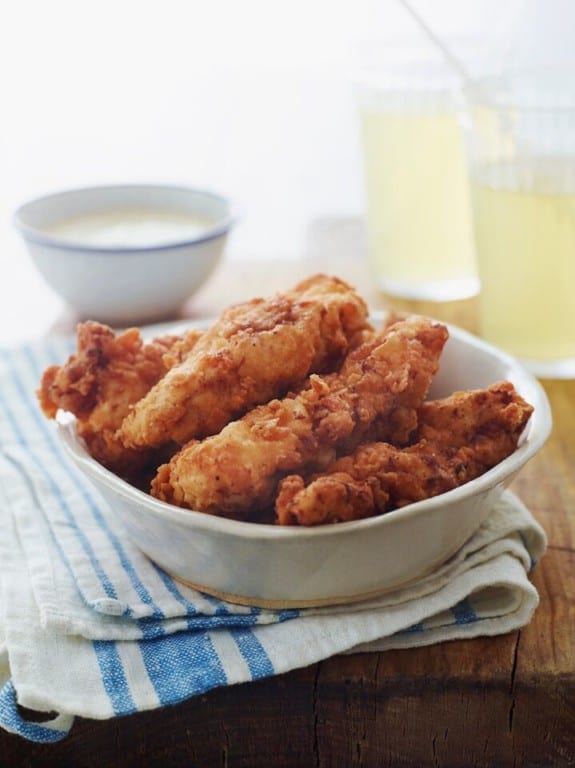
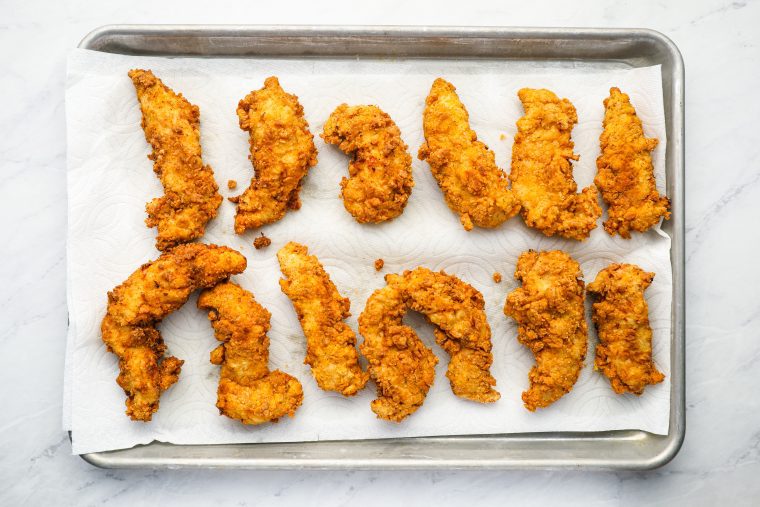
Photo by Alexandra Grablewski (Chronicle Books, 2018)
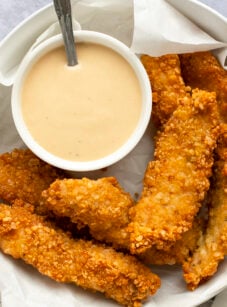
Like most kids, my daughter prefers “kid food” to “grown-up food” any day of the week. Occasionally, it works to my advantage—a trip to McDonald’s makes excellent bribery—but most of the time I’m just dealing with a picky eater. Rather than desperately trying to coax her into eating dinner every night, sometimes I just make her favorites. These chicken tenders, marinated in seasoned buttermilk and pan-fried to crispy, crunchy perfection, are at the top of her list. They’re delicious plain, dipped in honey mustard sauce, BBQ sauce or ranch dressing, or perched on top of a salad.
If you love these, you’ll also enjoy my fried chicken sandwiches—they’re just as crowd-pleasing.
“This is the best chicken tenders recipe I have ever tried…So delicious and crispy and moist and flavorful! Mmm!rn”
What you’ll need To Make Buttermilk Fried Chicken Tenders
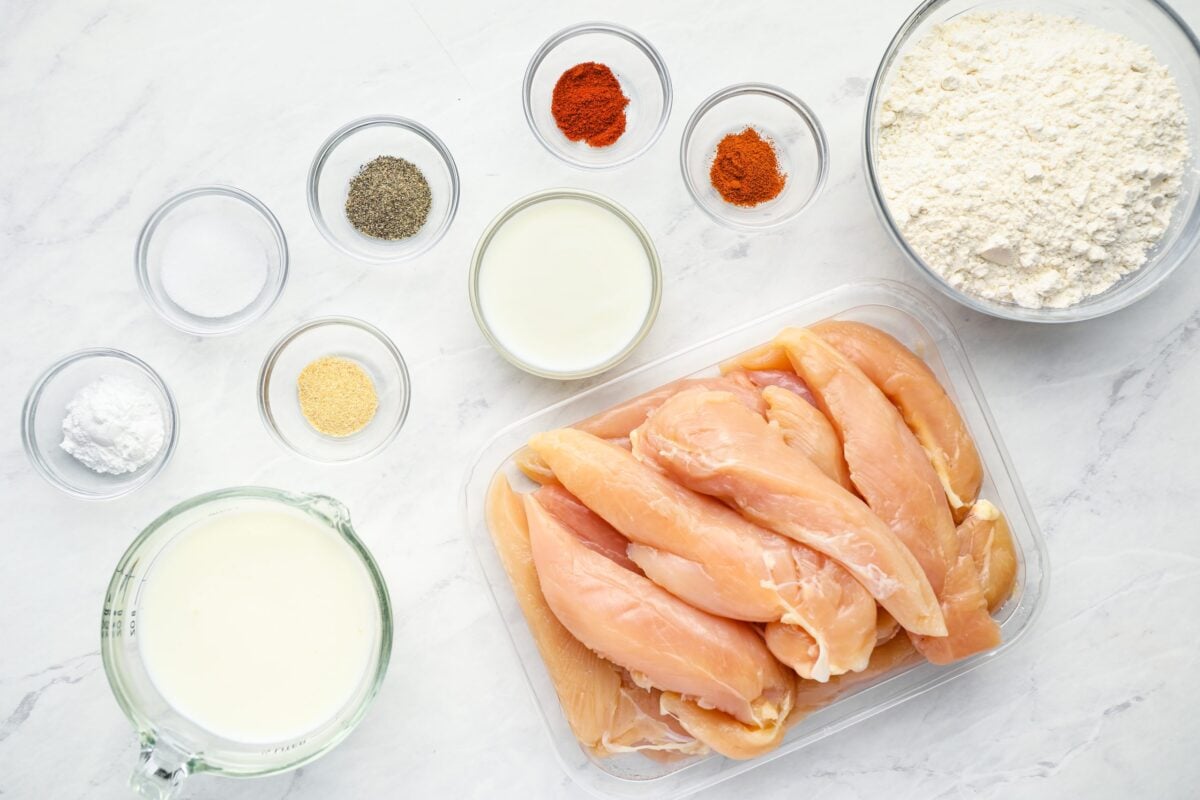
- Chicken tenderloins: Naturally tender and the perfect size for frying (and finger food), they stay juicy inside and crisp outside. If the white tendon peeks out of the end, just snip it off or trim it flush with the meat.
- Buttermilk: Tenderizes the chicken and adds a subtle tang that balances the crispy coating.
- Paprika, garlic powder, cayenne, salt, and pepper: Season both the marinade and the coating so the flavor runs all the way through.
- Flour and baking powder: Form a light, crisp crust that fries up golden and crunchy.
- Vegetable oil: For frying.
- Jump to the printable recipe for precise measurements
Step-by-Step Instructions
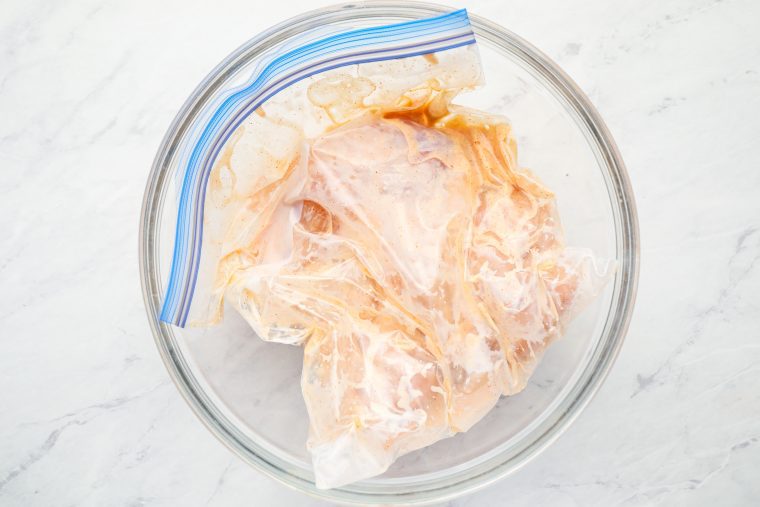
Step 1: Marinate the chicken. Add the chicken tenders to a large zip-top bag with the buttermilk, paprika, garlic powder, cayenne, and salt. Seal it up and give everything a good massage so the chicken is evenly coated. Set the bag in a bowl (just in case it leaks) and refrigerate for at least 4 hours, or up to a day if you can plan ahead—the longer it sits, the more flavorful and tender the chicken will be.
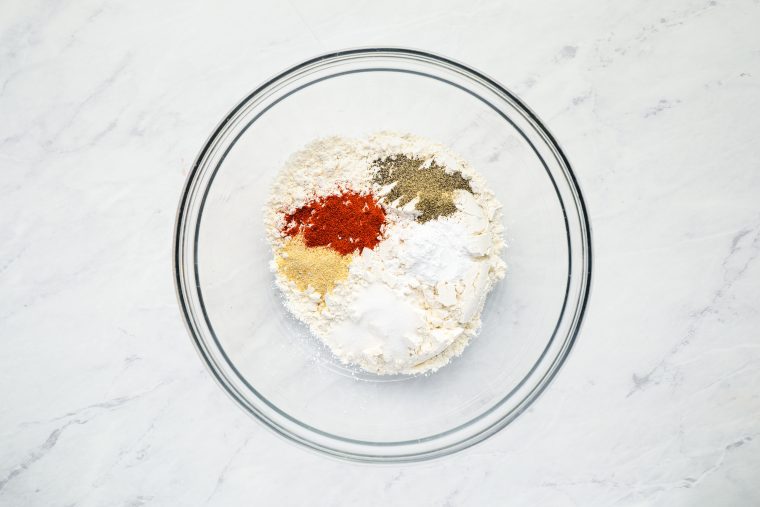
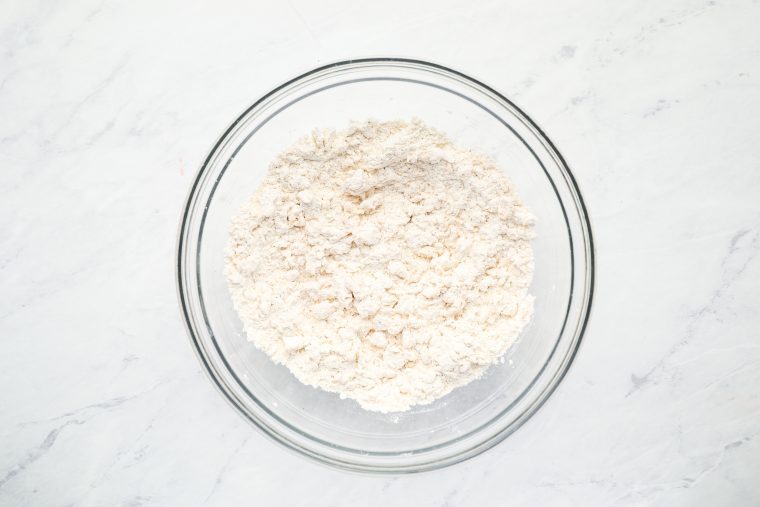
Step 2: Prep the seasoned flour. In a large bowl, whisk together the flour, baking powder, salt, pepper, garlic powder, and paprika until everything’s evenly mixed.
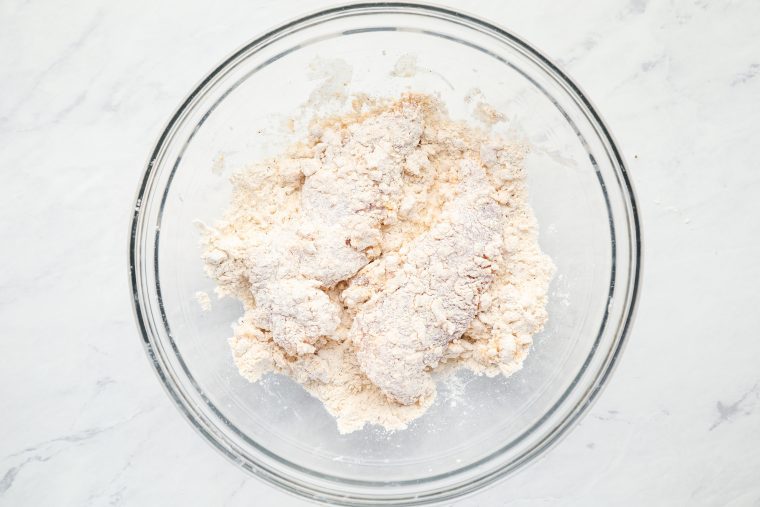
Step 3: Create the craggy coating. Add the buttermilk and stir with a fork until the mixture is evenly clumpy—the little bits of damp flour are what make the coating extra crunchy when fried.
Step 4: Coat the chicken. Working a few pieces at a time, lift the chicken from the marinade and add it to the flour mixture. Toss to coat, pressing the chicken firmly into the breading so those clumps stick—it’s what gives you that great crispy texture. (It’s a messy job, so use one hand for the wet chicken and the other for the dry coating to keep things manageable.)
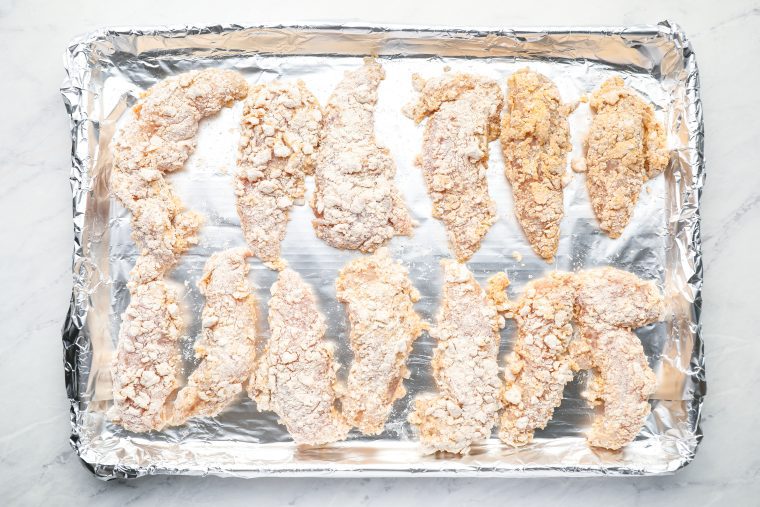
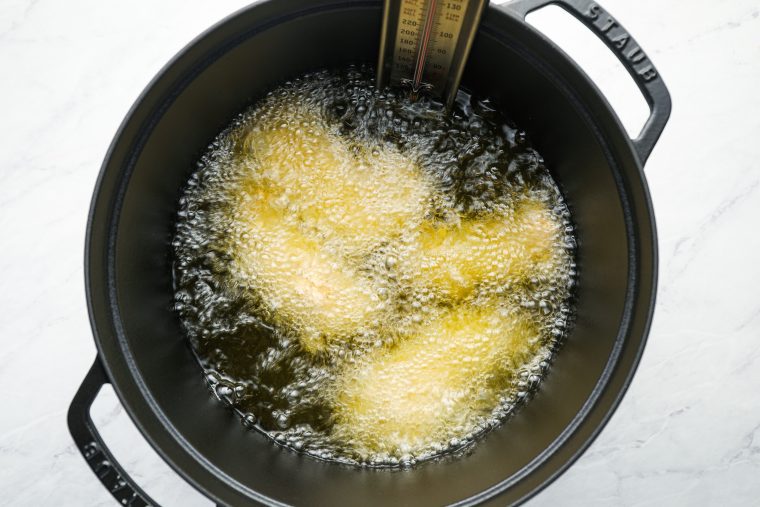
Step 5: Get ready to fry. Place the breaded tenders on a foil-lined baking sheet. Line another baking sheet with a few layers of paper towels and set it next to the stove for draining. Pour enough oil into a large, high-sided pot to reach about ¾ inch up the sides and heat over medium-high until it shimmers, about 350°F. (You’ll know it’s ready when a cube of bread sizzles right away.)
Step 6: Fry the chicken. Using tongs, carefully place a few chicken tenders in the hot oil, leaving space between them so they crisp instead of steam. Cook until golden brown on the bottom, a few minutes, then flip and fry the other side until it’s golden and cooked through, a few minutes more.
Step 7: Drain and serve. Transfer the cooked tenders to the paper towel–lined baking sheet to drain. Fry the remaining batches, adjusting the heat as needed—if they’re browning too quickly, turn it down a bit. Serve the chicken hot with honey mustard sauce (or your favorite dip) on the side.
Video Tutorial
More Crispy Chicken Recipes You May Like
Buttermilk Fried Chicken Tenders

Ingredients
For the Marinade
- 2 pounds chicken tenderloins
- 1 cup buttermilk
- 1½ teaspoons salt
- ¼ teaspoon cayenne pepper
- ¼ teaspoon garlic powder
- ¼ teaspoon paprika
For the Breading
- 1½ cups all-purpose flour
- 1½ teaspoons baking powder
- 1 heaping teaspoon salt
- ¾ teaspoon freshly ground black pepper
- ¾ teaspoon garlic powder
- ¾ teaspoon paprika
- 3 tablespoons buttermilk
For Cooking
- 3 to 4 cups vegetable oil, for cooking
Instructions
- To marinate the chicken: In a large sealable bag, combine the chicken tenders with the marinade ingredients. Seal the bag tightly and massage the chicken until it is evenly coated with buttermilk and seasoning. Place in a bowl (in case of leakage) and refrigerate for at least 4 hours or up to 24 hours.
- To make the breading: In a large bowl, combine the flour, baking powder, salt, pepper, garlic powder, and paprika. Whisk until well blended, then add the buttermilk and stir with a fork until the mixture is evenly clumpy.
- Line a baking sheet with aluminum foil for easy cleanup. Remove the chicken tenders from the marinade a few at a time and toss into the breading mixture. Be sure to press the chicken firmly into the breading so clumps adhere to the meat. (It's a messy job: use one hand to remove the wet tenders from the bag and the other to toss in the breading.) Set breaded tenders on the prepared baking sheet.
- To fry the chicken: Line another baking sheet with a few layers of paper towels and set next to the stove. Add oil to a large, high-sided pot until the level reaches about ¾-inch (2-cm). Heat over medium-high heat until oil is shimmering (about 350°/175°C). (If a cube of bread sizzles when you drop it in, it's ready.) Using tongs, place several chicken tenders in the hot oil without crowding the pan. Cook until golden brown on the bottom side, a few minutes, then flip and cook until the second side is also golden, a few minutes more. Set the cooked tenders on the paper towel-lined baking sheet to drain. Fry remaining tenders in batches adjusting the heat as necessary (if the tenders are browning too fast, lower the heat). Serve hot.
Notes
- I find that it's hard to tell how golden the chicken is when it's immersed in the oil. It may only look lightly golden, but it's actually a perfect fried chicken golden brown. If you're unsure, simply pull a tender out of the oil and rest it on the paper towels to see the true color.
- Nutritional information was calculated assuming that approximately ¼ cup of the oil is absorbed into the chicken tenders when frying.
- Freezer-Friendly Instructions: The cooked chicken tenders can be frozen for up to 3 months. To reheat, put the frozen tenders on a wire rack on top of a rimmed baking sheet and warm in a 350°F (175°C) oven until heated through and crisp, about 25 minutes, flipping halfway through.
Pair with
Nutrition Information
This website is written and produced for informational purposes only. I am not a certified nutritionist and the nutritional data on this site has not been evaluated or approved by a nutritionist or the Food and Drug Administration. Nutritional information is offered as a courtesy and should not be construed as a guarantee. The data is calculated through an online nutritional calculator, Edamam.com. Although I do my best to provide accurate nutritional information, these figures should be considered estimates only. Varying factors such as product types or brands purchased, natural fluctuations in fresh produce, and the way ingredients are processed change the effective nutritional information in any given recipe. Furthermore, different online calculators provide different results depending on their own nutrition fact sources and algorithms. To obtain the most accurate nutritional information in a given recipe, you should calculate the nutritional information with the actual ingredients used in your recipe, using your preferred nutrition calculator.
I made these for my partner months ago and he is still talking about them. The buttermilk marinade really adds to the incorporation of the spices into the chicken. The outcome is flavorful, crispy, and not overly greasy. Also, I have never deep fried anything before, and found the process of this recipe to be easy to follow and safe. My only regret is that I didn’t make more!
Anyone tried air frying
Pretty good recipe! For extra crispy chicken, use 3/4 cup flour and 3/4 cups corn starch. Also, the taste was more on the bland side, so don’t be afraid to SEASON UP the flour and buttermilk marinade. If the flour mixture doesn’t smell strongly of the seasonings, the outside will be bland after frying. This chicken comes out very juicy and melt in your mouth!
Hi Jenn,
I just want you to know how much I enjoy your recipes.
The first recipe I made of yours was your ginger snap crusted, pumpkin cheesecake. This has been a total hit at our family holiday gatherings. It has the look & taste of a very expensive dessert. I am always asked to bring it.
Your roasted asparagus soup recipe. I make this during the cold months for my family. I love how your addition of lemon really heightens the asparagus flavor.
And this fried buttermilk chicken fingers recipe (I made tonight) was by far the best recipe for chicken fingers I’ve ever made. So crunchy and full of flavor. They went well with a simple homemade ranch dressing dip.
I find your recipes are more refined then others I’ve tried elsewhere.
I love to cook and I just love cooking and sharing your recipes with my family and friends.
Thank you Jenn!!!
So glad you enjoy the recipes, Liz – thanks for your sweet words! ❤️
Can u sub the buttermilk for milk? Please need to know I want to do this for my family tonight?
Hi Rosemary, I really recommend using buttermilk here as it’s important for tenderizing the chicken. You can easily make your own buttermilk. See how to here. Hope that helps!
Hi Jen, just came to say that these are the best chicken tenders ever! I can eat an unlimited amount of these if I’m not careful. We have used your honey mustard sauce before (which is great), but decided to mix it up this time and used your BBQ sauce recipe from your cookbook as a dip. And oh wow! New favourite! Thank you!
I made this for my little family today, and my hubby and toddler were very pleased! I felt like Martha Stewart with all the compliments I received! Lol By far the best recipe!
Can these be baked instead of fried?
Hi Hazel, these really need to be fried; if you’d prefer tenders that can be baked, you may want to give these a try. (I’d bake them at 350°F for 15-20 minutes.) Hope you enjoy!
Good morning! I would like to use tonight but would like to bake the buttermilk tenders. The suggested alternative has nuts, we have people with allergies. Any suggestions would be great. thank you
These really are best fried – you could use the Pecan Crusted Chicken Tenders but use more panko in place of the nuts – it won’t have quite the same flavor, but should still be delicious.
Do you have to marinate for 4 hours? I think my chicken marinated for a good hour and a half
That’s fine, Lindsey – it will still be delicious.