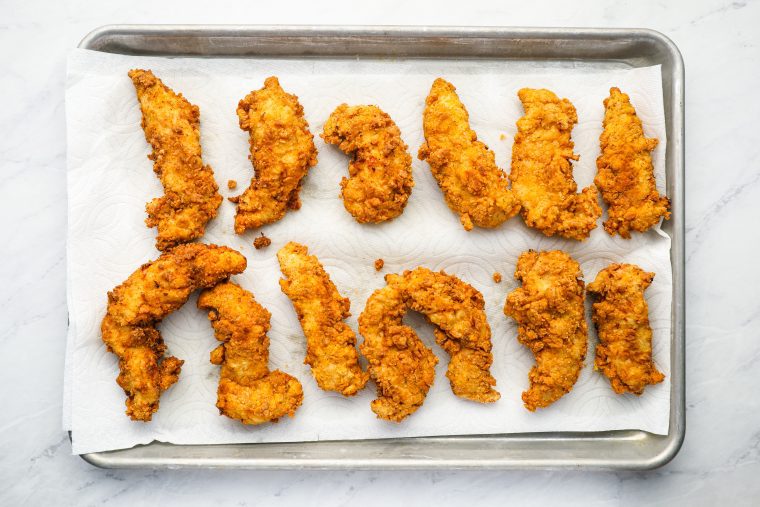
Buttermilk Fried Chicken Tenders

This post may contain affiliate links. Read my full disclosure policy.
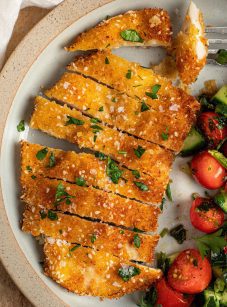
Crispy on the outside, juicy on the inside, and seasoned just right—these homemade chicken tenders are a total crowd-pleaser.
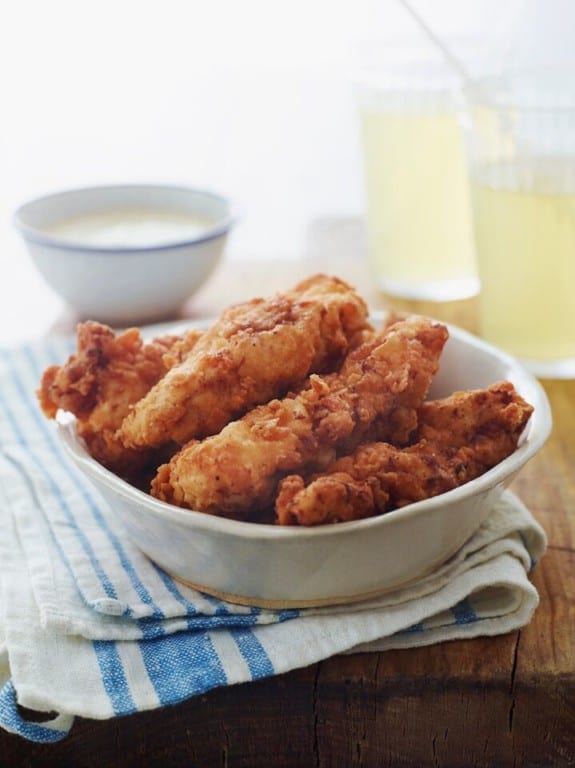
Photo by Alexandra Grablewski (Chronicle Books, 2018)
Like most kids, my daughter prefers “kid food” to “grown-up food” any day of the week. Occasionally, it works to my advantage—a trip to McDonald’s makes excellent bribery—but most of the time I’m just dealing with a picky eater. Rather than desperately trying to coax her into eating dinner every night, sometimes I just make her favorites. These chicken tenders, marinated in seasoned buttermilk and pan-fried to crispy, crunchy perfection, are at the top of her list. They’re delicious plain, dipped in honey mustard sauce, BBQ sauce or ranch dressing, or perched on top of a salad.
If you love these, you’ll also enjoy my fried chicken sandwiches—they’re just as crowd-pleasing.
“This is the best chicken tenders recipe I have ever tried…So delicious and crispy and moist and flavorful! Mmm!rn”
What you’ll need To Make Buttermilk Fried Chicken Tenders
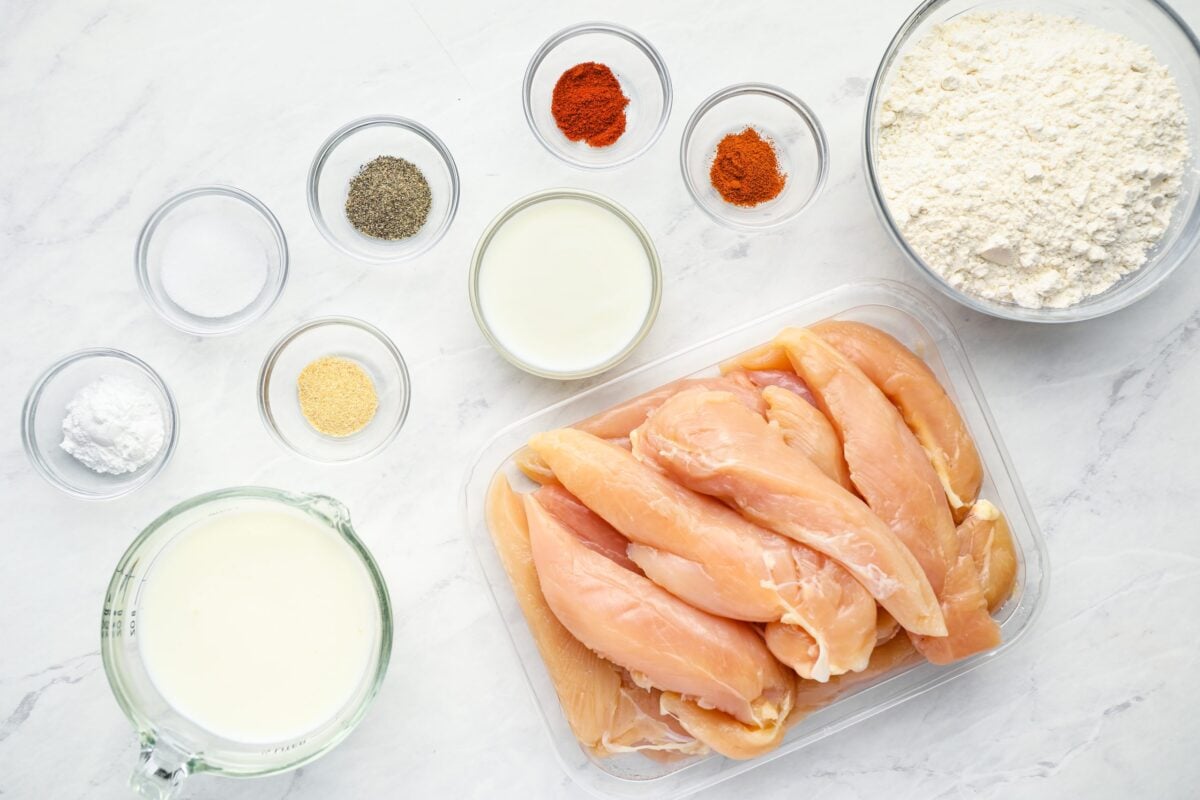
- Chicken tenderloins: Naturally tender and the perfect size for frying (and finger food), they stay juicy inside and crisp outside. If the white tendon peeks out of the end, just snip it off or trim it flush with the meat.
- Buttermilk: Tenderizes the chicken and adds a subtle tang that balances the crispy coating.
- Paprika, garlic powder, cayenne, salt, and pepper: Season both the marinade and the coating so the flavor runs all the way through.
- Flour and baking powder: Form a light, crisp crust that fries up golden and crunchy.
- Vegetable oil: For frying.
- Jump to the printable recipe for precise measurements
Step-by-Step Instructions
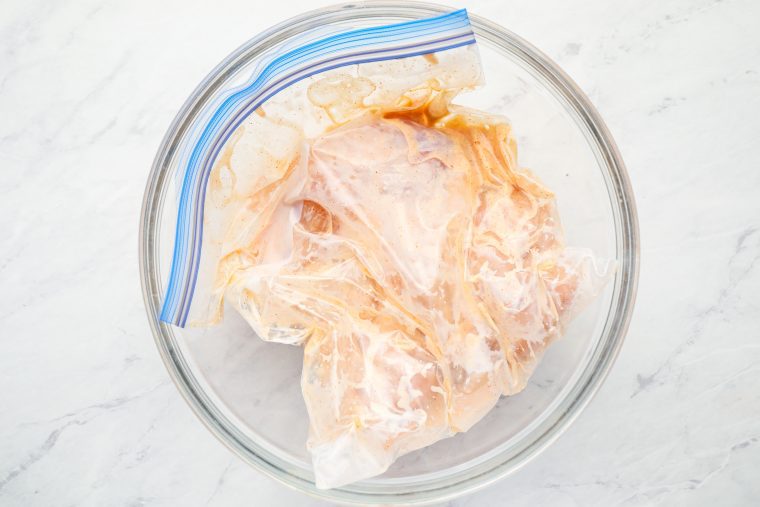
Step 1: Marinate the chicken. Add the chicken tenders to a large zip-top bag with the buttermilk, paprika, garlic powder, cayenne, and salt. Seal it up and give everything a good massage so the chicken is evenly coated. Set the bag in a bowl (just in case it leaks) and refrigerate for at least 4 hours, or up to a day if you can plan ahead—the longer it sits, the more flavorful and tender the chicken will be.
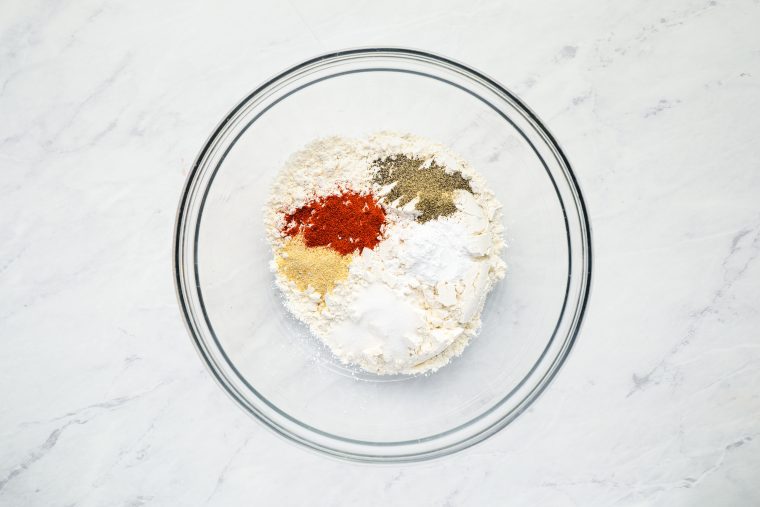
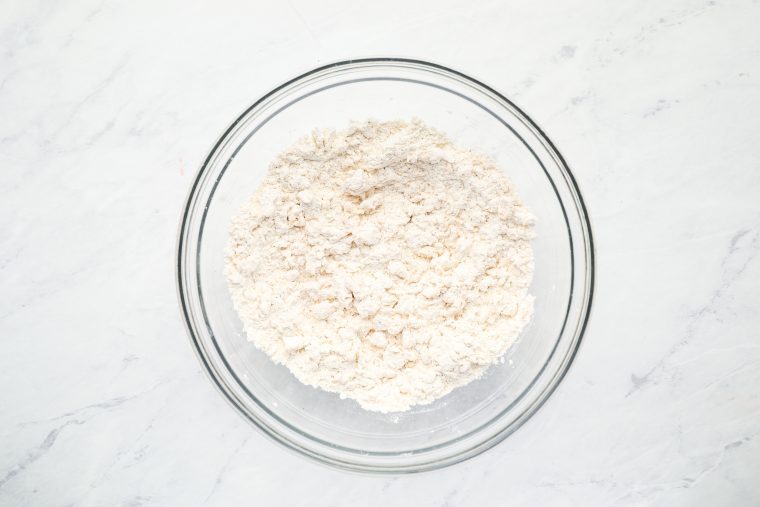
Step 2: Prep the seasoned flour. In a large bowl, whisk together the flour, baking powder, salt, pepper, garlic powder, and paprika until everything’s evenly mixed.
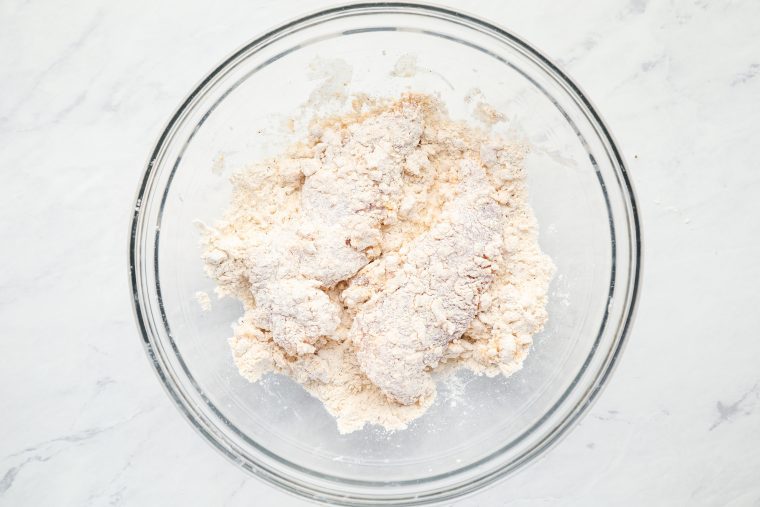
Step 3: Create the craggy coating. Add the buttermilk and stir with a fork until the mixture is evenly clumpy—the little bits of damp flour are what make the coating extra crunchy when fried.
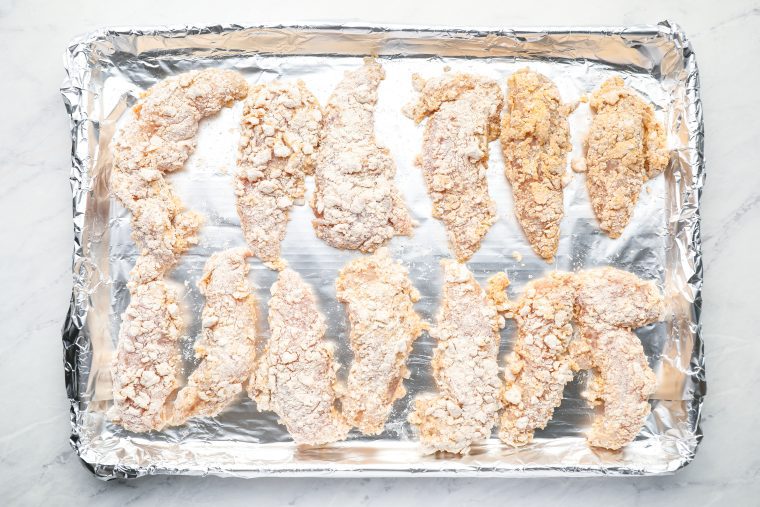
Step 4: Coat the chicken. Working a few pieces at a time, lift the chicken from the marinade and add it to the flour mixture. Toss to coat, pressing the chicken firmly into the breading so those clumps stick—it’s what gives you that great crispy texture. (It’s a messy job, so use one hand for the wet chicken and the other for the dry coating to keep things manageable.)
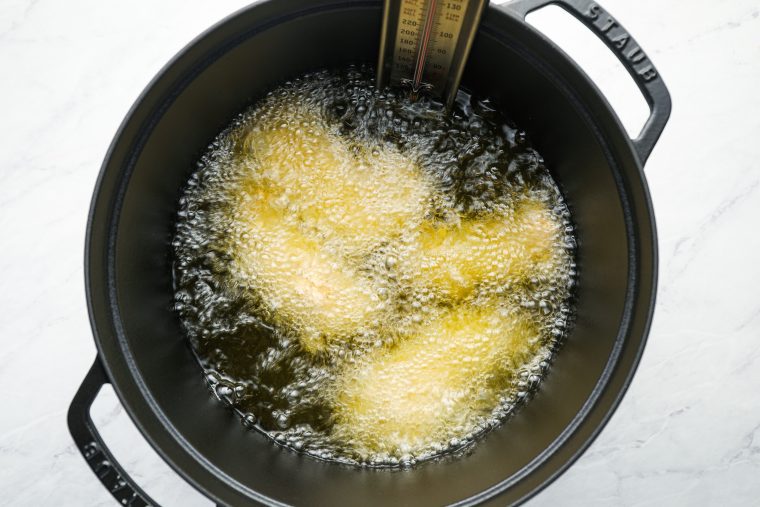
Step 5: Get ready to fry. Place the breaded tenders on a foil-lined baking sheet. Line another baking sheet with a few layers of paper towels and set it next to the stove for draining. Pour enough oil into a large, high-sided pot to reach about ¾ inch up the sides and heat over medium-high until it shimmers, about 350°F. (You’ll know it’s ready when a cube of bread sizzles right away.)
Step 6: Fry the chicken. Using tongs, carefully place a few chicken tenders in the hot oil, leaving space between them so they crisp instead of steam. Cook until golden brown on the bottom, a few minutes, then flip and fry the other side until it’s golden and cooked through, a few minutes more.
Step 7: Drain and serve. Transfer the cooked tenders to the paper towel–lined baking sheet to drain. Fry the remaining batches, adjusting the heat as needed—if they’re browning too quickly, turn it down a bit. Serve the chicken hot with honey mustard sauce (or your favorite dip) on the side.
Video Tutorial
More Crispy Chicken Recipes You May Like
Buttermilk Fried Chicken Tenders

Ingredients
For the Marinade
- 2 pounds chicken tenderloins
- 1 cup buttermilk
- 1½ teaspoons salt
- ¼ teaspoon cayenne pepper
- ¼ teaspoon garlic powder
- ¼ teaspoon paprika
For the Breading
- 1½ cups all-purpose flour
- 1½ teaspoons baking powder
- 1 heaping teaspoon salt
- ¾ teaspoon freshly ground black pepper
- ¾ teaspoon garlic powder
- ¾ teaspoon paprika
- 3 tablespoons buttermilk
For Cooking
- 3 to 4 cups vegetable oil, for cooking
Instructions
- To marinate the chicken: In a large sealable bag, combine the chicken tenders with the marinade ingredients. Seal the bag tightly and massage the chicken until it is evenly coated with buttermilk and seasoning. Place in a bowl (in case of leakage) and refrigerate for at least 4 hours or up to 24 hours.
- To make the breading: In a large bowl, combine the flour, baking powder, salt, pepper, garlic powder, and paprika. Whisk until well blended, then add the buttermilk and stir with a fork until the mixture is evenly clumpy.
- Line a baking sheet with aluminum foil for easy cleanup. Remove the chicken tenders from the marinade a few at a time and toss into the breading mixture. Be sure to press the chicken firmly into the breading so clumps adhere to the meat. (It's a messy job: use one hand to remove the wet tenders from the bag and the other to toss in the breading.) Set breaded tenders on the prepared baking sheet.
- To fry the chicken: Line another baking sheet with a few layers of paper towels and set next to the stove. Add oil to a large, high-sided pot until the level reaches about ¾-inch (2-cm). Heat over medium-high heat until oil is shimmering (about 350°/175°C). (If a cube of bread sizzles when you drop it in, it's ready.) Using tongs, place several chicken tenders in the hot oil without crowding the pan. Cook until golden brown on the bottom side, a few minutes, then flip and cook until the second side is also golden, a few minutes more. Set the cooked tenders on the paper towel-lined baking sheet to drain. Fry remaining tenders in batches adjusting the heat as necessary (if the tenders are browning too fast, lower the heat). Serve hot.
Notes
- I find that it's hard to tell how golden the chicken is when it's immersed in the oil. It may only look lightly golden, but it's actually a perfect fried chicken golden brown. If you're unsure, simply pull a tender out of the oil and rest it on the paper towels to see the true color.
- Nutritional information was calculated assuming that approximately ¼ cup of the oil is absorbed into the chicken tenders when frying.
- Freezer-Friendly Instructions: The cooked chicken tenders can be frozen for up to 3 months. To reheat, put the frozen tenders on a wire rack on top of a rimmed baking sheet and warm in a 350°F (175°C) oven until heated through and crisp, about 25 minutes, flipping halfway through.
Pair with

Nutrition Information
This website is written and produced for informational purposes only. I am not a certified nutritionist and the nutritional data on this site has not been evaluated or approved by a nutritionist or the Food and Drug Administration. Nutritional information is offered as a courtesy and should not be construed as a guarantee. The data is calculated through an online nutritional calculator, Edamam.com. Although I do my best to provide accurate nutritional information, these figures should be considered estimates only. Varying factors such as product types or brands purchased, natural fluctuations in fresh produce, and the way ingredients are processed change the effective nutritional information in any given recipe. Furthermore, different online calculators provide different results depending on their own nutrition fact sources and algorithms. To obtain the most accurate nutritional information in a given recipe, you should calculate the nutritional information with the actual ingredients used in your recipe, using your preferred nutrition calculator.
These are ahhhhmazing!! Thanks so much!!
Followed the recipe exactly. Excellent!
Delicious. I doubled the recipe and ponded my chicken breast just to make the thicker sections a little closer in thickness to the thinner sections. Other than that, followed it to the tee. Thx for the fried chicken recipe that needs no skin.
We love this recipe..as we like spicier foods I add Frank’s Hot Sauce to the marinade. Thank you for a great recipe.
Hi! Thoughts on adding corn starch to the flour mixture? Would this make the chicken more crispy? Should we then eliminate the baking powder? How much corn starch would be appropriate?
Hi Mike, I think you could do that. I’d replace 3 tablespoons of the flour with cornstarch (and I wouldn’t omit the baking powder). Please LMK how they turn out!
Best fried chicken ever!! I used chicken breasts- marinated them all day… it was tender and crispy!! There were no leftovers!! Another fabulous recipe- this site is the best!
Hello! I would like to make these chicken fingers for a party. Rather than freezing them, can I make a day ahead and refrigerate them and then bake in the oven shortly before the party? If yes, since they would not be frozen would I still heat at 350 degrees but for a shorter time? Also, does the peanut oil make them greasier than vegetable oil (canola oil). Since I want to impress my guests, which will produce the best chicken finger? Thank you so much for your time.
Hi Sharon, I think you could get away with breading them ahead and refrigerating, but I wouldn’t recommend baking them. If you want a chicken tender you can bake, I’d recommend this recipe. These are also best fried, but you can get away with baking them. If you go that route, I’d suggest baking them 350°F for 15 – 20 minutes. Hope that helps!
I’ve got a kid who LOVES chicken tenders but is allergic to milk. Would almond or cashew milk work for the buttermilk if I added vinegar or lemon juice to it?
Hi Terri, I do think it would work. Please LMK how it turns out if you try it.
OMG! I finally found an absolute winner for my family! The buttermilk makes the chicken so tender and the spices are just enough. My son hates bread crumbs so this was a winner with using flour. Soooo good. I’ve made it twice in the last week. 😆
I made these with almond milk and vinegar in place of the buttermilk for my daughter who’s allergic to milk. I also made a regular batch with buttermilk for the rest of the family. Honestly, I couldn’t tell the difference between the two! She was soooooo happy to have her beloved chicken tenders again! What a great recipe. Thanks for sharing your amazing talents!
My family can’t have milk either. How much vinegar did you use?
I use oat milk and don’t bother with the vinegar 😊
These were absolutely wonderful! So was the honey mustard sauce. My family absolutely loves everything that I make of yours. I’m becoming a superstar in the kitchen thanks to you:) Have one of your cookbooks, going to get another one as well. Thank you so much:)
My pleasure! 🙂
Shockingly good. I have NEVER ‘fried’ anything before so this was something new. They were really delicious and actually quite easy to put together. I made one pound and it was enough for two meals for the two of us. PERFECT. And we enjoyed them cold as well. I might not make these as often as your other meals but it is definitely on my ‘will do again’ list. Thanks, Jenn. I always know that your recipes will not only turn out but will be amazing.