


This post may contain affiliate links. Read my full disclosure policy.
With a flaky, buttery crust, loads of juicy cherries, and a filling that sets beautifully, this cherry pie tastes like summer.

This homemade cherry pie is a true taste of summer, with a flaky, buttery crust, loads of juicy cherries, and a filling that slices beautifully without being runny. The golden lattice top looks impressive, but it’s easy to assemble—I walk you through the process below.
The crust is my go-to all-butter pie crust, and the filling is adapted from pastry chef Stella Parks’ cherry pie recipe. A splash of almond extract brings out the flavor of the cherries, while tapioca flour thickens their juices without making the filling cloudy or gummy.
Patience is key with this pie. Be sure to bake it until the filling is bubbling in the center, then let it cool completely before slicing so the filling has time to set. Serve it with vanilla ice cream or whipped cream for a delicious finish to any summer meal.
“The filling was full of summer flavor and set beautifully. I’m tempted to make this again this weekend before cherries are out of season…it’s a winner!!”
What You’ll Need To Make Cherry Pie

- All-purpose flour: Forms the structure of the crust. For the most accurate results, measure it by weight or spoon it into the measuring cup and level it off.
- Granulated sugar: Adds a touch of sweetness to the crust and also sweetens the cherry filling.
- Salt: Enhances the flavor of both the buttery crust and the cherry filling.
- Unsalted butter: Gives the crust its rich flavor and flaky texture and is also dotted over the cherry filling before the top crust goes on.
- Ice water: Brings the dough together while keeping the butter cold. Add only as much as needed for the dough to hold together.
- Cherries: This pie is designed for sweet cherries, such as Bing cherries, rather than sour or tart cherries. Fresh, in-season cherries give the best flavor, but frozen sweet cherries work beautifully, too—and there’s no need to thaw them first. If using frozen cherries, plan on adding about 10 to 15 minutes to the baking time.
- Lemon Juice & Almond Extract: Lemon juice adds brightness and balances the sweetness of the filling, while almond extract adds a subtle nutty note that naturally complements cherries.
- Tapioca Flour: Thickens the cherry filling, ensuring it sets properly without becoming runny. It is often preferred over cornstarch in pie fillings because it creates a clearer, more glossy finish and provides a smoother, silkier texture. Additionally, tapioca flour holds up better when pies are frozen and thawed.
- Jump to the printable recipe for precise measurements
Step-By-Step Instructions
Step 1: Make the homemade pie crust: Combine the flour, sugar, salt, and baking powder in a food processor and pulse a few times to mix. Add the butter and pulse until the mixture looks crumbly, with lots of pea-size bits throughout. Add the cold water and pulse again until evenly moistened and still a bit crumbly.
Pro Tip: No food processor? Just whisk the dry ingredients in a large bowl, cut in the butter with a pastry cutter or two knives, then add the ice water and mix with a fork (and your hands if needed) until the dough comes together. Divide, shape into discs, and chill as directed.


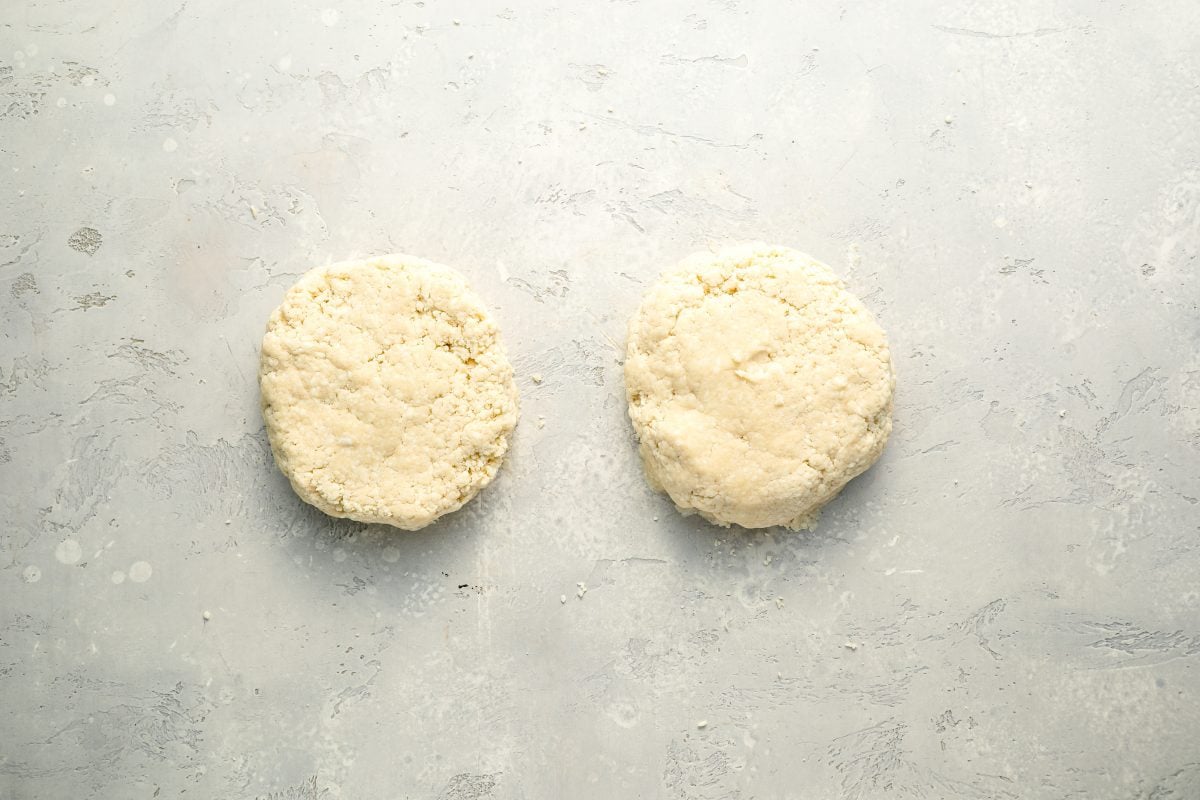
Step 2: Chill the dough. Turn the dough out onto your work surface and divide it into two even piles. Press each into a ball, then flatten into 5-inch discs. Wrap in plastic and refrigerate for at least 45 minutes or up to 3 days.
Step 3: Make the filling. In a large bowl, combine the cherries, lemon juice, almond extract, sugar, salt, and tapioca flour. Toss until combined; don’t worry if the mixture is powdery.

Step 4: Prepare the bottom crust. Let one dough disc soften slightly on a lightly floured surface, then gently knead just until pliable. Roll it into a 13-inch circle and transfer it to a deep-dish pie plate. Press it gently into the pan, leaving a little overhang.

Step 5: Fill the pie. Transfer the filling into the crust and press into an even layer. Dot the cherries with the butter cubes, then pop it in the fridge while you prepare the top crust.

Step 6: Prepare the lattice top crust. Remove the top disc of dough from the refrigerator and roll it out into a 10×15-inch rectangle. Using a pizza or pastry cutter, trim the edges and then cut the dough into one-inch-wide strips.

Step 7: Assemble the pie. Lay half of the dough strips across the filling in one direction, spaced about ½ inch apart. Fold every other strip back halfway, then lay one new strip across them in the opposite direction. Unfold the strips so they lie over the new strip. For the next crosswise strip, fold back the alternating strips—the ones you left in place the first time—and lay another strip across. Continue alternating which strips you fold back as you work across the pie to create the woven lattice. Trim the ends, then fold the bottom crust over the lattice edges and crimp or flute to seal.


Step 8: Bake. Set the pie on a lined baking sheet to catch any drips and bake until the crust is golden and the filling is bubbling in the center as well as around the edges. If using a thermometer, the center should reach at least 213°F. Tent loosely with foil if the crust browns too quickly. Let the pie cool completely; as tempting as it is, don’t cut into it while it’s warm or you’ll end up with cherry soup!

Once cooled, the pie keeps at room temp for up to 2 days or refrigerated for up to 4 days. You can make the crust up to 3 days ahead and keep it in the fridge, or freeze it for up to 3 months.
The unbaked pie also freezes well. Chill it first until firm, then wrap tightly in plastic and foil. Freeze for up to 3 months, and thaw in the fridge overnight before baking.
Frequently Asked Questions
Why is my cherry pie filling runny?
A runny filling usually means the pie was underbaked or sliced before it had fully cooled. Be sure the filling is bubbling in the center as well as around the edges; if you have a thermometer, the center should reach at least 213°F. Then let the pie cool completely—at least 8 hours—before slicing so the filling has time to set.
Do I need to blind bake the crust for cherry pie?
No. Blind baking is generally used for single-crust pies and is tricky with a double-crust or lattice pie, since you need an unbaked bottom crust to attach and seal the top crust. In this recipe, the bottom crust bakes along with the filling and lattice top, and the long baking time ensures it cooks through.
What’s the easiest way to pit cherries for cherry pie?
A cherry pitter makes quick work of the job, especially when you’re prepping a large quantity. I use the Leifheit Cherry Stoner, which lets you pit cherries quickly and continuously without having to handle each one individually.
Cherry Pie Video Tutorial
More Fruit Desserts You May Like



Cherry Pie

Ingredients
For the Crust
- 3 cups all-purpose flour spooned into measuring cup and leveled-off
- 3 tablespoons sugar
- 1 teaspoon salt
- ¼ teaspoon baking powder
- 2½ sticks (20 tablespoons) cold unsalted butter, sliced into 1-inch pieces
- ½ cup ice cold water
For the Filling
- 5¼ cups pitted cherries, from about 2 lbs (6 cups) whole cherries, fresh or frozen (if frozen, no need to thaw)
- 2 tablespoons lemon juice
- ¼ teaspoon almond extract
- ¾ cup + 2 tablespoons sugar
- ¼ teaspoon salt
- ⅓ cup tapioca flour (also called tapioca starch), such as Bob’s Red Mill
- 2 tablespoons unsalted butter, cut into small cubes
Instructions
Prepare the Crust
- If using a food processor: Combine the flour, sugar, salt, and baking powder in the bowl of a food processor fitted with the metal blade. Pulse a few times to combine. Add the pieces of butter and pulse until the mixture is crumbly with lots of pea-size clumps of butter within. Add the water and pulse until the mixture is evenly moistened and very crumbly. Dump the dough crumbles onto a work surface and divide into two even piles. Make two balls of dough and pat each one into a 5-inch disc. Wrap the discs in plastic and refrigerate for at least 45 minutes and up to 3 days.If making by hand: In a large mixing bowl, whisk together the flour, sugar, salt, and baking powder. Add the butter cubes and use a pastry cutter or two knives to cut the butter into the dry ingredients until the mixture resembles coarse crumbs. Gradually add the ice water, mixing with a fork, and then your hands until the dough comes together into a ball. Divide the dough in half, shape into disks, wrap in plastic wrap, and refrigerate for at least 45 minutes and up to 3 days.
Prepare the Filling
- In a large bowl, combine the cherries, lemon juice, almond extract, sugar, salt, and tapioca flour. Toss until combined; don’t worry if the mixture is powdery.
Assemble and Bake
- Preheat the oven to 425°F and set an oven rack in the lower third position. Line a baking sheet with aluminum foil (the foil will catch the juices that bubble over from the pie, making for easy clean up).
- Prepare the bottom crust: Remove one disc of dough from the refrigerator. Lightly dust a clean work surface with flour and place the dough on it; sprinkle a bit of flour over the dough as well. Gently knead the dough with your hands just until it becomes soft and malleable (avoid overworking it—you want it just supple enough to roll out). Roll the dough out into a 14-inch circle, adding more flour as needed to prevent sticking. Carefully lift the dough by draping it over your rolling pin and transfer it to a 9-inch deep-dish pie pan (it should be 2 inches deep). Gently press the dough into the pan, making sure to ease it into place without stretching. Trim the edges of the dough to extend about ½ inch beyond the pie pan's lip.
- Fill the pie: Transfer the filling into the crust and press into an even layer (do not mound). Dot the cherries with the butter. Refrigerate while you prepare the top crust.
- Prepare the lattice top crust: Remove the top disc of dough from the refrigerator and roll it out into a 10×15-inch rectangle, following the same process described earlier. Using a pizza or pastry cutter, trim the edges and cut the dough into 14 one-inch-wide strips. Retrieve the filled pie from the refrigerator. Lay half of the strips horizontally over the pie filling, leaving about ½ inch of space between each strip. Fold back every other strip halfway over itself. Place one strip of dough vertically over the unfolded strips. Unfold the folded strips over the new strip, then fold back the alternating strips that were previously left unfolded. Lay another strip of dough parallel to the first vertical strip, about ½ inch away from it. Repeat the process, folding back the strips as necessary, until the lattice crust covers the entire pie. Trim any excess dough from the edges of the lattice strips, leaving a slight overhang. Fold the edges of the bottom crust over the lattice strips, then crimp or flute the edges to seal the pie.
- Place the pie on the lined baking sheet and bake at 425°F for 20 minutes. Reduce the oven temperature to 375°F and continue baking for an additional 60 to 70 minutes, or until the crust is golden brown and the filling is bubbling both on the edges and in the center (if you have a digital thermometer, it should be at least 213°F in the center). Keep an eye on the pie during the second half of baking and tent lightly with foil if it’s getting too brown on top (I usually tent it at the 40-minute mark in the second phase).
- Immediately move the hot pie off the foil and place on a heat-proof surface. If necessary, take a wad of wet paper towels and wipe any cherry juice from the edges (it gets extremely sticky as it dries). Let the pie cool completely before slicing, at least 8 hours or overnight (if you have a digital thermometer, it should be 78°F or lower in the center before slicing). Resist the temptation to cut into the pie while it’s even slightly warm, or you will end up with cherry soup!Once cooled, you can keep the pie at room temperature for up to 2 days, covering it loosely with foil to prevent it from drying out. If you need to store the pie for longer than 2 days, place it in the refrigerator, covered with plastic wrap or aluminum foil, and store for up to 4 days.
Notes
- It’s normal for the cherry juices to bubble out of the pan towards the end.
- The cooking time will depend on the type of pan you use and whether you use frozen cherries (count on an extra 10 to 15 minutes if using frozen).
- It is critical that the pie is boiling in the middle or reaches 213°F, or it will not set up properly.
- Don’t be tempted to reduce the sugar—it is needed for the pie to set.
Nutrition Information
This website is written and produced for informational purposes only. I am not a certified nutritionist and the nutritional data on this site has not been evaluated or approved by a nutritionist or the Food and Drug Administration. Nutritional information is offered as a courtesy and should not be construed as a guarantee. The data is calculated through an online nutritional calculator, Edamam.com. Although I do my best to provide accurate nutritional information, these figures should be considered estimates only. Varying factors such as product types or brands purchased, natural fluctuations in fresh produce, and the way ingredients are processed change the effective nutritional information in any given recipe. Furthermore, different online calculators provide different results depending on their own nutrition fact sources and algorithms. To obtain the most accurate nutritional information in a given recipe, you should calculate the nutritional information with the actual ingredients used in your recipe, using your preferred nutrition calculator.
Glass, ceramic or metal? Does it make a difference?
Hi Andrea, if you have all three options, I’d go with metal or ceramic. Just keep in mind that ceramic may increase the baking time just a touch. Enjoy!
Wow I can’t believe there are so few reviews for this amazing pie. After discovering this recipe last summer and making it several times to rave reviews, I’ve been looking forward to when fresh Ranier cherries came back in season. Bought 2 pounds today when I saw them at Costco and came back here to print the recipe. It is absolutely the favorite pie around here, and we LOVE Jenn’s pumpkin, key lime, coconut cream, and pecan pie recipes! One thing I hadn’t done before was a lattice crust, and it was easy! We’ll be having cherry pie for dessert throughout the summer – thanks Jenn!
Hi Jen, my niece requested cherry pie for her birthday. Since is is March, I got some frozen cherries from the store. The only bag was half sweet, half sour. Any tips for making a pie with half and half?
Also, we have a nut allergy. Do you think skipping the almond extract is fine?
I love all your recipes! I must make 5 a week.
Hi Kathleen, thanks for your kind words – so glad you like the recipes! For the pie, skipping the almond extract is fine, or you could replace it with vanilla extract. And regarding using a combination of sweet and sour cherries, while technically it will work, it could be pretty tart (and I don’t recommend adding more sugar as it will make the filling too liquid). Please LMK how it turns out if you make it!
Can you please start including times/mods for glass vs metal baking dishes? I made this in a 9.5 inch glass pie dish and the outer crust burnt within the 40 min pf the second timer but took the pie an hour longer to reach the center temp of 213 F. I haven’t tasted it yet, but it’s disappointing to look at. This is the only recipe that I’ve had such troubles with 🙁
How do you pit the cherries?
Hi Carol, I use a Leifheit cherry stoner/pitter (but it looks like there are a number of brands out there).
Jenn, I have four 14.5 oz cans of Whole Pitted Oregon Tart Cherries packed in water. Do you think that would work in this recipe if I drain them? Sweetness?
Your pie looks delicious 🍒
Hi Sue, I don’t recommend them – you really need sweet cherries for this recipe. Sorry!
Made this pie over the weekend – guests for dinner. Followed both the crust and cherry pie filling recipes exactly and it turned out amazing. Soooooo delicious. As you noted, I did have to tent the crust the last 20 or so minutes. The pastry turned out perfect, the pie filling — oh my goodness it was perfect too. Anyone trying this recipe – I wouldn’t change or substitute a thing.
Delicious cherry pie! The directions seemed overwhelming at first but Jenn is great breaking them down step by step. Followed them all and was rewarded with a great tasting crust and cherry pie filling. I used frozen cherries and still turned out fantastic!
Hi Jenn,
I don’t have tapioca flour, can I substitute regular flour or a mix of flour and corn starch? If yes, how much.
Thank you.
Hi Alison, I recommend sticking with tapioca flour. It creates a clear, glossy finish with a smooth texture that holds up well, even if you freeze the pie. Cornstarch, while effective, can make the filling look cloudy and may become grainy or watery.
YUM, yum, yum! My grocery store had a great sale on cherries, so I decided to give this a go and so happy I did. I’ve never made a lattice crust and was a little intimidated by it, but Jenn’s instructions are perfect. The filling was full of summer flavor and set beautifully. I’m tempted to make this again this weekend before cherries are out of season. Regardless of whether it’s this weekend or next summer, I WILL be making this again — it’s a winner!!
The pie filling is perfect. Only problem is my bottom crust is over baked. Wondering why this pie is baked in the lower third of the oven; I’ll go with typical middle rack baking next time.