Flourless Chocolate Almond Cake with Chocolate Ganache Frosting

This post may contain affiliate links. Read my full disclosure policy.
Made with ground almonds and topped with chocolate ganache, this flourless chocolate almond cake is rich and elegant.
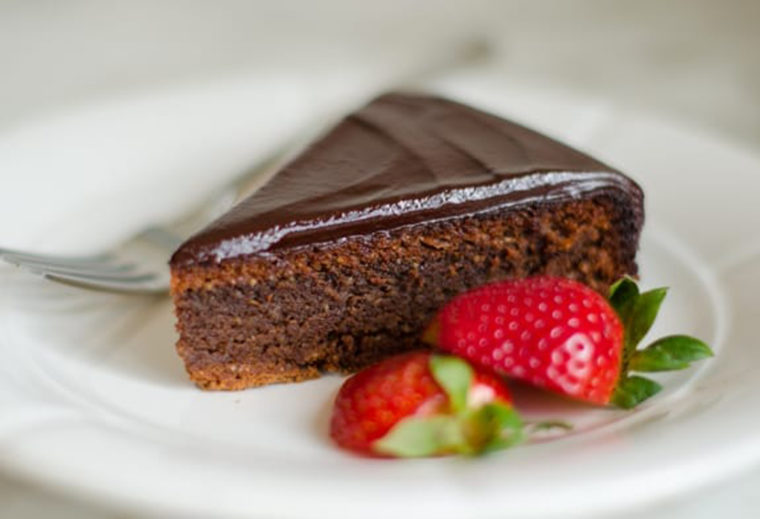
I’m in charge of dessert for Passover every year so I’ve made my fair share of flourless chocolate cakes. This one, adapted from Maida Heatter’s Cakes, is one of my all-time favorites. Originally called the Queen Mother’s Cake (it’s a long story), the cake is Heatter’s most popular recipe ever. Made with ground almonds instead of flour and topped with a decadent chocolate ganache, it’s rich and elegant. Though the ingredients are simple, there are several steps, but I think it’s totally worth it!
You May Also Like

Flourless Chocolate Almond Cake with Chocolate Ganache

Ingredients
For the Cake
- 1½ cups slivered almonds
- Handful fine dry breadcrumbs, matzo meal or gluten-free substitute (for dusting the pan)
- 6 oz semisweet chocolate, best quality such as Ghiradelli, finely chopped
- ¾ cup sugar, divided
- 6 oz (1½ sticks) unsalted butter, at room temperature, plus more for greasing the pan
- 6 large eggs, yolks and whites separated
- ⅛ teaspoon salt
- 1 teaspoon fresh lemon juice, from 1 lemon
For the Ganache Frosting
- ½ cup heavy cream
- 2 teaspoons instant coffee or espresso powder
- 8 ounces semisweet chocolate, best quality such as Ghiradelli, finely chopped
Instructions
- Preheat the oven to 350°F (180°C). Line a baking sheet with parchment paper.
- Spread the almonds in a single layer on the prepared pan and bake for 5 to 7 minutes, or until the almonds are lightly colored and fragrant. Set aside to cool. Leave the oven on.
- Butter the bottom and sides of a 9 x 3-in (23 x 8-cm) springform pan and line the bottom with a round of parchment paper cut to fit. Butter the paper. Dust the pan all over with the fine bread crumbs (or matzo meal); rotate the pan several times to spread evenly, then invert over the sink and tap lightly to shake out any excess crumbs. Set the prepared pan aside.
- Place the chocolate in a microwave-safe bowl. Microwave in 20-second intervals, stirring in between, until about 75% melted. Stir and let the residual heat melt the chocolate until completely smooth. Set aside until tepid.
- Place the almonds and ¼ cup (50 g) of the sugar (reserve remaining ½ cup/100 g sugar) in a food processor fitted with a metal chopping blade. (Reserve the parchment paper from the nuts for icing the cake.) Process until the nuts are finely ground, stopping the machine once or twice to scrape down the sides. You should process for about one minute total. The mixture will be a little pasty but should not be the consistency of a nut butter. Set aside the ground nuts.
- In the large bowl of an electric mixer, beat the butter until soft. Add ¼ cup (50 g) of the sugar (reserve the remaining ¼ cup/50 g sugar) and beat to mix. Add the egg yolks, one at a time, beating and scraping the sides of the bowl as necessary until smooth. On low speed, add the chocolate and beat until mixed. Then add the processed almonds and beat, scraping the bowl, until incorporated.
- Now, the whites should be beaten in the large bowl of the mixer. If you don't have an additional large bowl for the mixer, transfer the chocolate mixture to any other large bowl. Wash the bowl and beaters.
- In the clean bowl of the mixer, with clean beaters, beat the egg whites with the salt and lemon juice, starting on low speed and increasing it gradually. When the whites barely hold a soft shape, gradually add the remaining ¼ cup (50 g) sugar. Continue to beat until the whites hold stiff peaks when the beaters are raised. Do not overbeat.
- Stir a large spoonful of the whites into the chocolate mixture to lighten it a bit. Then, in three additions, fold in the remaining whites. Do not fold thoroughly until the last addition and do not handle more than necessary. Transfer the batter to the prepared pan and spread evenly.
- Bake for 20 minutes at 350°F (180°C), then reduce the temperature to 325°F (165°C) and continue to bake for an additional 40 to 50 minutes. The top might crack a bit; that's okay.
- Remove the cake pan from the oven and place it on a rack. Let stand until tepid, 50 to 60 minutes.
- Release and remove the sides of the pan (do not cut around the sides with a knife—it will make the rim of the cake messy). Now, let the cake stand until it is completely cool.
- The cake will sink a little in the middle as it cools. Use a long, thin, sharp knife (I prefer serrated) and level the top. It will seem like you're cutting off a lot; don't worry about it. The finished cake should be about 1½ in (4 cm) high. Brush away any loose crumbs. Place a rack or a small board over the cake and carefully invert. Remove the bottom of the pan and the paper lining.
- The cake is now upside down; this is the way it will be iced. Place 4 strips of the reserved parchment paper (each about 3 x 12 in/8 x 30 cm) around the edges of a cake plate. With a large, wide spatula, carefully transfer the cake to the plate; check to be sure that the cake is touching the paper all around (in order to keep the icing off the plate when you ice the cake).
- To make the ganache frosting, heat the cream in a medium saucepan over medium heat until it boils. Add the espresso or coffee powder and whisk to dissolve. Add the chocolate and remove from the heat. Stir until all the chocolate is all melted and the mixture is smooth. Let the ganache stand at room temperature, stirring occasionally, for about 15 minutes, or until it begins to thicken.
- Pour the ganache slowly over the top of the cake. Using a long, narrow metal spatula, smooth the top and spread the icing so that a little runs down the sides of the cake (not too much—the icing on the sides should be a much thinner layer than on the top). Smooth the sides with the spatula, then remove the parchment liners.
Nutrition Information
This website is written and produced for informational purposes only. I am not a certified nutritionist and the nutritional data on this site has not been evaluated or approved by a nutritionist or the Food and Drug Administration. Nutritional information is offered as a courtesy and should not be construed as a guarantee. The data is calculated through an online nutritional calculator, Edamam.com. Although I do my best to provide accurate nutritional information, these figures should be considered estimates only. Varying factors such as product types or brands purchased, natural fluctuations in fresh produce, and the way ingredients are processed change the effective nutritional information in any given recipe. Furthermore, different online calculators provide different results depending on their own nutrition fact sources and algorithms. To obtain the most accurate nutritional information in a given recipe, you should calculate the nutritional information with the actual ingredients used in your recipe, using your preferred nutrition calculator.
Gluten-Free Adaptable Note
To the best of my knowledge, all of the ingredients used in this recipe are gluten-free or widely available in gluten-free versions. There is hidden gluten in many foods; if you're following a gluten-free diet or cooking for someone with gluten allergies, always read the labels of your ingredients to verify that they are gluten-free.
tasted great but I think the amount of almond flour is too much. most other recipes only use 1.5 cups and this one uses 2 cups. I was excited because I have ALOT of almond flour. I wasnt worried when the batter was thick because she mentioned using cold eggs might make it thick but when it came out it felt rock hard. I checked it with a toothpick 2x during bake. The centre was the texture the edge should be by the time it came out clean. luckily we had other desserts for the party.
Can this cake be made with almond flour rather than ground almonds?
Sure, that’s fine. Enjoy!
I just made this cake this morning and I’m very disappointed. It isn’t fudgy and has a grainy texture. Not impressive at all😌
I followed all instructions, including pan size, lining with parchment, etc., and ‘Bake for 20 minutes at 350°F, then reduce the temperature to 325°F…” I set the timer “to bake for an additional 50 minutes.”
However, with 16 minutes left on the final 50 minutes, I detected the scent of burning chocolate, and the cake was clearly (over?)done. The hour and 10 minute bake time was way too long. My oven cooks at the stated temperature.
The cake was, in fact well-done, but tasted okay.