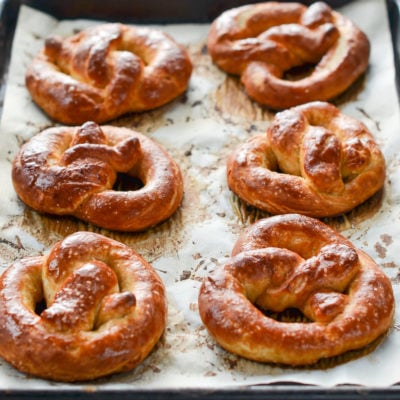
Soft Pretzels


This post may contain affiliate links. Read my full disclosure policy.
Easy to make and even better to eat, these buttery soft pretzels have that irresistible mall pretzel flavor everyone loves.
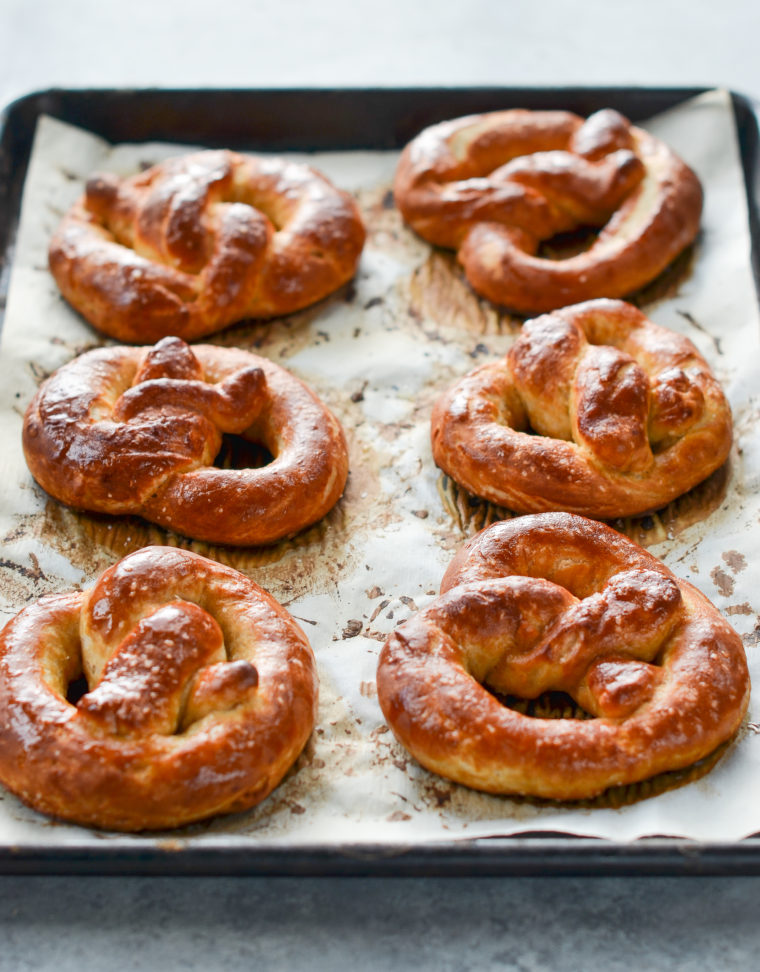
Everyone needs a go-to soft pretzel recipe—for snow days, rainy afternoons, casual get-togethers, or just because. My kids absolutely love these buttery, slightly sweet pretzels; they taste just like Auntie Anne’s. The dough comes together easily in a stand mixer, but kneading by hand works just as well. And while twisting them into classic pretzel shapes is half the fun, pretzel bites are a great option if you want to keep it simple.
These soft pretzels are easy to customize, too. Go classic with coarse salt, or skip the salt, brush with butter, and sprinkle with cinnamon sugar for a sweet version. For the grown-ups, they’re great with mustard or a side of beer cheese dip for extra flavor.
“I made these for a party. They were amazing. I love Auntie Anne’s pretzels and these tasted just like them.”
What You’ll Need To Make Soft Pretzels
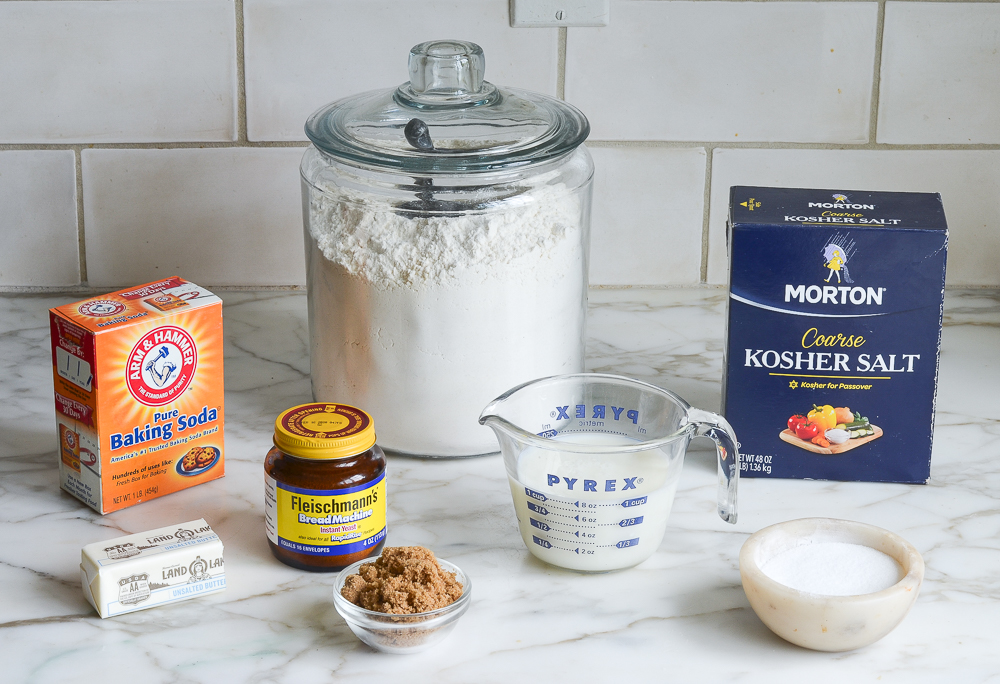
- Milk: Adds moisture and richness to the dough, giving the pretzels their soft texture.
- Unsalted butter: Some is melted into the dough for flavor and softness, while the rest is brushed on top for that buttery finish.
- Light brown sugar: Adds just the right amount of sweetness and helps the yeast do its job.
- Instant/rapid-rise yeast: Makes the dough rise and gives the pretzels their light, fluffy texture.
- All-purpose flour: The backbone of the dough that gives the pretzels their structure.
- Fine & Course salt: Enhances all the flavors in the dough and lends that classic salty bite.
- Baking soda: Mixed with warm water to create a solution for dipping the dough before baking. This step is what gives pretzels their golden-brown crust, shiny appearance, and classic flavor.
- Jump to the printable recipe for precise measurements
Step-by-Step Instructions
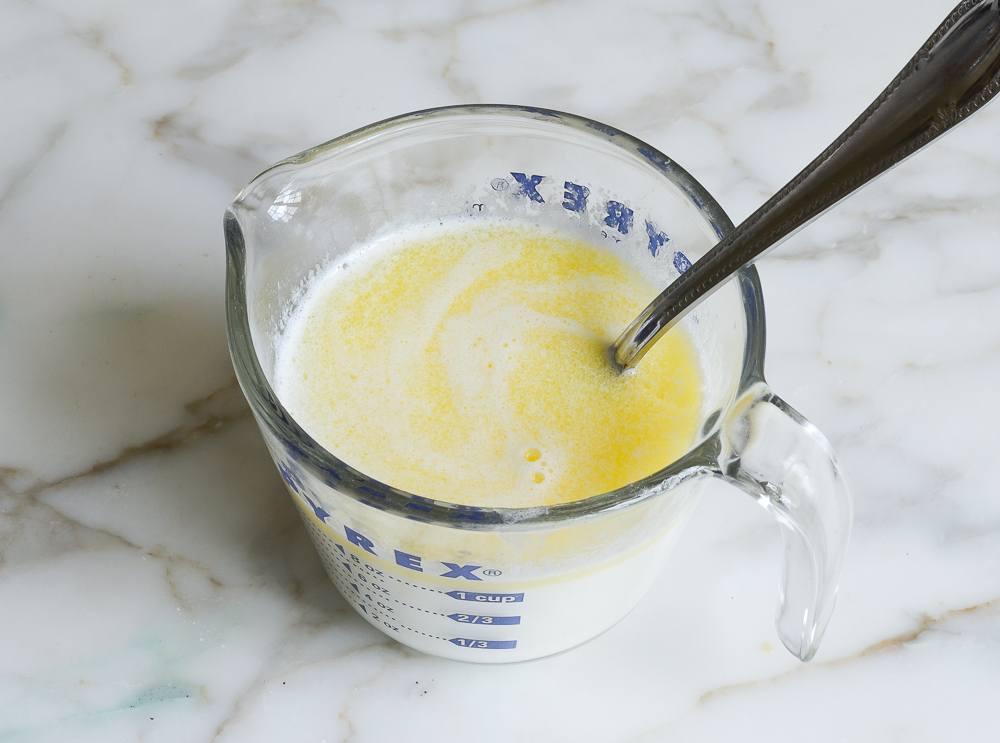
Step 1: Warm the milk and butter. Warm the milk and 2 tablespoons of butter in the microwave for about 90 seconds, just until the butter melts—be careful not to let it boil. (You can also do this in a small saucepan if you prefer.) Stir in the brown sugar until it’s dissolved, then set it aside.
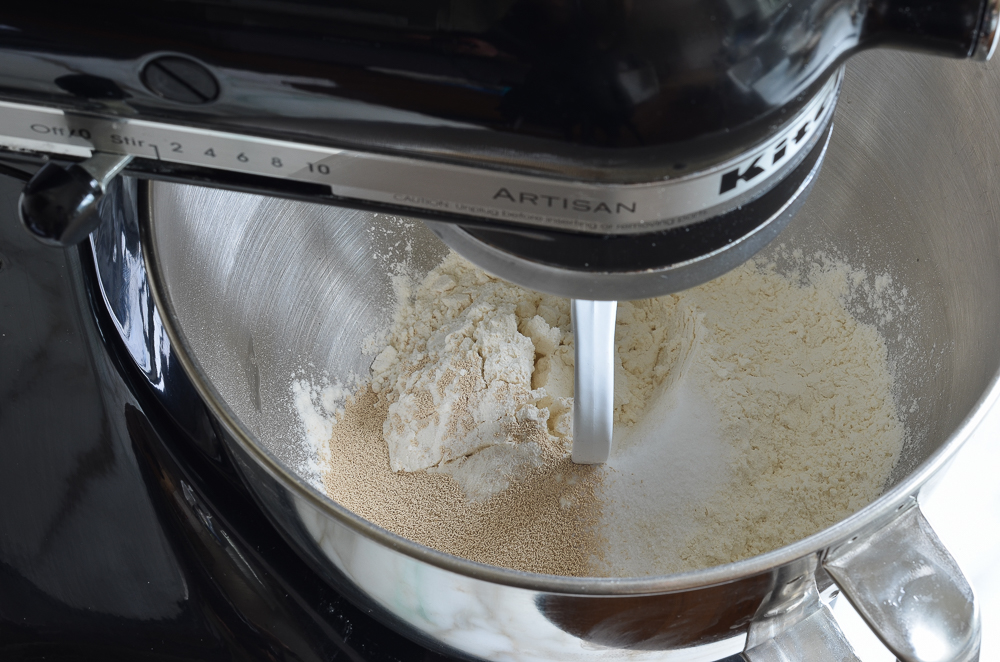
Step 2: Combine the dry ingredients. In the bowl of a stand mixer fitted with the paddle attachment, combine the flour, yeast, and salt. Mix on low speed for about a minute, until everything is well combined.
Step 3: Add the wet ingredients. Keep the mixer on low and slowly pour in the warm milk mixture. Mix until the dough comes to together into a cohesive mass.
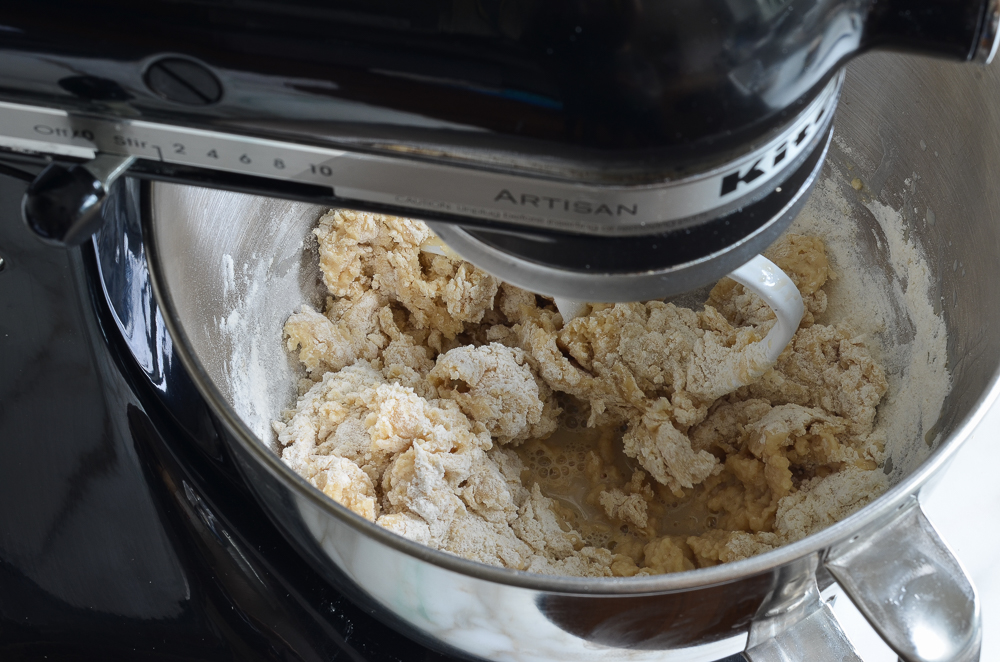
Step 4: Knead. Swap the paddle attachment for the dough hook and knead on medium-low speed until the dough is smooth but still slightly tacky, about 5 minutes. Feel free to add a bit more flour if needed.
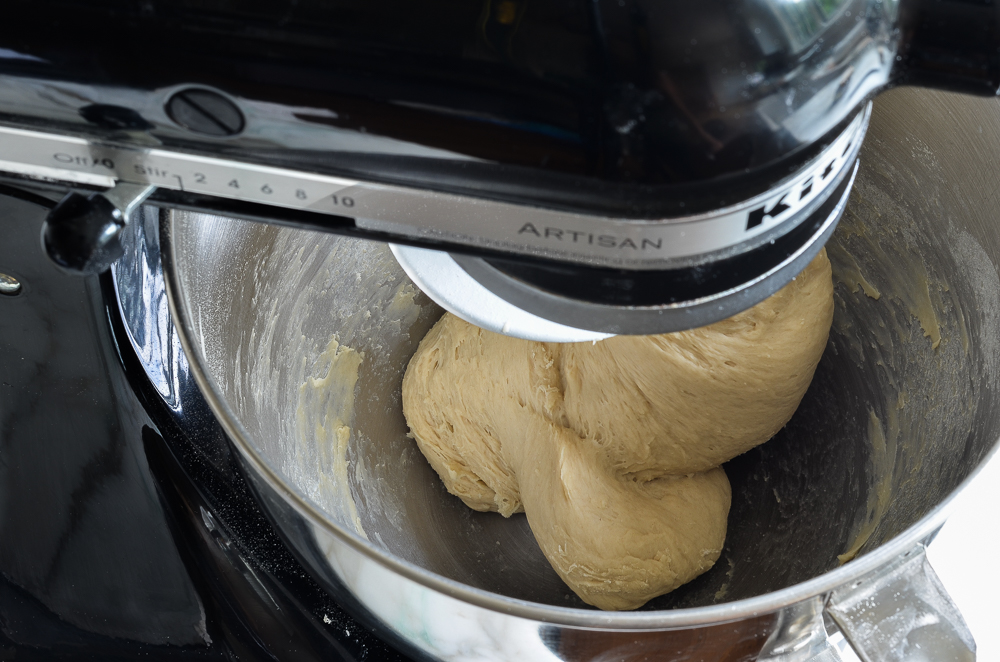
Step 5: Let it rise. Shape the dough into a ball and place it in a clean, lightly greased bowl. Cover with plastic wrap and let it rise in a warm spot until doubled in size—it will take 1 to 2 hours.


Step 6: Divide the dough. Gently punch it down to release the air, then turn it out onto a clean work surface. Shape it into a log and cut it into six equal pieces.

Step 7: Roll it out. Roll and stretch each piece into a 24-inch rope using the palms of your hands. Hold the ends and gently slap the middle of the rope on the counter to help stretch it out.

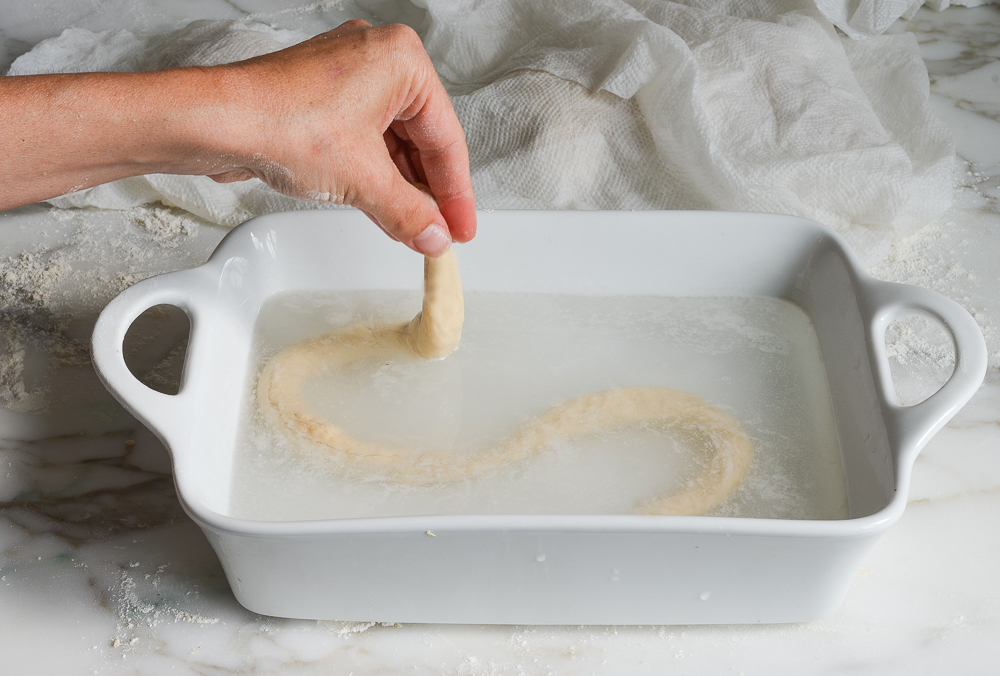
Step 8: Dip the dough. Combine the baking soda and warm water in a 2-quart baking dish, stirring until the baking soda dissolves. Gently dip each rope into the solution—this step is key to giving the pretzels their signature dark brown, shiny crust and unique flavor.
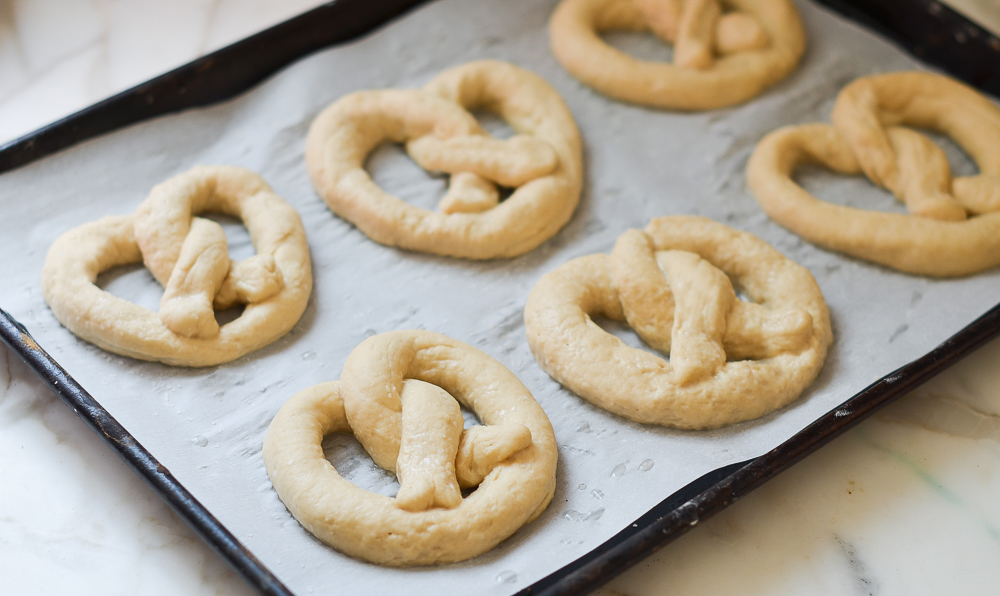
Step 9: Shape the pretzels. Let any excess liquid drip off, then shape the dough into a pretzel directly on the prepared baking sheet. To do this, form a U-shape with the rope, cross the ends over and under each other to make a twist in the middle, and press the ends onto the bottom of the pretzel. Sprinkle evenly with coarse salt.
Step 10: Bake and butter. Bake the pretzels until golden, 8 to 12 minutes. Melt the remaining 3 tablespoons of butter and brush it over the warm pretzels. Enjoy them fresh from the oven, or reheat later in the oven or microwave.

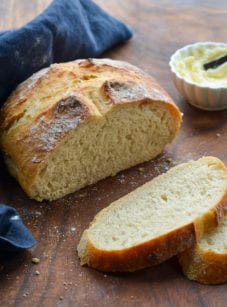
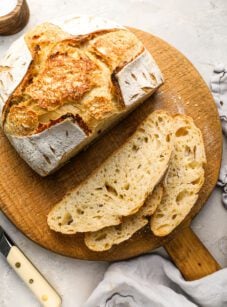
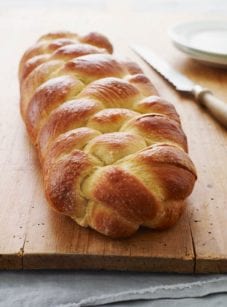
More Homemade Bread Recipes You’ll Love

Soft Pretzels
Ingredients
- 1 cup milk
- 5 tablespoons unsalted butter, divided
- 3 tablespoons (packed) light brown sugar
- 2¼ teaspoons instant/rapid-rise yeast (1 package)
- 3 cups all-purpose flour, spooned into measuring cup and leveled-off
- 1 teaspoon fine salt
- ¼ cup baking soda
- ¾ teaspoon coarse salt
Instructions
- Warm the milk and 2 tablespoons (28 g) of the butter in the microwave until the butter is just melted, about 90 seconds; do not boil. (Alternatively, warm the butter and milk in a small saucepan.) Add the brown sugar and stir until dissolved; set aside.
- In the bowl of an electric mixer fitted with the paddle attachment, combine the flour, yeast, and fine salt. Mix on low speed until well combined, about 1 minute. With the mixer on low, gradually add the warm milk/butter mixture to the bowl. When the dough forms a cohesive mass, switch from the paddle attachment to the dough hook. Knead on medium-low speed until the dough is smooth but still slightly tacky, about 5 minutes. (Alternatively, the dough can be mixed and kneaded by hand.) Shape the dough into a ball, place in a clean, lightly greased bowl, and cover with plastic wrap. Let rise in a warm spot until doubled in size, 1 to 2 hours.
- Preheat the oven to 450°F (235°C). Line a large baking sheet with parchment paper and spray lightly with nonstick cooking spray.
- In a 2-qt (2L) baking dish, combine the baking soda with 2¼ cups (540 ml) warm water. Stir until the baking soda is dissolved; set aside. (Dipping the pretzel dough in a baking soda solution gives the pretzels a nice golden brown crust.)
- Punch the dough to deflate it, then turn it out onto a clean work surface. (If the dough seems sticky, you can dust it with a bit of flour as needed.) Shape the dough into a log, then cut into 6 equal pieces; cover with a damp dish towel so the dough doesn't dry out. Roll and stretch each piece with the palms of your hands into a 24-in (61-cm) rope, holding the ends and slapping the middle of the rope on the counter as you stretch.
- Using two hands, gently dip each "rope" into the soda solution. Let any excess liquid drip off, then form the dough into a pretzel shape directly on the prepared baking sheet (form a U-shape, then holding the ends of the rope, cross them over and under each other—making a twist in the center—and press the ends onto the bottom of the pretzel). Sprinkle evenly with the coarse salt. Bake until golden, 8 to 12 minutes; watch the bottoms carefully as they can burn.
- Melt the remaining butter and brush on the baked pretzels. The pretzels are best enjoyed warm out of the oven or fresh on the same day (reheat in the oven or microwave).
Notes
- Active dry yeast may be used instead of instant yeast, however, the dough will take longer to rise. To give active dry yeast a boost, you can dissolve it in the warm milk and butter, let it sit until frothy, about 10 minutes, and then proceed with the recipe.
- If you prefer a cinnamon sugar topping, omit the coarse salt. Brush with butter after baking and sprinkle generously with cinnamon sugar (½ cup sugar plus about ¾ teaspoon cinnamon).
- Make-Ahead Instructions: After the dough has risen, it can be refrigerated for up to three days or frozen for a few months. Thaw the frozen dough in the refrigerator before using. The dough can be shaped into pretzel bites while still cool, but allow about 30 minutes for the bites to puff up a bit before dipping and baking.
Nutrition Information
This website is written and produced for informational purposes only. I am not a certified nutritionist and the nutritional data on this site has not been evaluated or approved by a nutritionist or the Food and Drug Administration. Nutritional information is offered as a courtesy and should not be construed as a guarantee. The data is calculated through an online nutritional calculator, Edamam.com. Although I do my best to provide accurate nutritional information, these figures should be considered estimates only. Varying factors such as product types or brands purchased, natural fluctuations in fresh produce, and the way ingredients are processed change the effective nutritional information in any given recipe. Furthermore, different online calculators provide different results depending on their own nutrition fact sources and algorithms. To obtain the most accurate nutritional information in a given recipe, you should calculate the nutritional information with the actual ingredients used in your recipe, using your preferred nutrition calculator.
Best pretzel recipe I’ve tried, and very easy to make without a stand mixer too.
First batch I made as written except that I used traditional yeast bloomed in 1/4 cup warm water, and I used 1/4 cup less milk. They came out better than any carnival pretzel I have ever had.
Second batch I replaced 3/4 cup of white flour with whole wheat, and I pureed 1 head of roasted garlic in the milk. I also allowed them to proof overnight in the fridge. They came out perfect. The garlic flavor was subtle when eating plain, and not noticeable when dipped in cheesy mustard sauce.
These pretzels are my new guilty pleasure. Thanks Jenn.
Can these be frozen and baked at a later time, if so will time and temp be the same?
Hi Mary, these are really best made fresh, but you could get away with freezing the dough (after it rises) for up to 3 months. You can find some additional tips here on thawing and baking the dough. Hope you enjoy if you make them!
Can these pretzels be frozen and baked later?
Hi Mary, Hi, these are really best baked fresh, but I think you could get away with freezing the dough (after it rises) for up to 3 months. You can find some additional tips here on thawing and baking the dough.
Thank u I will give it a try reason is I always need more than 6 pretzels at a time
I live in Denver. How should I tweak for high altitude?
Hi Maureen, I don’t have experience baking at high altitudes so, unfortunately, I don’t have any wisdom to share – I’m sorry! You may find these tips helpful though. Hope you enjoy the pretzels if you make them!
Made these with my son. So easy to make! Stored them in the fridge overnight and came back to them after they were at room temperature and still soft and delicious. We made them with cinnamon and sugar. Soooooo good!!!
My 9yo can make these now without my help. Today will be the third day in a row we’ve made them
Thanks Jenn,
When I was a kid and spent time in Germany they had these pretzels that were 8-10” long and 11/2”-2” thick. Any idea how to achieve that with this recipe?
As always,
Grateful
Hi Eric, I think that’s doable –it really doesn’t matter what shape you make the pretzels. The baking time may be a little bit different so keep a close eye on them. Also, just a heads up that these taste more like the kind of pretzel that you would get at a mall kiosk then what you’d find in Germany. Just want to make sure you know what to expect. 🙂
These were absolutely amazing! I used the dough program on my bread machine. Made half savory, half with cinnamon sugar. So delicious-much better than any other soft pretzel I’ve ever had.
Delicious, easy and fun! My 5 year old daughter and I made these for an after dinner pretzel party! We don’t have a mixer or much dough experience, and this was very simple to make. Thanks for the idea.
Can I ask why you dip the roped dough in the liquid?
Hi Irene, The baking soda bath gives the pretzels a lovely golden crust. Enjoy! 🙂
Would you recommend using bread flour or high gluten flour?
Hi Carol, for the best/most predictable results, I’d stick with the all-purpose flour here.
First time making these and WOW!! Perfect soft pretzel with sooooo much flavour!