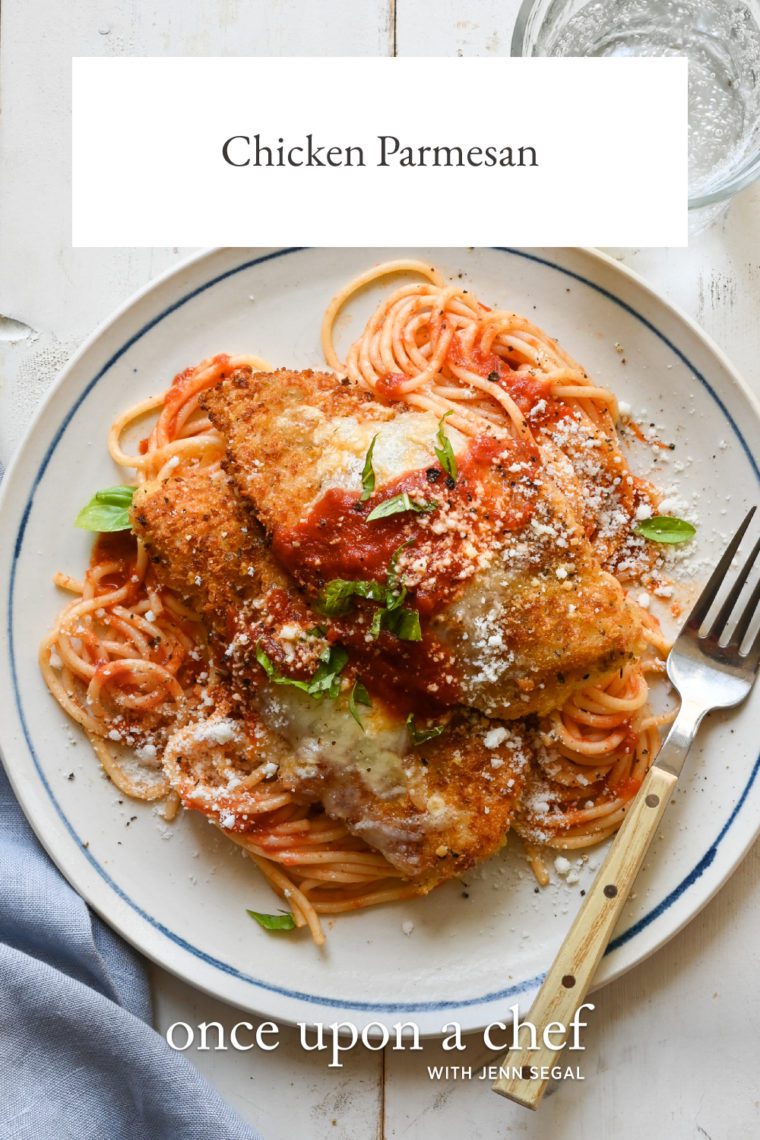
Easy Chicken Parmesan

This post may contain affiliate links. Read my full disclosure policy.
Crispy, golden chicken topped with gooey melted cheese and smothered in marinara—this chicken Parmesan recipe is an easy weeknight dinner that tastes like it’s from your favorite Italian restaurant!

Chicken parm is always a hit with the family, but the traditional recipe can take a lot of time. From making homemade tomato sauce to pounding, breading, and frying the chicken—and then baking it with cheese—it can easily take over an hour and create a sinkful of dishes. This easy chicken parmesan recipe incorporates a few smart shortcuts, like using good-quality jarred sauce and chicken tenderloins, making it totally doable on a weeknight. You’ll notice that I don’t smother the chicken with sauce and cheese; this keeps the crust crispy (and you can always serve more sauce on the side).
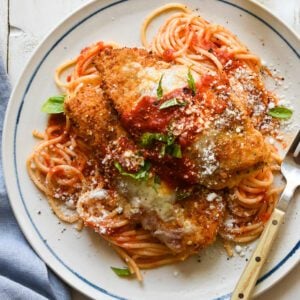
Chicken parm is a great dish for entertaining since most of the prep can be done ahead of time. It pairs nicely with pasta, polenta, an arugula salad, or roasted broccoli.
“Huge hit with the family! Seasoning, moisture, crispness all on point…This is some really great chicken.”
What You’ll Need To Make Chicken Parmesan
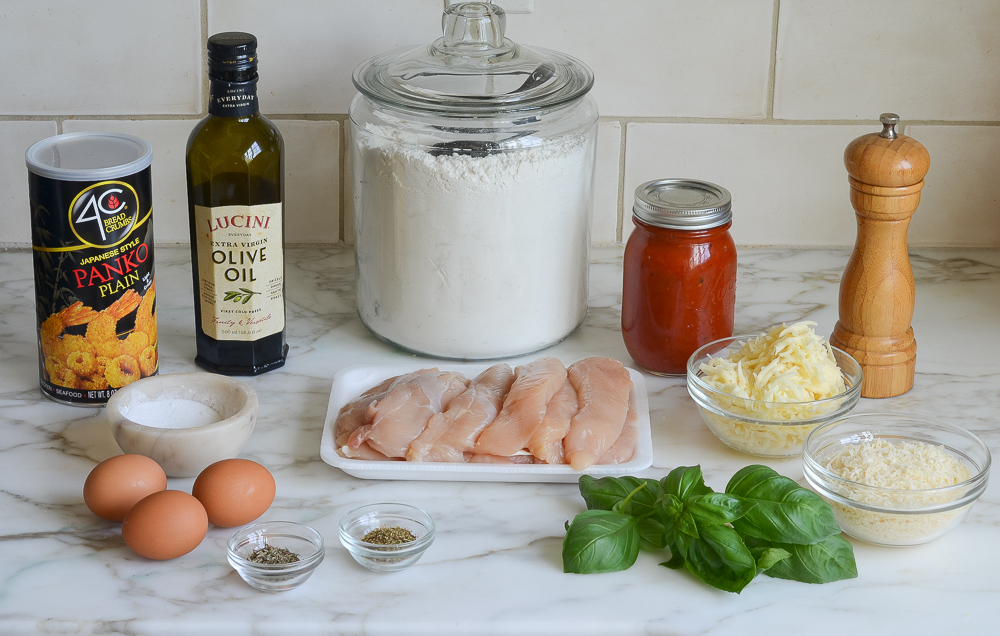
- Chicken tenderloins: I prefer using chicken tenderloins instead of boneless, skinless chicken breasts because they’re naturally tender and juicy. They can be quickly flattened with the palm of your hand for even cooking, making them faster and easier than slicing and pounding chicken breasts. Plus, they stay moist, unlike store-bought thin cutlets.
- Marinara Sauce: Since the recipe only calls for 1½ cups of sauce, it’s not worth it to make it from scratch. I recommend using a good-quality jarred marinara sauce, such as Rao’s or Victoria.
- Panko breadcrumbs: Create a feathery, crisp crust that stays crispy, so you don’t have to pan-fry the chicken at the very last minute.
- Dried oregano and thyme: These herbs add classic Italian flavor to the breading mixture.
- All-Purpose Flour: Helps the egg wash stick to the chicken for a crisp breading.
- Eggs: Binds the breadcrumbs to the chicken, helping the crust form during frying.
- Olive oil: Used for frying, providing the necessary fat to achieve a golden, crispy exterior.
- Fontina Cheese: I prefer fontina over mozzarella for chicken Parmesan because it has a buttery, nutty flavor and stays gooey when melted, unlike mozzarella, which can turn rubbery. Look for Swedish or Danish fontina (with a red wax rind) in most supermarkets, but mozzarella works if you can’t find it.
- Parmigiano Reggiano: Authentic Italian Parmesan cheese adds a rich, nutty flavor to the breading and topping.
- Fresh basil: A sprinkle on top adds a freshness and color to balance the richness of the dish.
- Jump to the printable recipe for precise measurements
Step-by-Step Instructions
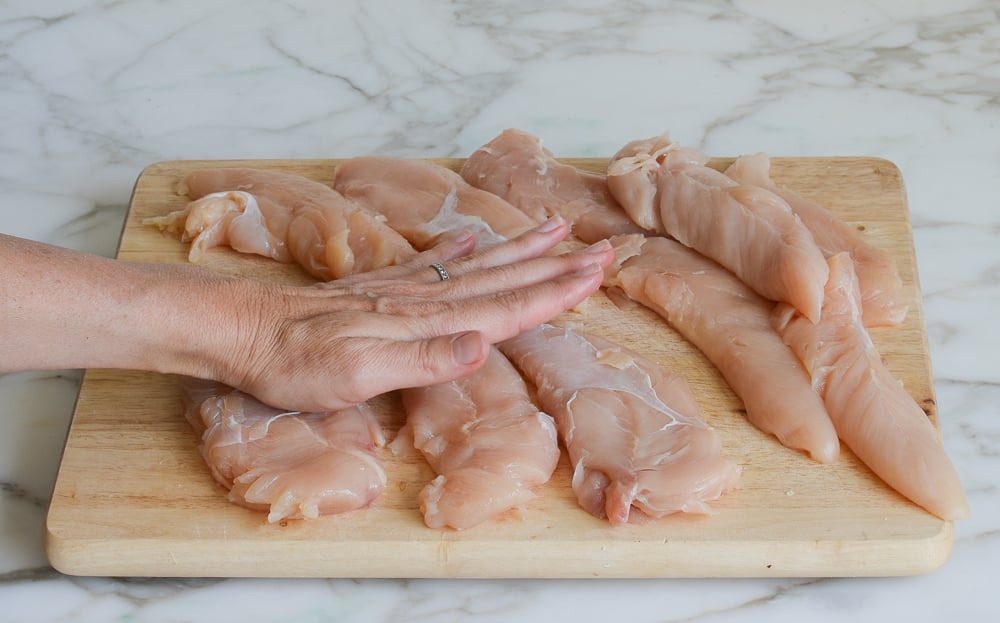
Start by prepping the tenderloins. You might see a white tendon at the end—just trim it off with a knife or kitchen shears. Then, using the palm of your hand, gently flatten the tenderloins so they’re an even 1/4-inch thick. Sprinkle the chicken all over salt and pepper.
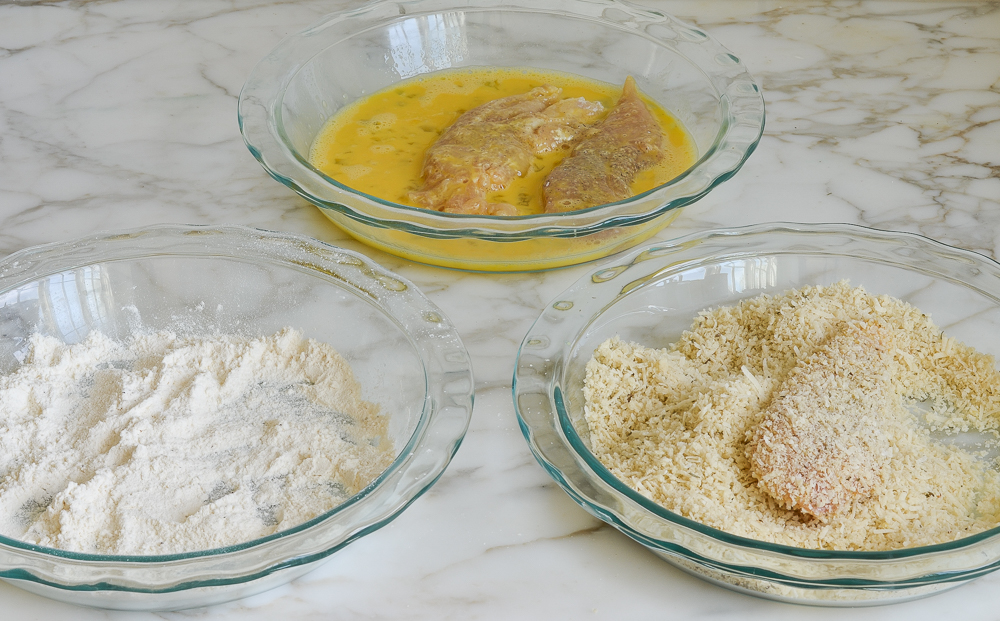
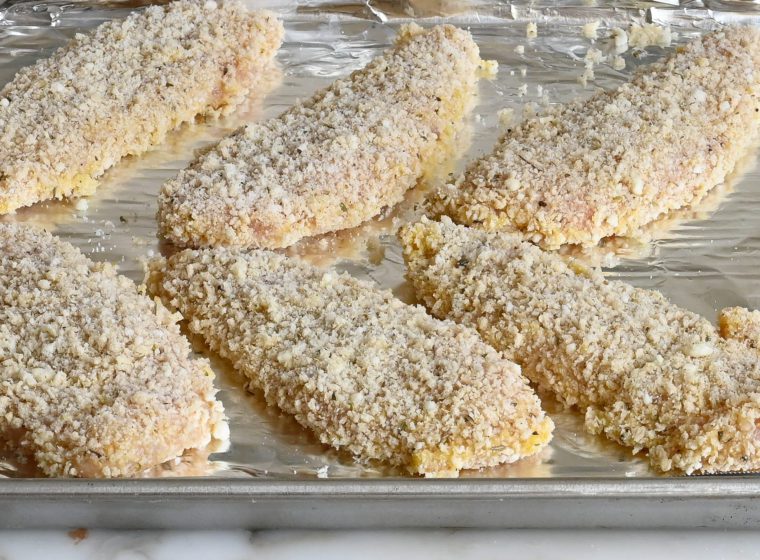
To bread the chicken, combine panko, Parmigiano Reggiano, and seasoning in a shallow bowl (I use a pie plate). Mix well, breaking up any clumps of cheese. In another shallow bowl, place the flour, and beat the eggs in a third bowl. Dredge the chicken in the flour, dip in the eggs (letting any excess drip off), then coat in the panko mixture.
Place the breaded chicken on a lined baking sheet. You can prep the recipe up to this point ahead of time—just cover and refrigerate for up to 8 hours, or freeze the breaded tenders for up to 3 months.
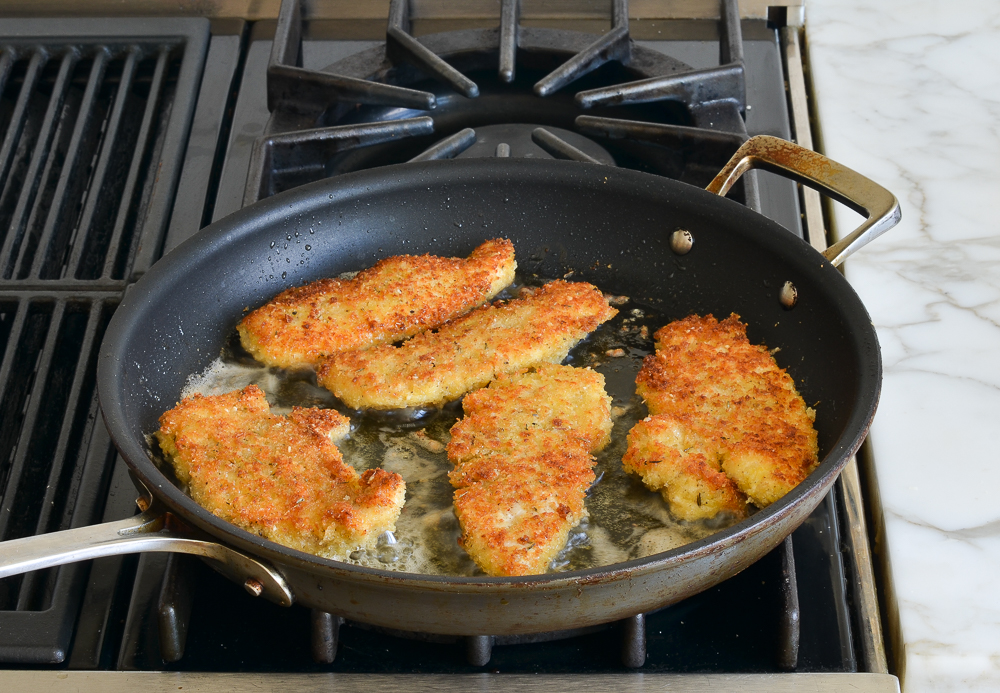
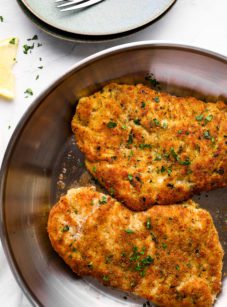
To pan-fry the chicken, heat the oil in a nonstick skillet over medium heat until it shimmers. Add 5 or 6 tenders in a single layer. Cook for 2 to 3 minutes until the first side is golden brown, then flip and cook for another 2 to 3 minutes until golden and cooked through. Repeat with the remaining chicken, adding more oil if needed.
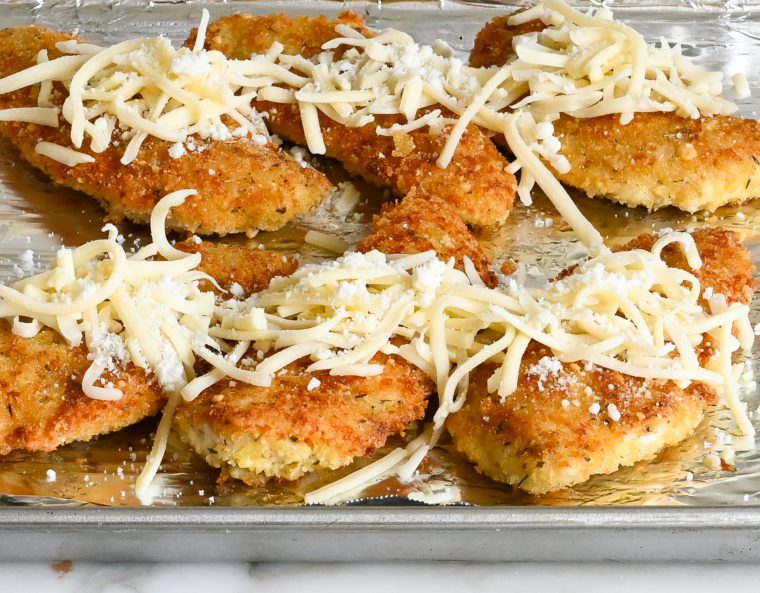
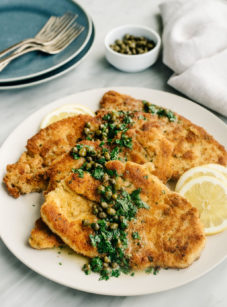
Place the cooked chicken on a foil-lined baking sheet. Sprinkle the fontina and remaining 2 tablespoons of Parmigiano Reggiano over the center of each tenderloin, leaving the edges bare so they stay crispy.
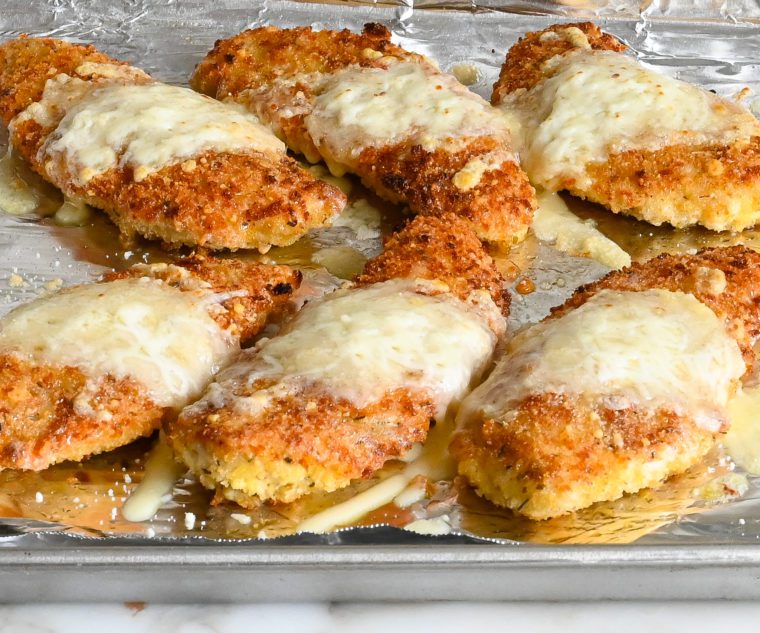
Broil for a few minutes until the cheese is melted and bubbling.
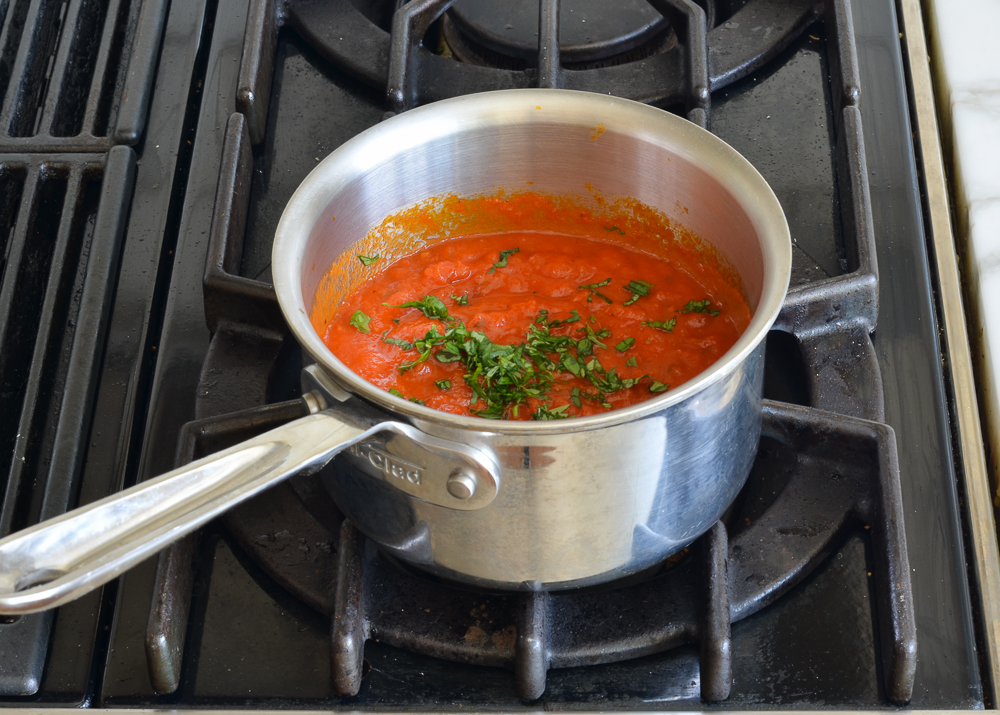
Warm the marinara sauce, then taste and adjust the seasoning as needed. If you’re using store-bought sauce, a pinch of sugar and some fresh basil really help enhance the flavor.
Transfer the chicken to a serving platter or individual plates. Spoon the marinara sauce over the cheese, making sure to leave the edges bare so they stay crispy. Top with fresh basil and serve.

You May Also Like


Chicken Parmesan
Ingredients
- 2 lbs chicken tenderloins
- 2 teaspoons salt, divided
- ¾ teaspoons freshly ground black pepper, divided
- 1½ cups panko
- ¾ cup + 2 tablespoons grated Parmigiano Reggiano, divided
- 1 teaspoon dried oregano
- ½ teaspoon dried thyme
- ½ cup flour
- 3 large eggs
- Olive oil, for cooking
- 1½ cups homemade or store-bought marinara sauce, best quality such as Rao's or Victoria
- 6 oz fontina, shredded (about 1½ cups)
- 3 tablespoons fresh chopped basil
Instructions
- Using kitchen shears, trim off any white tendons at the ends of the tenderloins. Using the palm of your hand, gently flatten the tenderloins so that they are an even ¼-in (6-mm) thickness. Season the chicken all over with 1¼ teaspoons of the salt and ½ teaspoon of the pepper.
- In a large shallow bowl, combine the panko, ¾ cup (75 g) of the Parmigiano Reggiano, the oregano, the thyme, the remaining ¾ teaspoon salt, and the remaining ¼ teaspoon pepper. Mix well, making sure there are no clumps of cheese.
- Place the flour in another shallow bowl. Beat the eggs in a third bowl. Set up a breading station in this order: flour, eggs, panko. Line a baking sheet with aluminum foil or parchment paper for easy clean up. Dredge the chicken in the flour, coating evenly; dip in the eggs, letting any excess drip off; then dredge in the panko mixture, turning and patting to adhere. Place the breaded chicken on the prepared baking sheet. (The recipe can be prepared up to this point, covered, and refrigerated up to 8 hours ahead of time.)
- Preheat the broiler and set an oven rack about 4 in (10 cm) from the heating element. Bring the marinara sauce to a simmer over low heat. Taste and adjust seasoning to your liking (with store-bought sauce, I find a generous pinch of sugar and fresh basil go a long way). Cover and keep warm.
- Line another baking sheet with aluminum foil or parchment for easy clean up; set aside. In a large nonstick skillet, heat about ⅛ in (3 mm) of oil over medium heat until shimmering. Place 5 or 6 tenders in the pan in a single layer and cook until the first side is golden brown, 2 to 3 minutes. Flip the chicken and cook for another 2 to 3 minutes, until golden and cooked through. Place the cooked chicken on the prepared baking sheet. Cook the remaining chicken in the same manner, adding additional oil only if necessary. You may need to lower the the heat as you go, so that the chicken doesn't brown before it is cooked through.
- Sprinkle the fontina and remaining 2 tablespoons Parmigiano Reggiano over the center of the chicken tenderloins, leaving the sides bare so that they remain crispy. Broil until the cheese is melted and bubbling, 1 to 2 minutes.
- Transfer the chicken to a serving platter or individual plates. Spoon the marinara sauce over the cheese, again leaving the sides bare so that they stay crispy. Sprinkle with fresh basil and serve.
Notes

Nutrition Information
This website is written and produced for informational purposes only. I am not a certified nutritionist and the nutritional data on this site has not been evaluated or approved by a nutritionist or the Food and Drug Administration. Nutritional information is offered as a courtesy and should not be construed as a guarantee. The data is calculated through an online nutritional calculator, Edamam.com. Although I do my best to provide accurate nutritional information, these figures should be considered estimates only. Varying factors such as product types or brands purchased, natural fluctuations in fresh produce, and the way ingredients are processed change the effective nutritional information in any given recipe. Furthermore, different online calculators provide different results depending on their own nutrition fact sources and algorithms. To obtain the most accurate nutritional information in a given recipe, you should calculate the nutritional information with the actual ingredients used in your recipe, using your preferred nutrition calculator.
Yep. This was good one. The tenderloin idea was a game changer. No more trying to get the chicken breast cut perfectly in half and then POUND, POUND, POUND (Ooops, Too much. It shredded). The tenderloins were much easier and consistent. Also, the Fontina vs. the Mozzarella was a nice substitute. Nice nutty flavor enhancement minus the rubbery texture. My guest bragged to her co-workers the next day about what a great cook I am. Thanks for making me look good, Jenn.