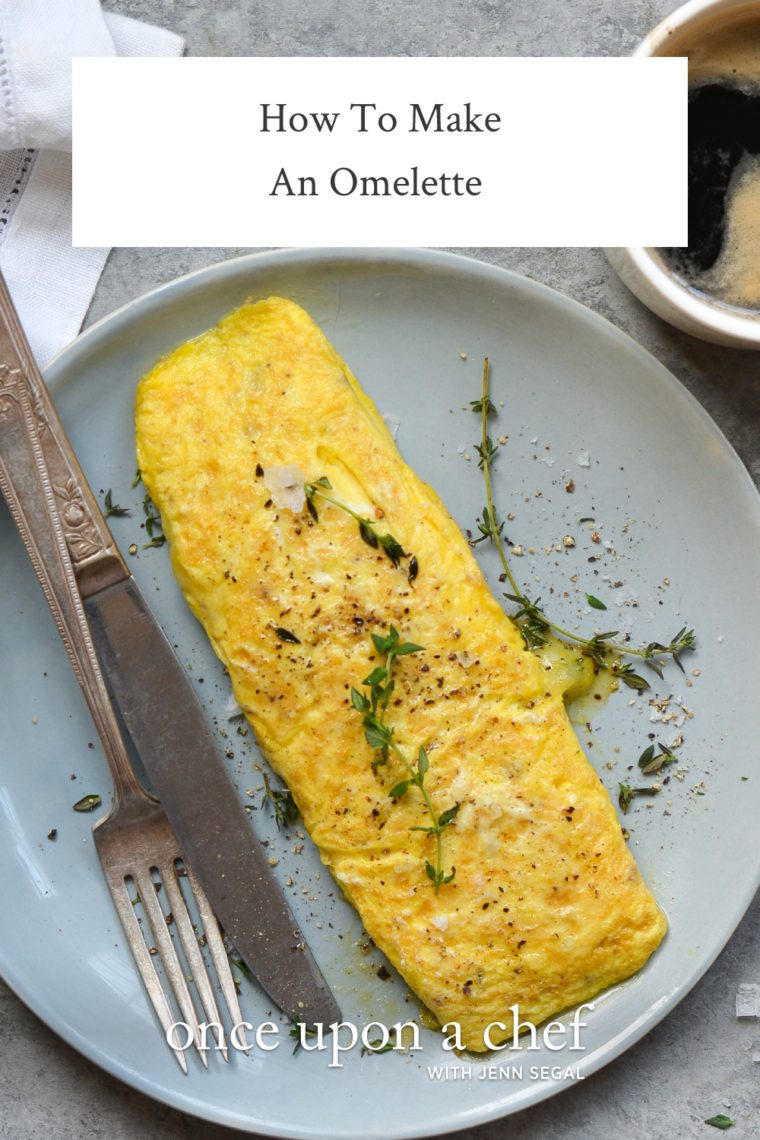
How To Make An Omelette

This post may contain affiliate links. Read my full disclosure policy.
An omelette seems fancy at first, but it’s really just eggs, cheese, and a little confidence. Get cracking—this version is easy to master and endlessly customizable with whatever fillings you’re in the mood for.

My first practical exam in culinary school was making an omelette, and it nearly gave me a panic attack. Students lined up single file at the stove, and we were each given exactly 3 minutes to crack, beat, and season the eggs; pour them into a sizzling-hot skillet; shake the pan to keep them from sticking; add the filling; and, finally, roll the omelette into a perfect cylinder. Meanwhile, the chef stood by, grading us—out loud.
Though an omelette is simple and made with just a few ingredients, it’s surprisingly tricky to master. In the restaurant world, a well-made omelette is often seen as the mark of a good cook; some chefs even require would-be line cooks to make an omelette as part of their job interview!
“This was a major winner…This was literally so easy that I felt like a chef making it.”
French vs American Omelettes
There are two main types of omelettes: French and American. A French omelette, made as described above, has a custardy, barely-set center that oozes when you cut into it and no hint of brown color.
An American omelette is fully cooked with a golden crust and fluffy texture – and, no surprise, much easier to make. The eggs are briefly scrambled in the pan and then left to set and develop a lightly golden crust. The omelet is then filled with cheese, meat, or vegetables and folded in half or thirds.
This is an American-style omelette (read: easy), but with a little French flair thanks to the creamy texture, good cheese, fresh herbs, and optional last-minute butter gloss. I keep it simple with just cheese, but feel free to add 1/4 cup of your favorite fillings; diced ham, bacon, breakfast sausage, smoked salmon, avocado, tomatoes, and cooked vegetables (like ratatouille) are all great options.
The Omelette Pan
It is essential to use a nonstick pan when making an omelette, as eggs like to stick. The size of the pan is also important, as it determines how thick or thin the base of your omelette will be. If the pan is too large, the eggs will spread too thin and dry out. For best results, use an 8-inch nonstick skillet (skillets are measured across the top) with sloping sides to make it easier to slide the omelette out of the skillet and onto a plate.
What You’ll Need To Make An Omelette
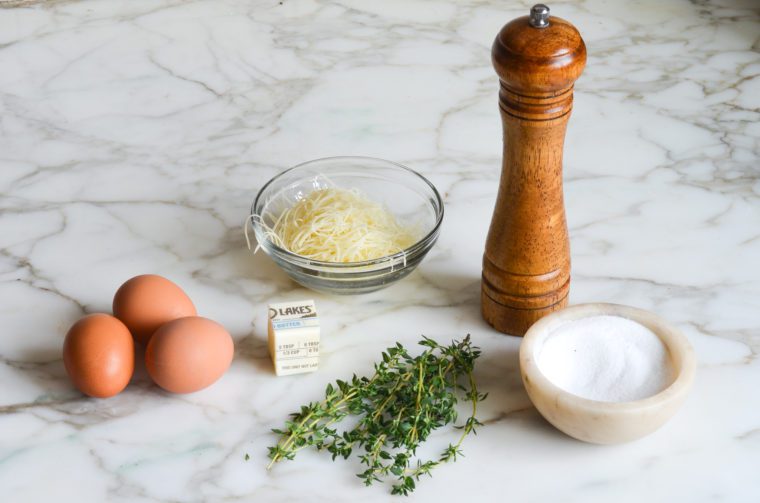
- Eggs, Water, Salt & Black Pepper: The basics. A splash of water keeps the eggs tender, and salt and pepper bring out their delicate flavor.
- Butter: For that classic silky texture and buttery taste—feel free to add a little extra at the end for gloss.
- Shredded Cheese: Gruyère, Cheddar, or any melty cheese you like. It melts into creamy, cheesy pockets throughout.
- Fresh Herbs (Optional): A sprinkle of chopped thyme or chives adds freshness and a little color if you’re feeling fancy.
- Jump to the printable recipe for precise measurements
Step-by-Step Instructions
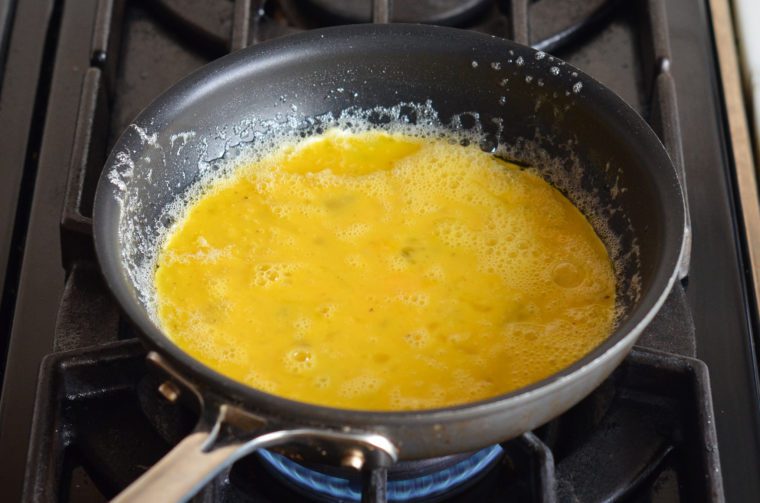
Step 1: Beat the eggs. In a medium bowl, combine the eggs with the water, a generous pinch of salt, and a few grinds of pepper. Beat with a fork until well combined. Using a fork instead of a whisk makes it easier to control the texture—you want the eggs well mixed but not overly aerated.

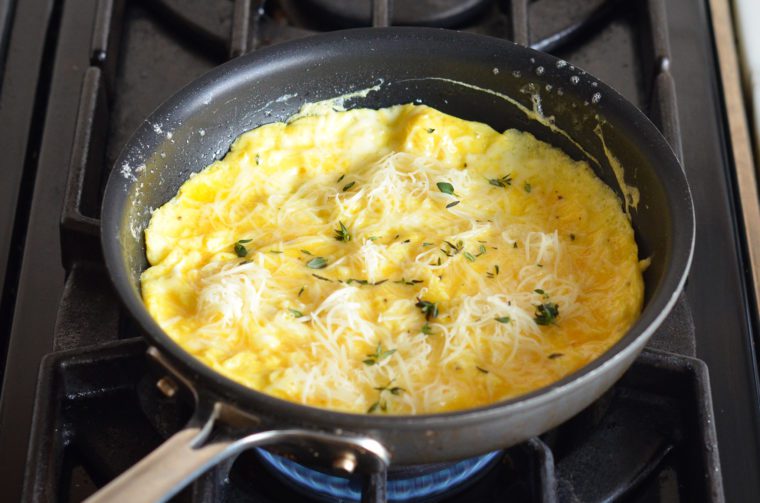
Step 2: Start cooking the eggs. Melt the butter in a small nonstick skillet over medium-low heat and swirl to coat the pan. (Medium-low heat is key—too hot and the eggs will brown or toughen instead of staying soft and creamy.) Pour in the eggs and let them cook undisturbed until the edges start to set.
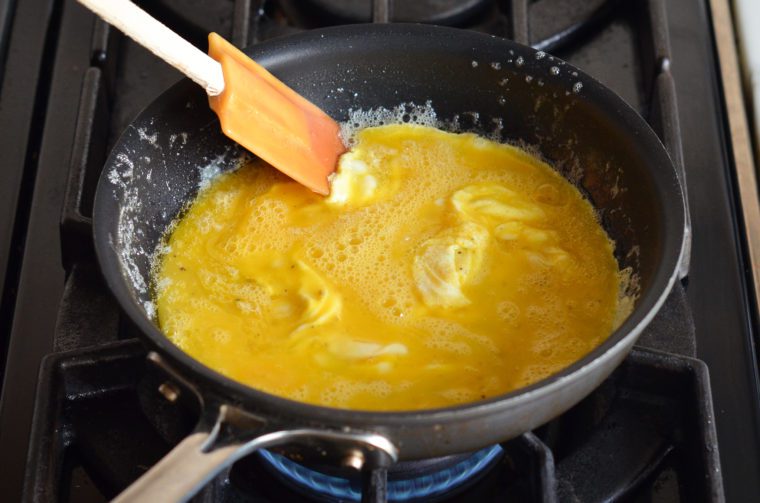
Step 3: Stir gently. Use a rubber spatula to gently pull the cooked eggs from the edges toward the center, letting the uncooked egg run to the outside of the pan.
Step 4: Add cheese and herbs. When the eggs are about 75% set, press them into an even layer and sprinkle the cheese and herbs all over the surface. Let cook until the cheese is mostly melted.
Step 5: Fold the omelette. Use the spatula to fold the side closest to you toward the center.

Fold the opposite side over to close the omelette. The entire cooking process should take no more than 3 to 4 minutes. Cooking quickly helps preserve the soft, velvety texture.

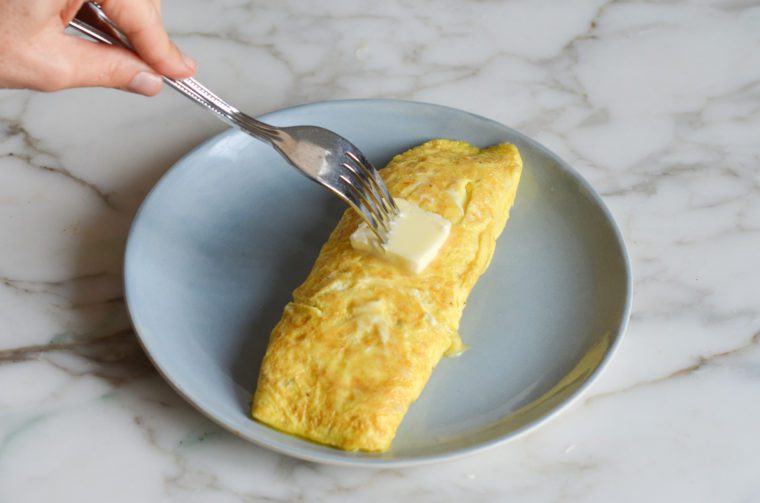
Step 6: Plate and finish. Tilt the pan over a plate to slide the omelette out seam-side down. (Sliding the omelette seam-side down helps it hold its shape and gives a more finished look on the plate.) For extra buttery flavor, you can run a fork with a bit of butter over the top before serving.
Video Tutorial
More Breakfast Recipes You May Like


How To Make An Omelette

Ingredients
- 3 large eggs
- 2 teaspoons water
- Salt
- Freshly ground black pepper
- 1 tablespoon unsalted butter, plus a bit more for glossing the omelette (optional)
- ⅓ cup finely shredded Gruyère, Cheddar, or any other flavorful melting cheese
- 1 teaspoon finely chopped fresh thyme or chives (optional)
Instructions
- In a medium bowl, combine the eggs with the water, a generous pinch of salt, and a few grinds of pepper. Using a fork or whisk, beat vigorously until well combined and there are no visible egg whites.
- In an 8-in (20-cm) nonstick skillet over medium-low heat, melt the butter and swirl to coat the whole surface of the pan. Add the eggs and let cook, undisturbed, until the eggs start to set around the edges. Once the eggs start to set, use a rubber spatula to move the cooked egg away from the edges, letting the raw egg run to the outside of the pan. Continue gently scrambling the eggs until they are about 75% set, and then use the spatula to press the runny eggs into an even layer. Sprinkle the cheese and herbs (if using) all over the eggs and let cook, undisturbed, until the cheese is mostly melted. Using the spatula, fold the edge of the omelette closest to you toward the center. Fold the other edge toward the center, and then tilt the pan over the center of a plate so the omelette lands seam side down. The entire cooking process should take no more than 3 to 4 minutes. If you'd like, spear the extra butter with a fork and run it over the top of the omelette to gloss it and give it some extra buttery flavor. Serve immediately.
Nutrition Information
This website is written and produced for informational purposes only. I am not a certified nutritionist and the nutritional data on this site has not been evaluated or approved by a nutritionist or the Food and Drug Administration. Nutritional information is offered as a courtesy and should not be construed as a guarantee. The data is calculated through an online nutritional calculator, Edamam.com. Although I do my best to provide accurate nutritional information, these figures should be considered estimates only. Varying factors such as product types or brands purchased, natural fluctuations in fresh produce, and the way ingredients are processed change the effective nutritional information in any given recipe. Furthermore, different online calculators provide different results depending on their own nutrition fact sources and algorithms. To obtain the most accurate nutritional information in a given recipe, you should calculate the nutritional information with the actual ingredients used in your recipe, using your preferred nutrition calculator.
Gluten-Free Adaptable Note
To the best of my knowledge, all of the ingredients used in this recipe are gluten-free or widely available in gluten-free versions. There is hidden gluten in many foods; if you're following a gluten-free diet or cooking for someone with gluten allergies, always read the labels of your ingredients to verify that they are gluten-free.
I’m using this for my school projectAnd this is going to be perfect
Worked well in a stainless steel pan (revere ware)! Used a bit more butter since it was a 10-inch pan
Hi Chef Jenn:
This was a major winner. I have always failed hard at omelettes in the past that I have not wanted to waste expensive eggs trying again and failing! But this was literally so easy that I felt like a chef making it. I put fresh basil, mushrooms, mozzarella cheese, smoked salmon, tomatoes and green onions for the win. The omelette is so fluffy that it could handle all that with no issues. Thanks so much for the confidence booster!
Hello Jenn,
Thank you so much for this delicious recipe!
I’ve been wanting to make a cream cheese and chive Omelette since eating one in a restaurant recently. Would your recipe work with those substitutions?
Hi Rebecca, Glad you like it! While the cream cheese will melt a little differently than Gruyere, it should work.
This recipe was easy to follow and it turned out great! Thanks so much!
The best omelette I’ve ever eaten. I knew the technique but my proportions were off. I’ve never started with a whole tablespoon of butter so at some point before the eggs were done there was sticking. I’d been taught not to salt the eggs until done. Not true! These were so well flavored and not tough. Always added milk or cream, not water. The water definitely made them lighter – who knew? I happened to have Gruyère and thyme and the flavor was outstanding. I loved the hint of herb with the rich cheese.
Thanks Jenn for helping elevate what would seem like a simple thing. Can’t wait to serve it to my overnight guests this month!
I think this is the best omelette I’ve ever made. It turned out moist and fluffy. I followed this recipe but added bacon bits, onion powder, garlic powder, and small bits of cold butter. (I saw that tip somewhere else) I chose Gruyère cheese, and it paired well with the bacon. My omelettes I’ve made in the past all seemed to be too dry. This was yummy. Thanks!
Thanks for your kind words, Charlie — glad you happened upon the site!
Wonderful!
Directions were easy to follow too. My omelette looked “almost” as good as yours, the folding is a little tricky .
Wow – thank you for this tutorial! My husband said it’s the best omelet I’ve ever made. I need to practice some more with the rolling/folding part because mine didn’t come out as tightly rolled, but otherwise it was fantastic. Thank you!!!